Overview
This article covers deployment of the PhishID browser extensions on an organization’s Moslye managed Mac devices. The extension deployment covers Chrome, Firefox and Safari browsers. The deployment will require access to the below files, which you should confirm before proceeding.
PixmMacInstaller_0.1.0.8.pkg
PixmMacUninstaller_0.1.0.8.pkg
Profile for Pixm Chrome Extension Prod
Profile for Pixm Firefox Extension Prod
The first three sections cover deployment of the PixmMacInstaller. This includes uploading the installer file to Mosyle, creating a Device Group to track which Mac devices the installer deploys to, and the deployment step itself. The following three sections cover the deployment of the PIXM browser extensions to Chrome, Firefox, and Safari browsers, respectively. Please note: these sections must be followed sequentially so that the PixmMacInstaller is deployed before any of the browser extensions. The remaining sections walk through the uninstallation process.
Uploading Pixm Mac Installer and Uninstaller Packages to Mosyle
This section covers uploading the PixmMacInstaller and PixmMacUninstaller packages to Mosyle.
Login to Mosyle portal and click on the Management link on the top ribbon.

Under Management Profiles section, click on Install PKG

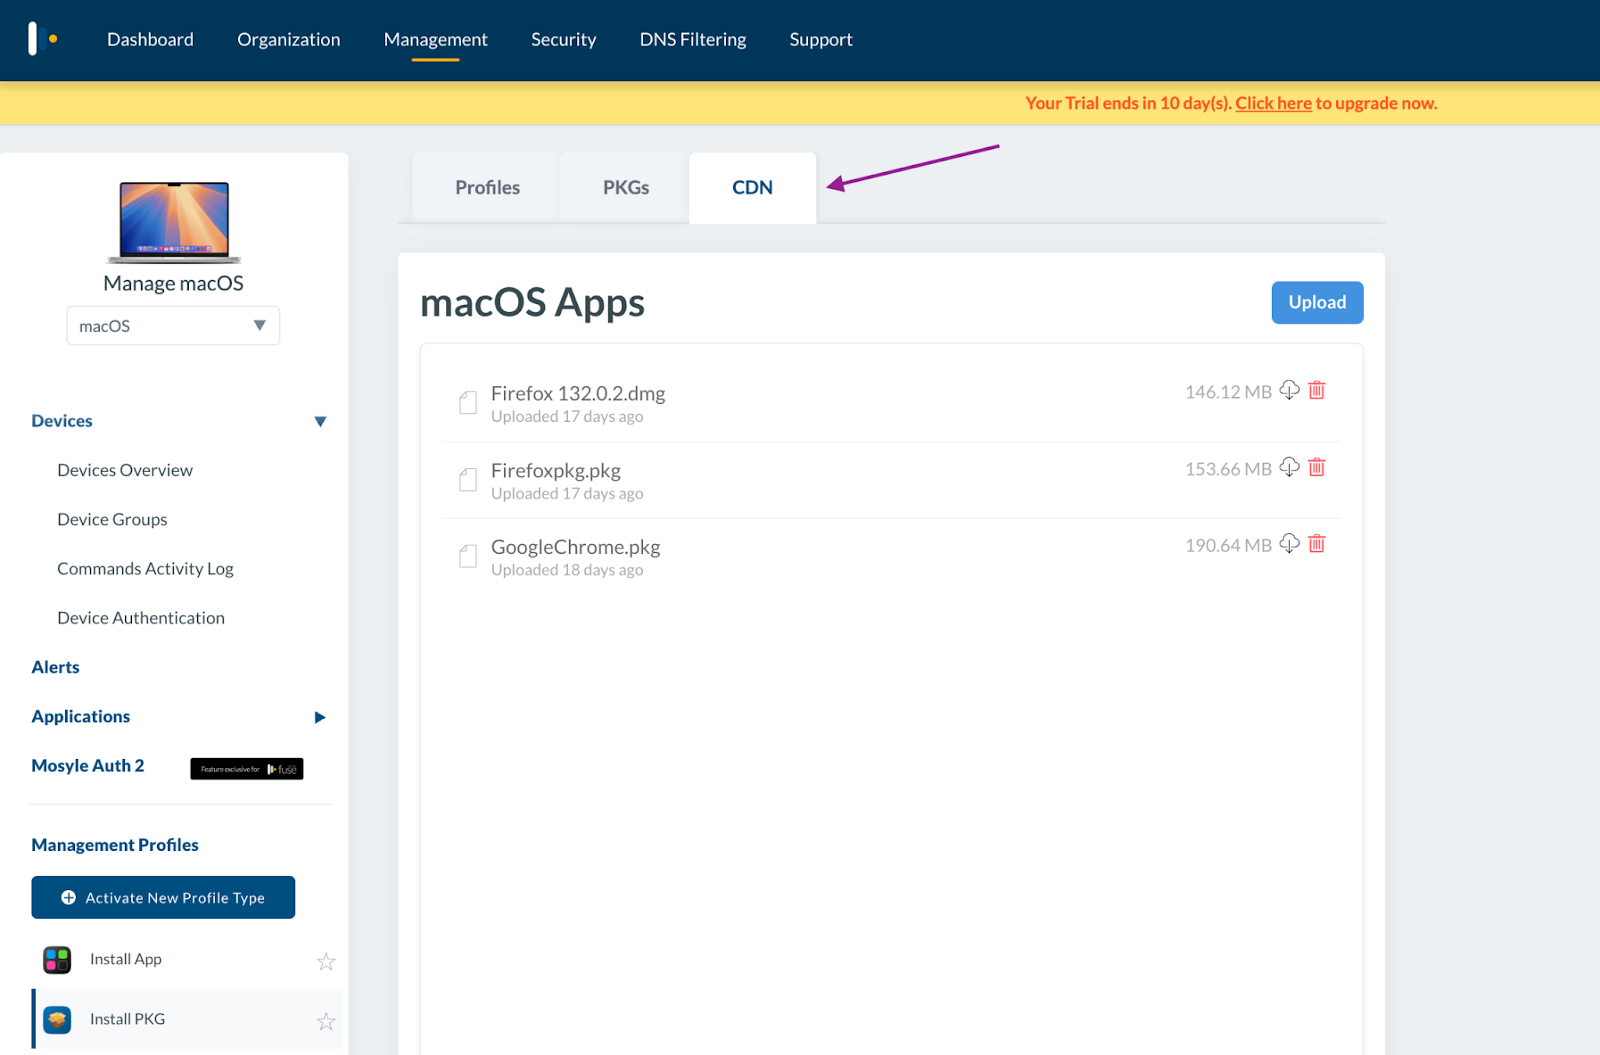
Click the CDN tab.
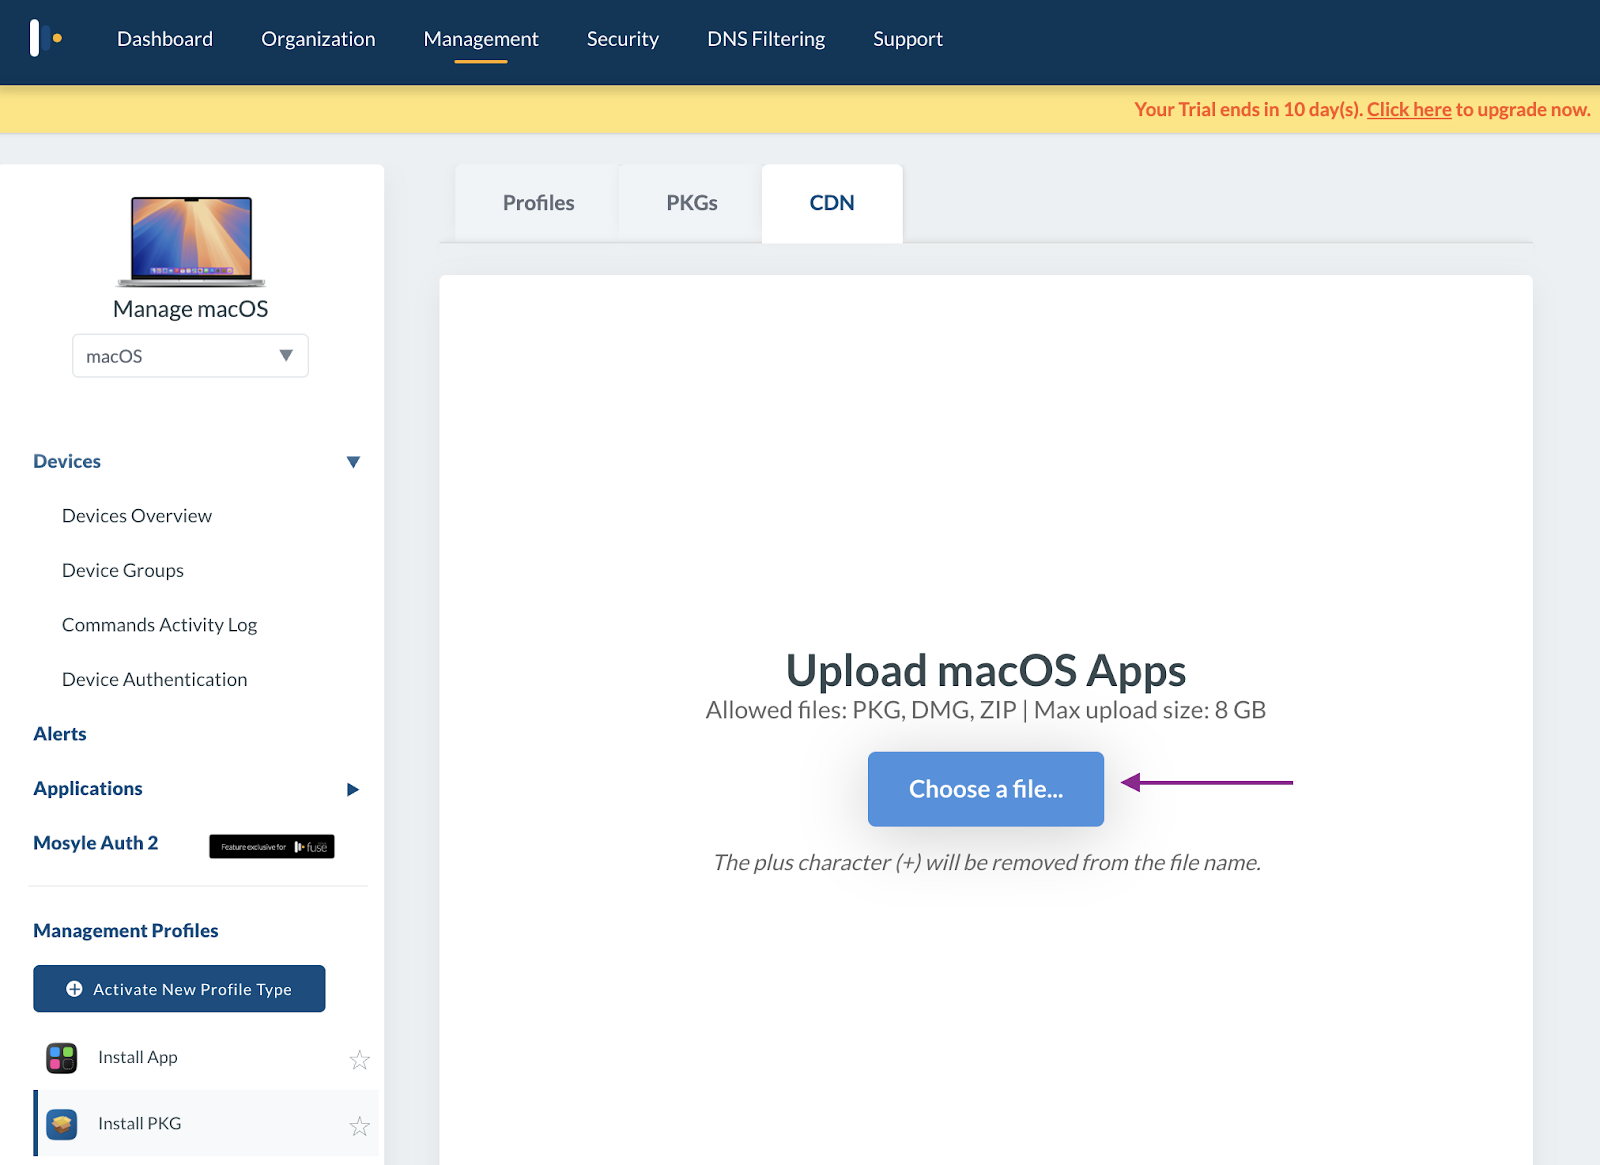
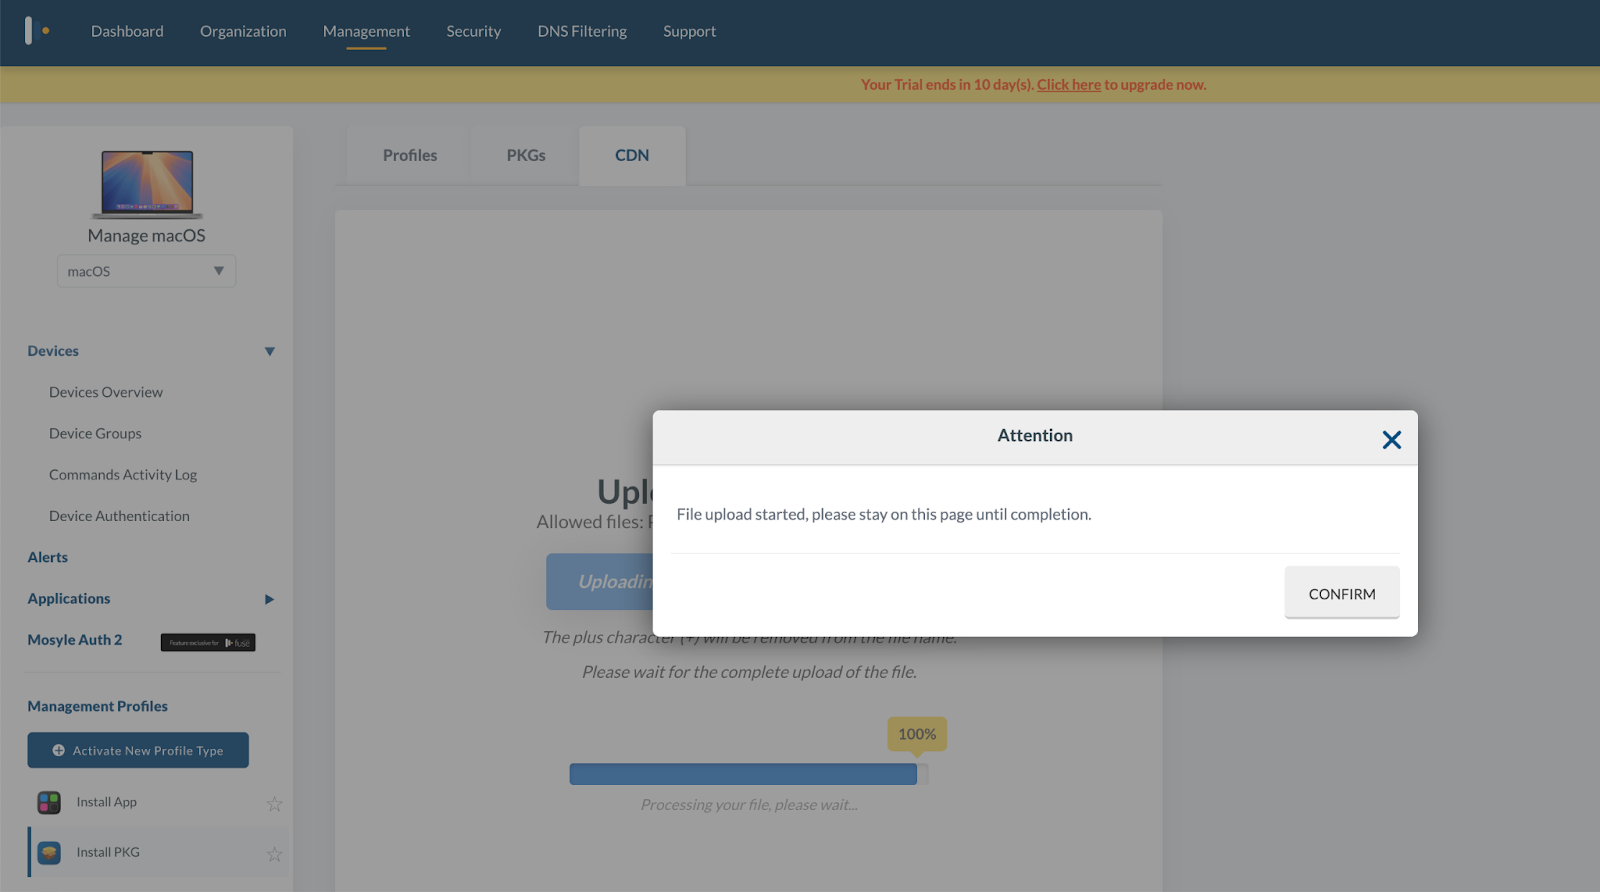
Click the Upload button.

Click Choose a file button.
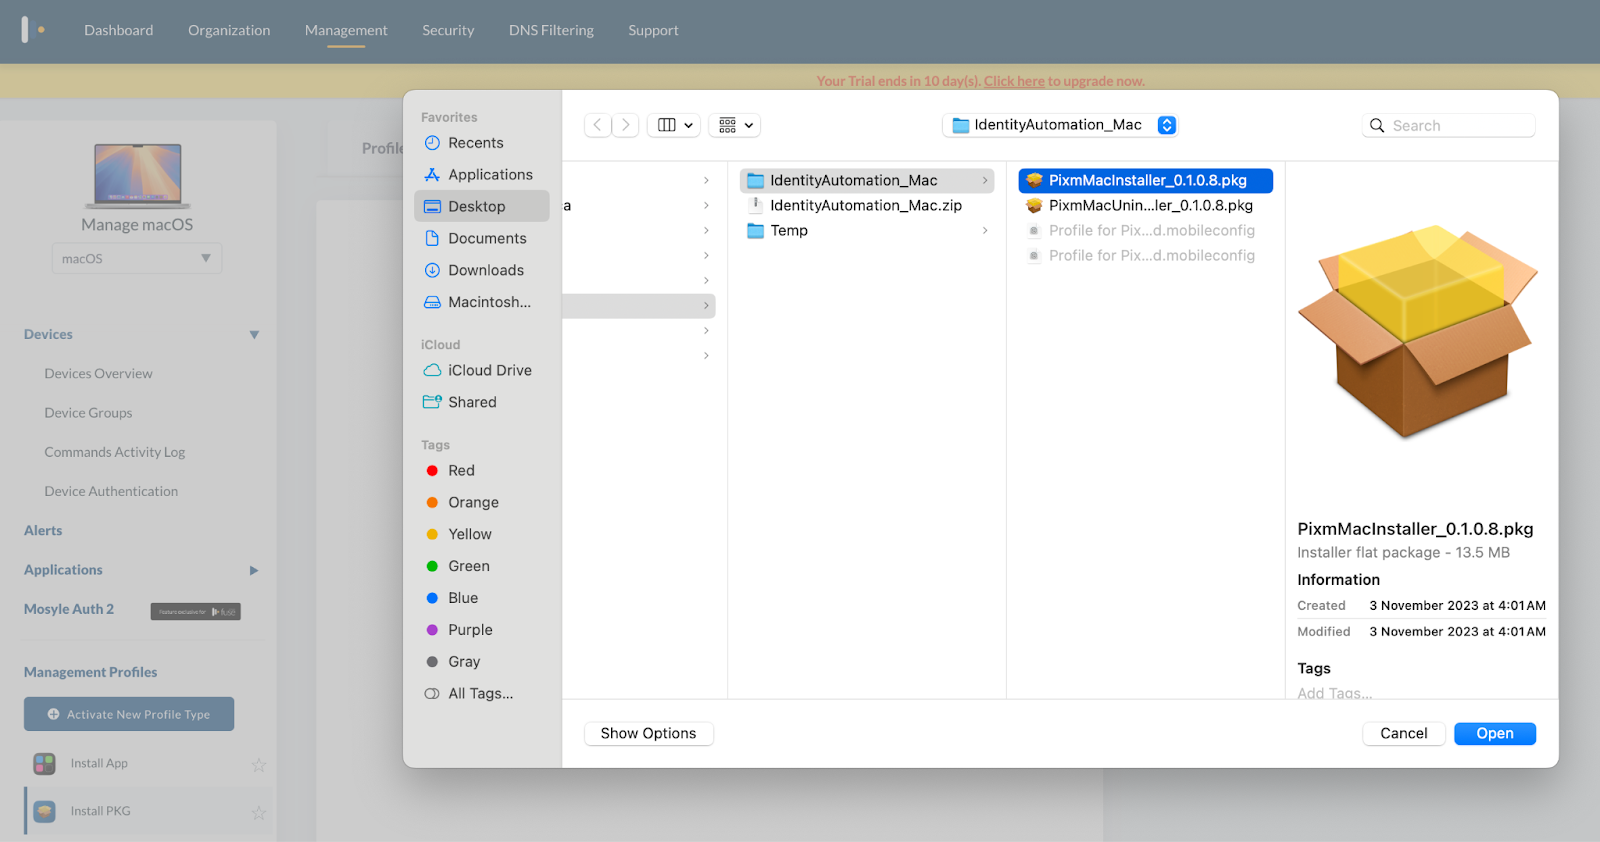
Navigate to the folder containing the PixmMacInstaller_0.1.0.8.pkg file, select it, and click Open to upload the package file. (Please do not rename the .pkg file.)
The file upload progress will be displayed, and once it reaches 100%, or if you receive an email confirming that the file has been uploaded successfully, click Confirm to complete the process.
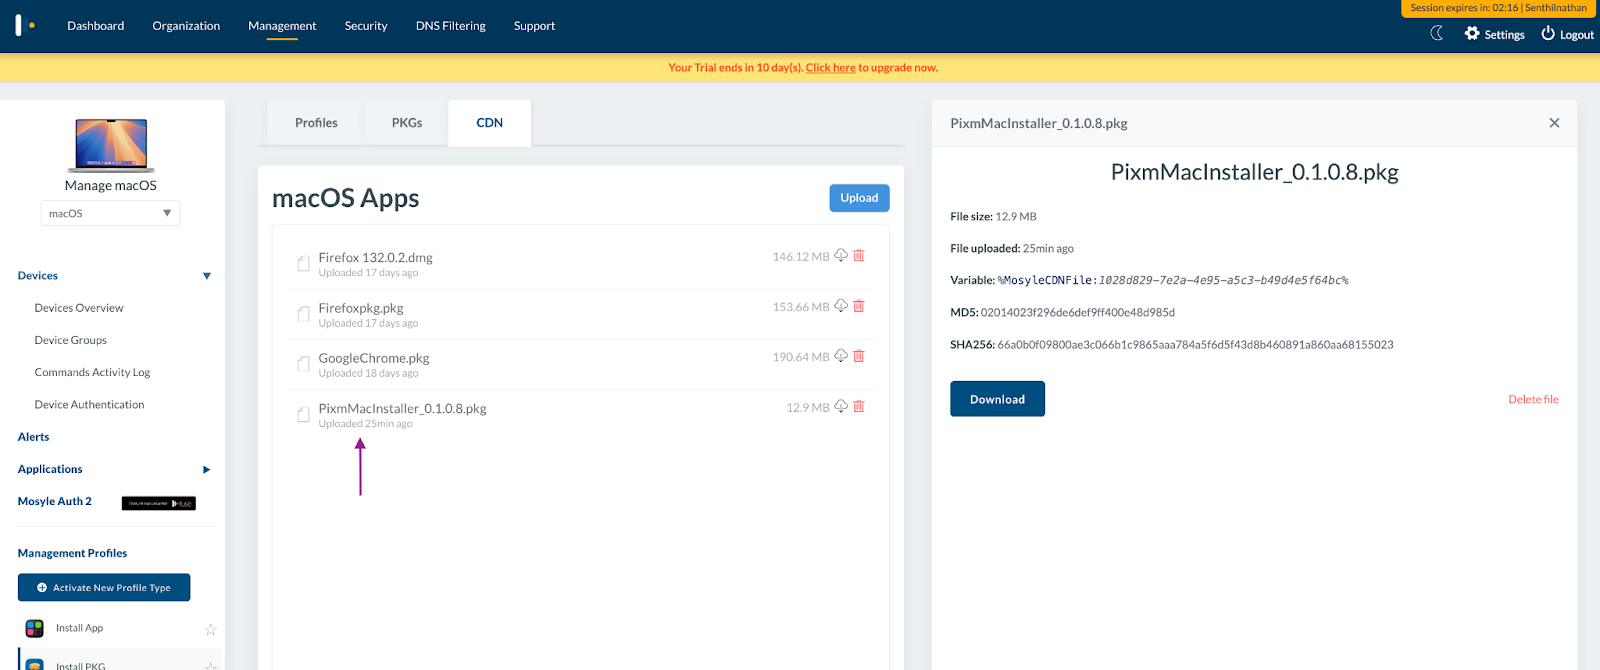
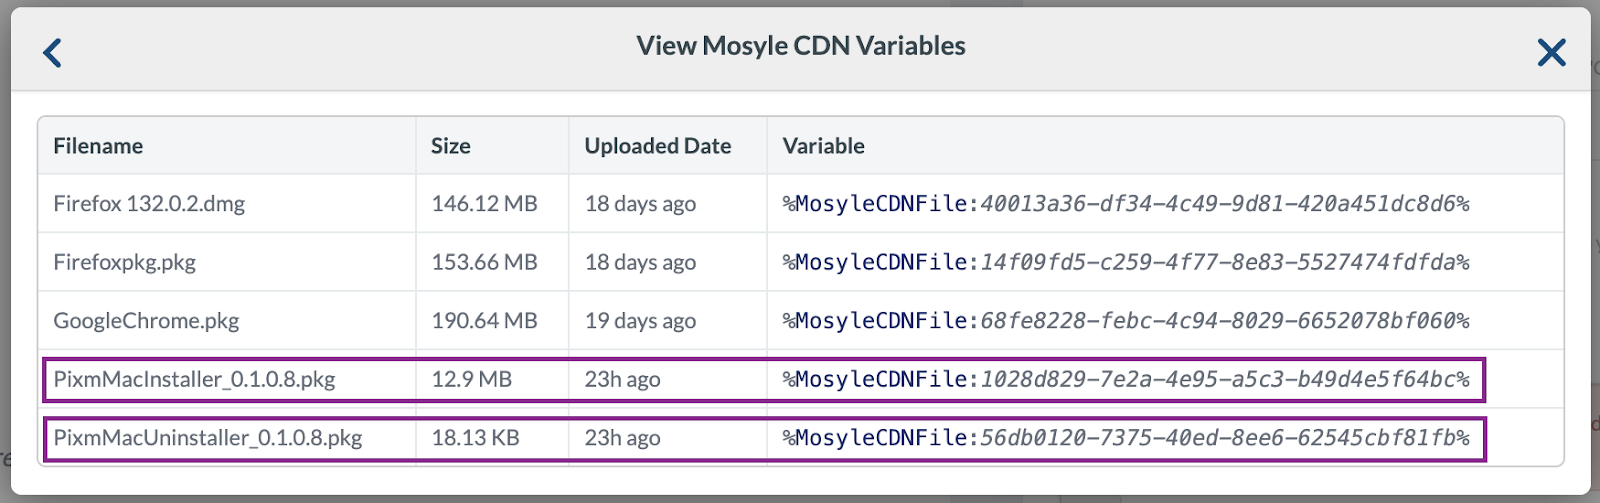
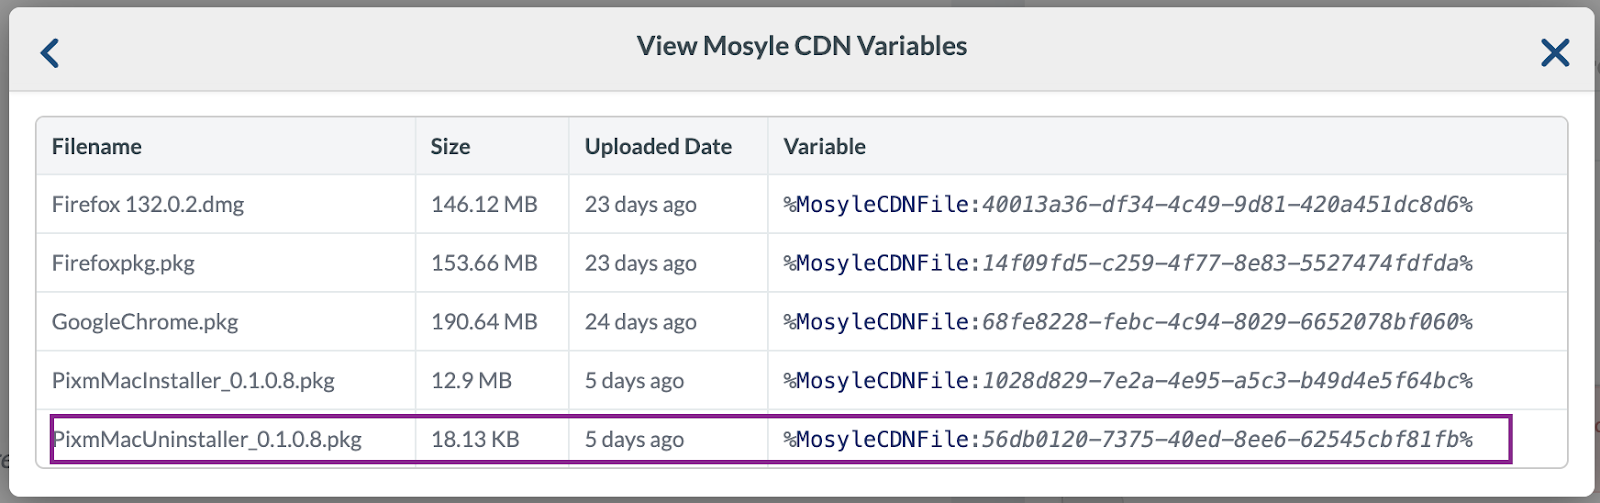
Click the CDN tab again and click on PixmMacInstaller_0.1.0.8.pkg. This will display the details of the uploaded file. Take note of the variable value, as it may differ for you. Be sure to record the value displayed on your screen.
%MosyleCDNFile:1028d829-7e2a-4e95-a5c3-b49d4e5f64bc%
This value will be used later in the custom command that deploys the Pixm Mac Installer package to the enrolled Macs.
Follow the same procedure to upload the PixmMacUninstaller_0.1.0.8.pkg
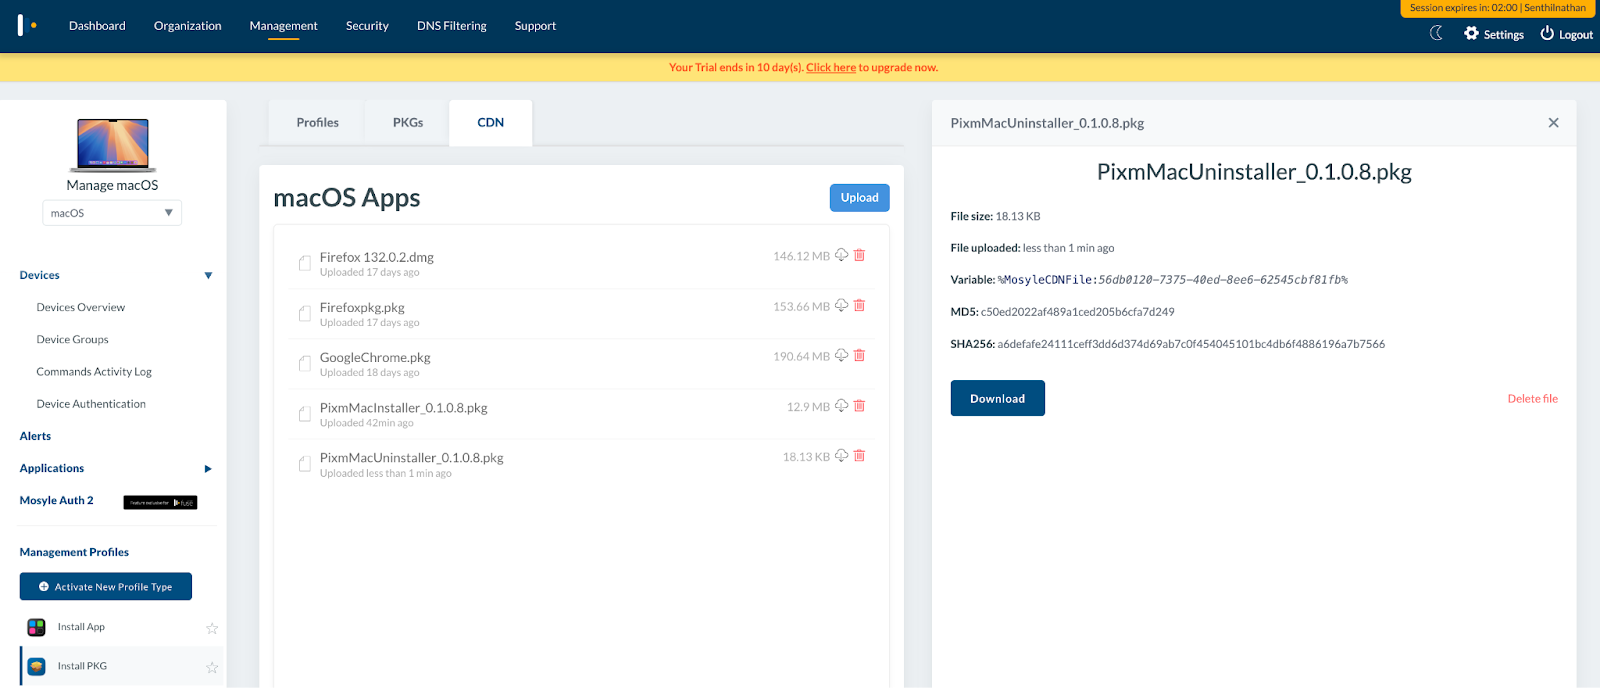
Take note of the variable value for this package as well. This value will be used later in the custom command to uninstall the Pixm Mac from the enrolled Macs.
%MosyleCDNFile:56db0120-7375-40ed-8ee6-62545cbf81fb%
Creating a Custom Device Group for Pixm Mac Deployment
This section explains how to create a Custom Group to dynamically track which Mac devices the PixmMacInstaller is deployed to. This step ensures that the browser extensions deployed in subsequent steps are not installed on devices until the PixmMacInstaller has been deployed first.
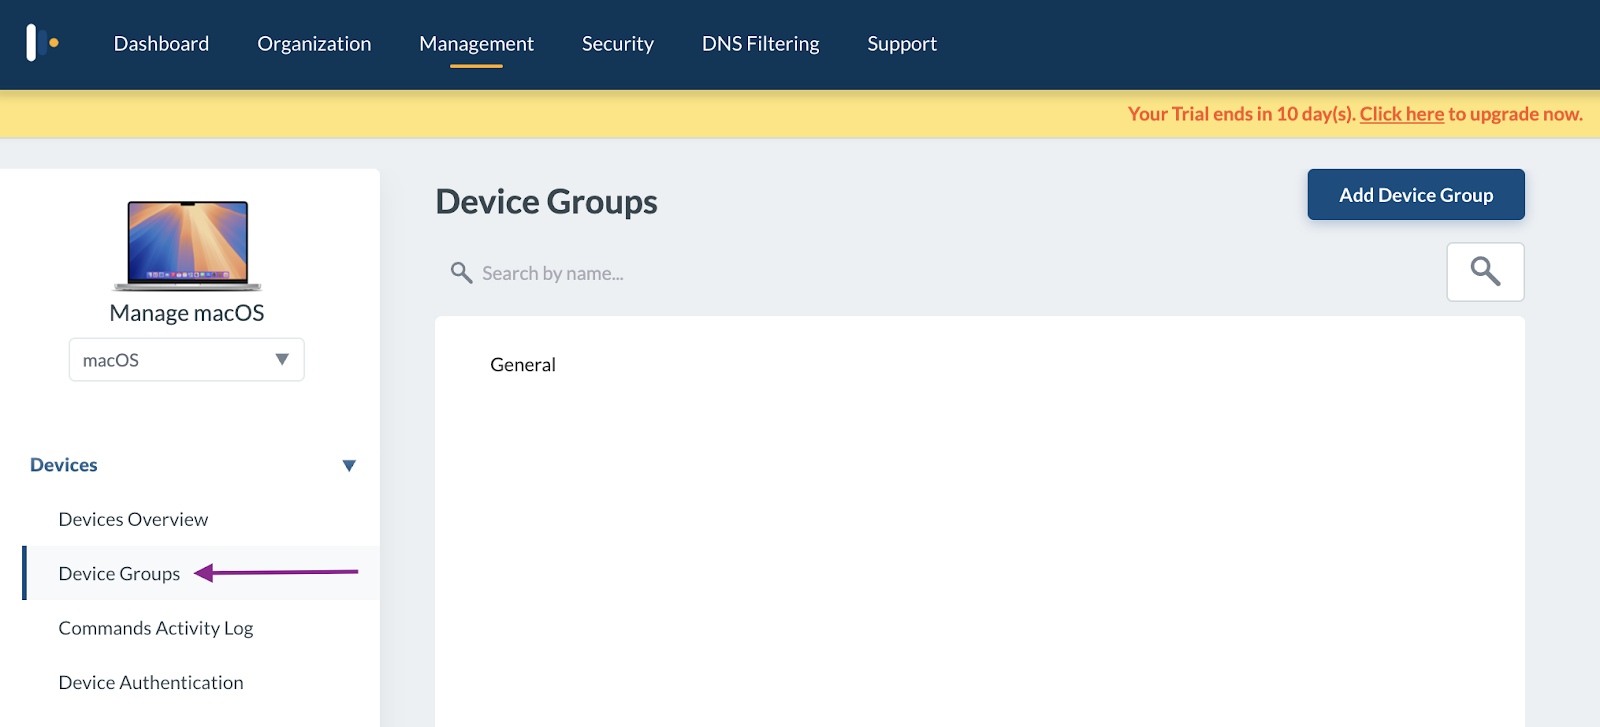
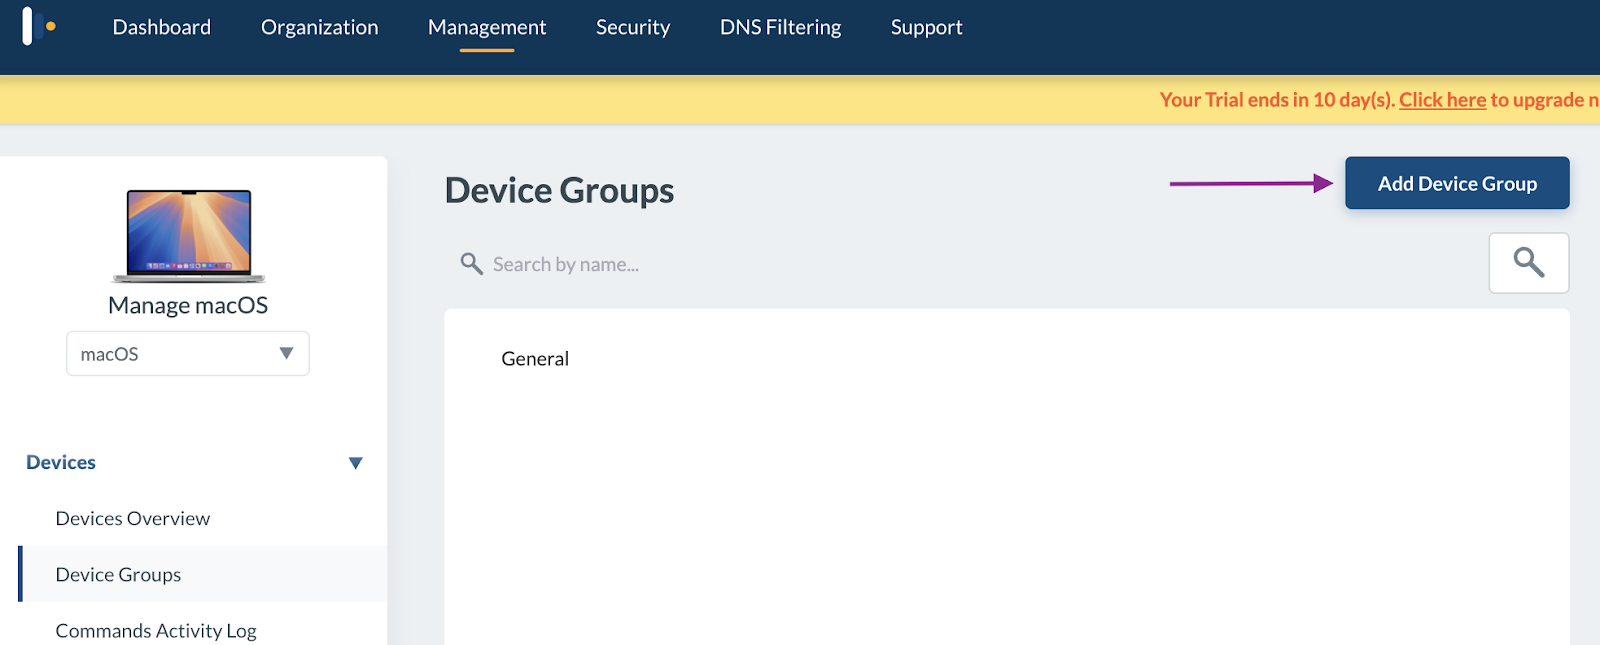
On the Management page, click on Device Groups under Devices from the left panel.
Click on Add Device Group
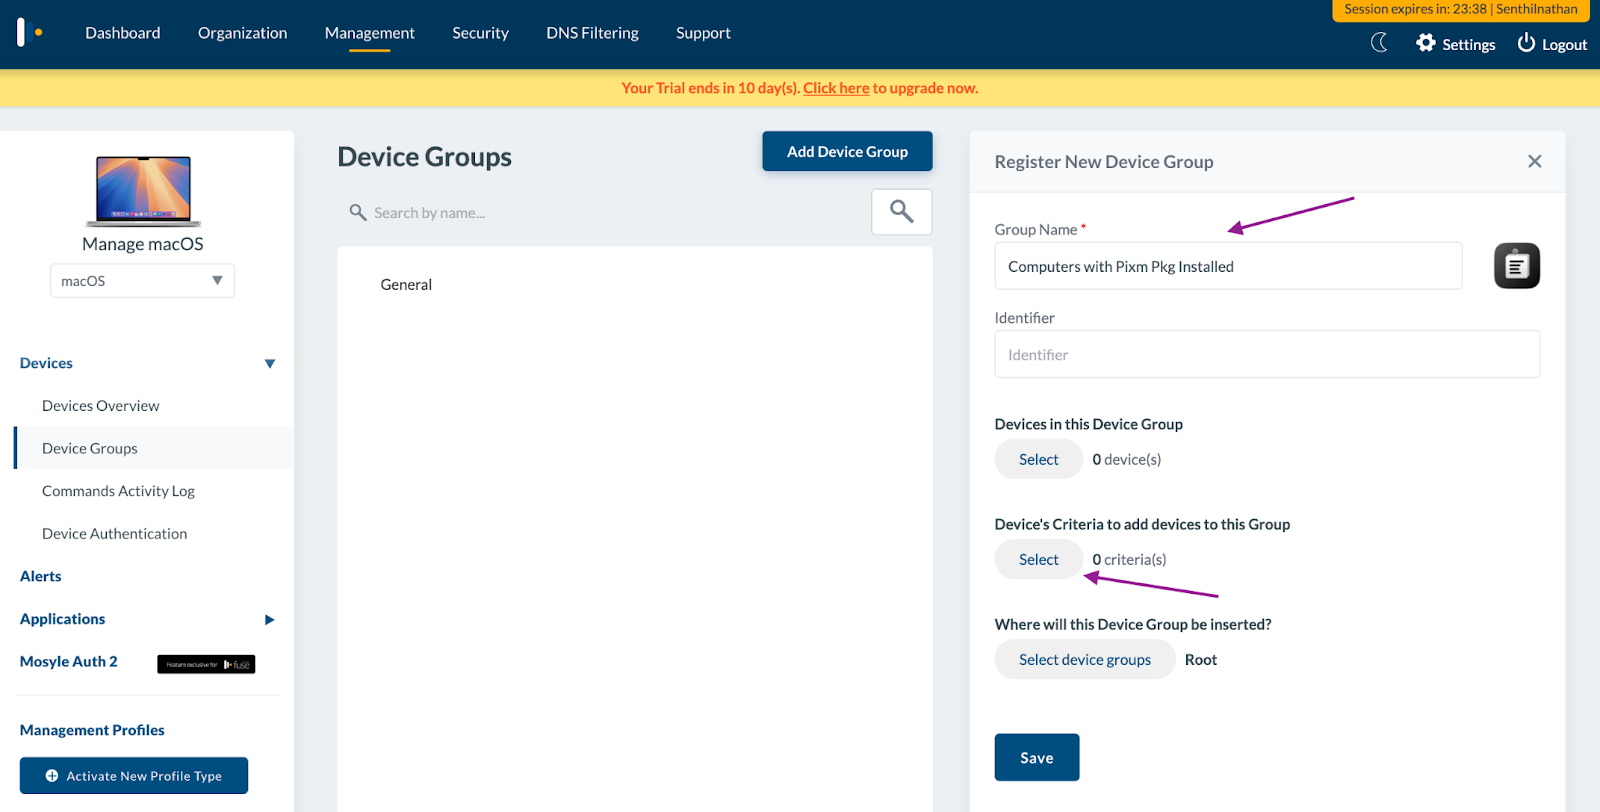
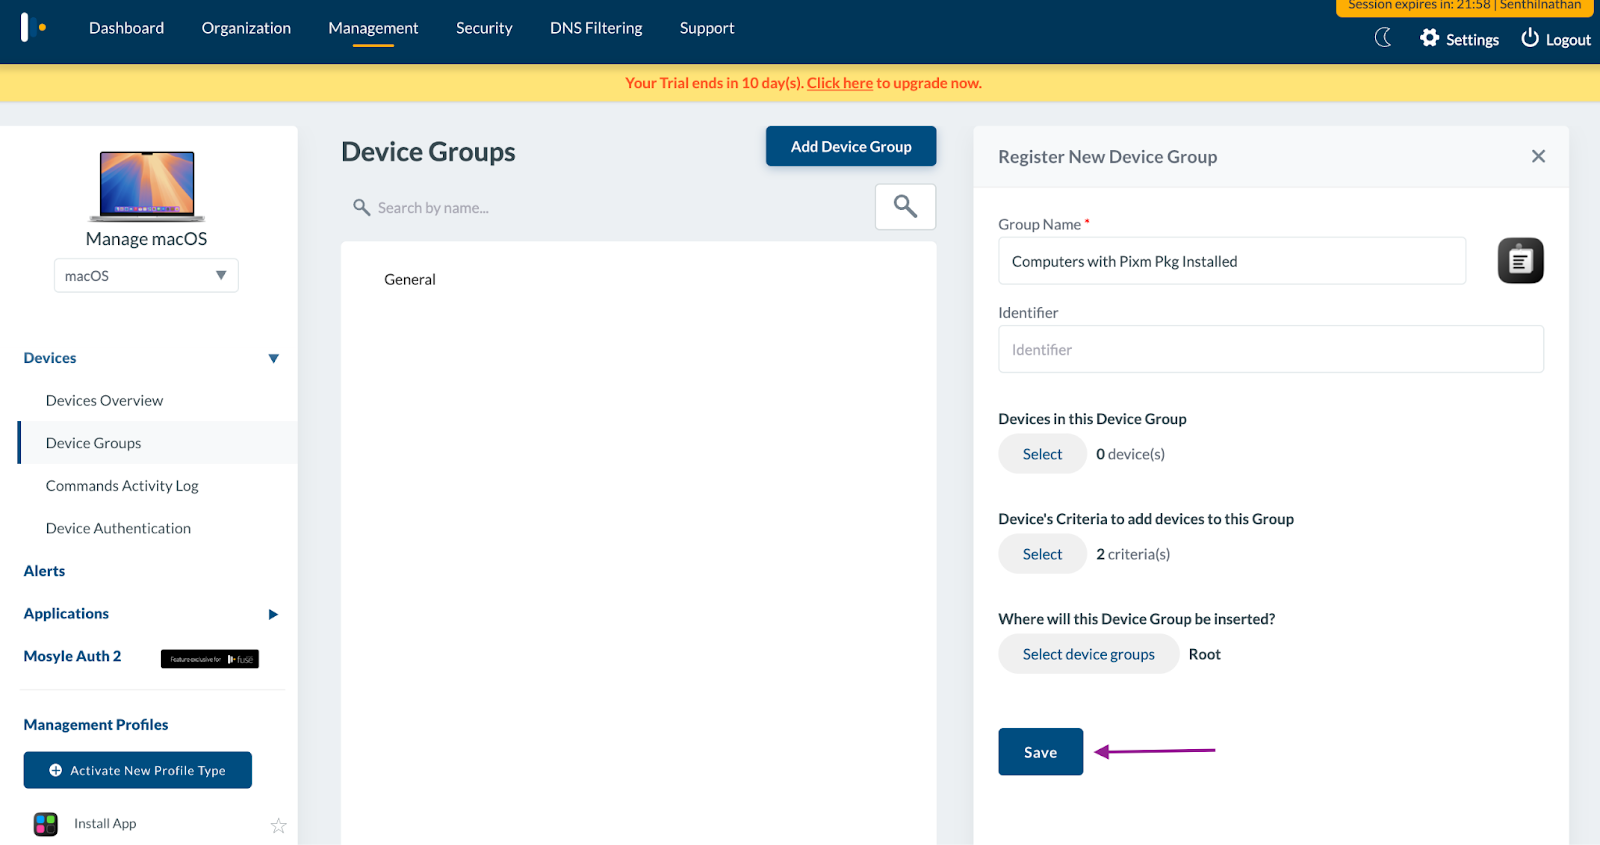
On the right side panel, enter “Computers with Pixm Pkg Installed” in the Group Name. Click on Select under Device's Criteria to add devices to this Group.
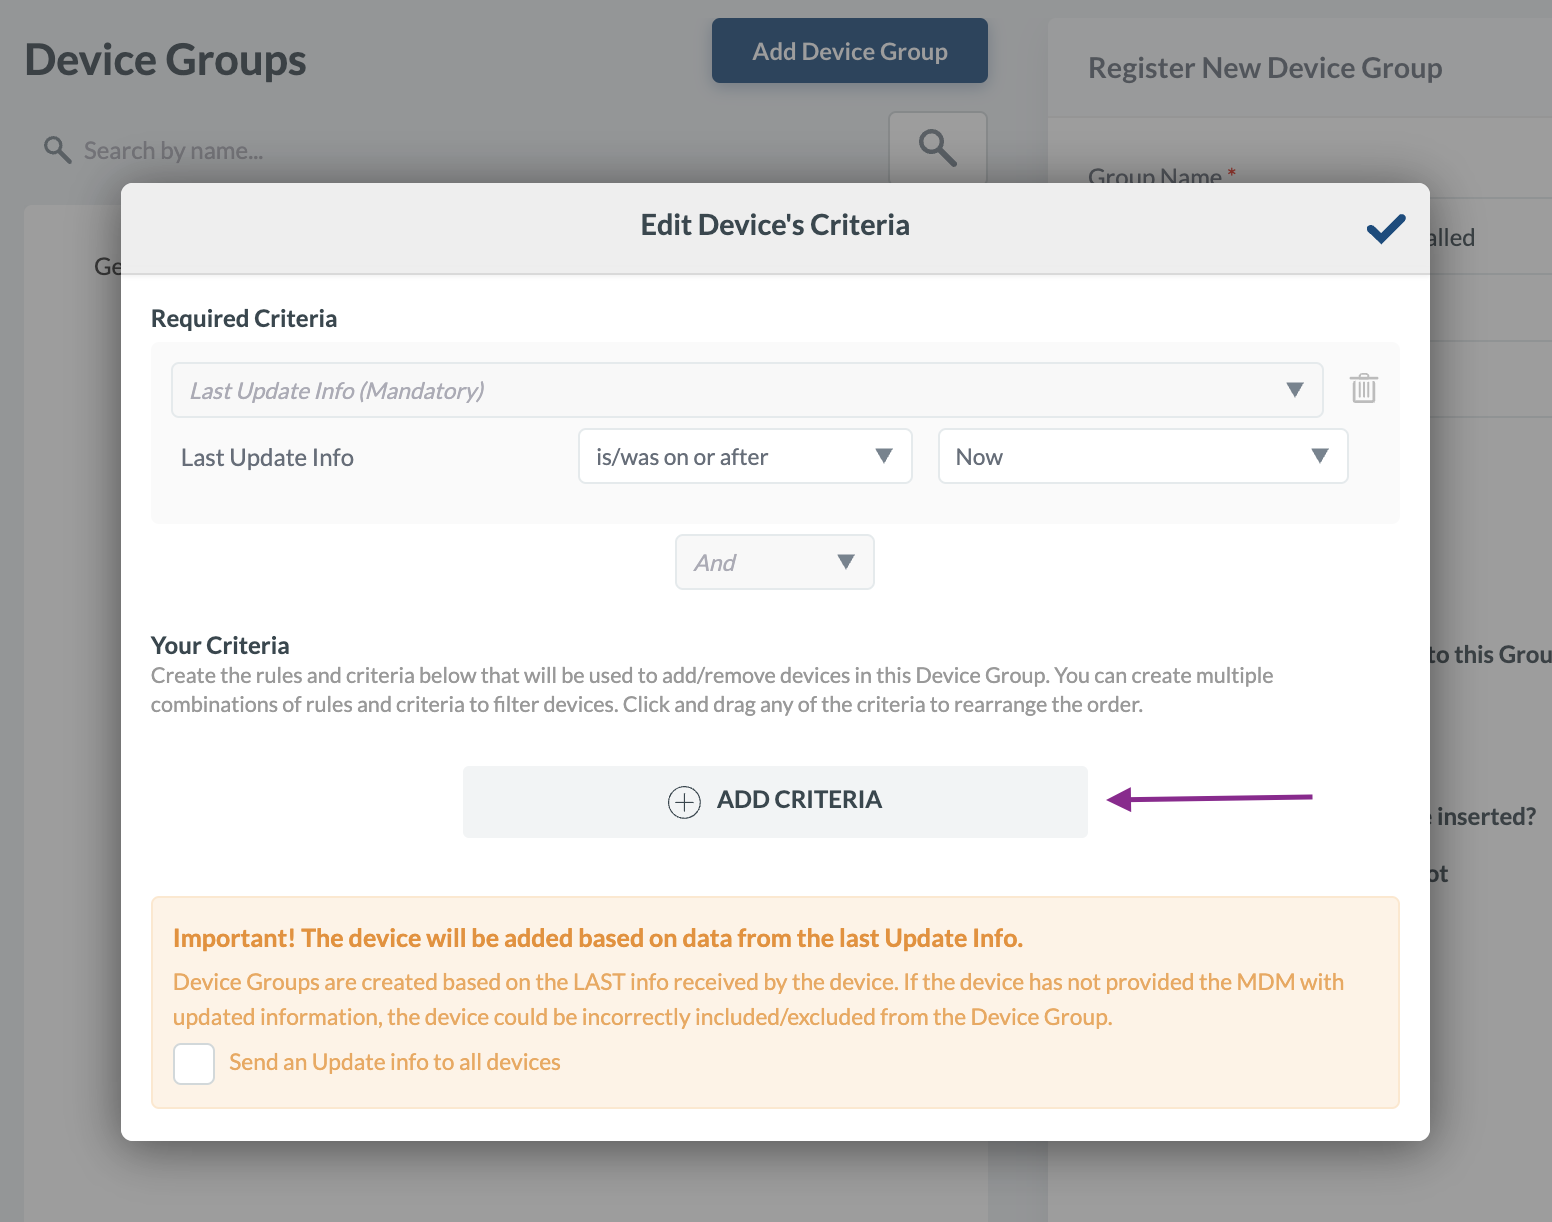
On the next dialog - Edit Device’s Criteria, leave the default values for Last Update Info. Under Your Criteria, click ADD CRITERIA.
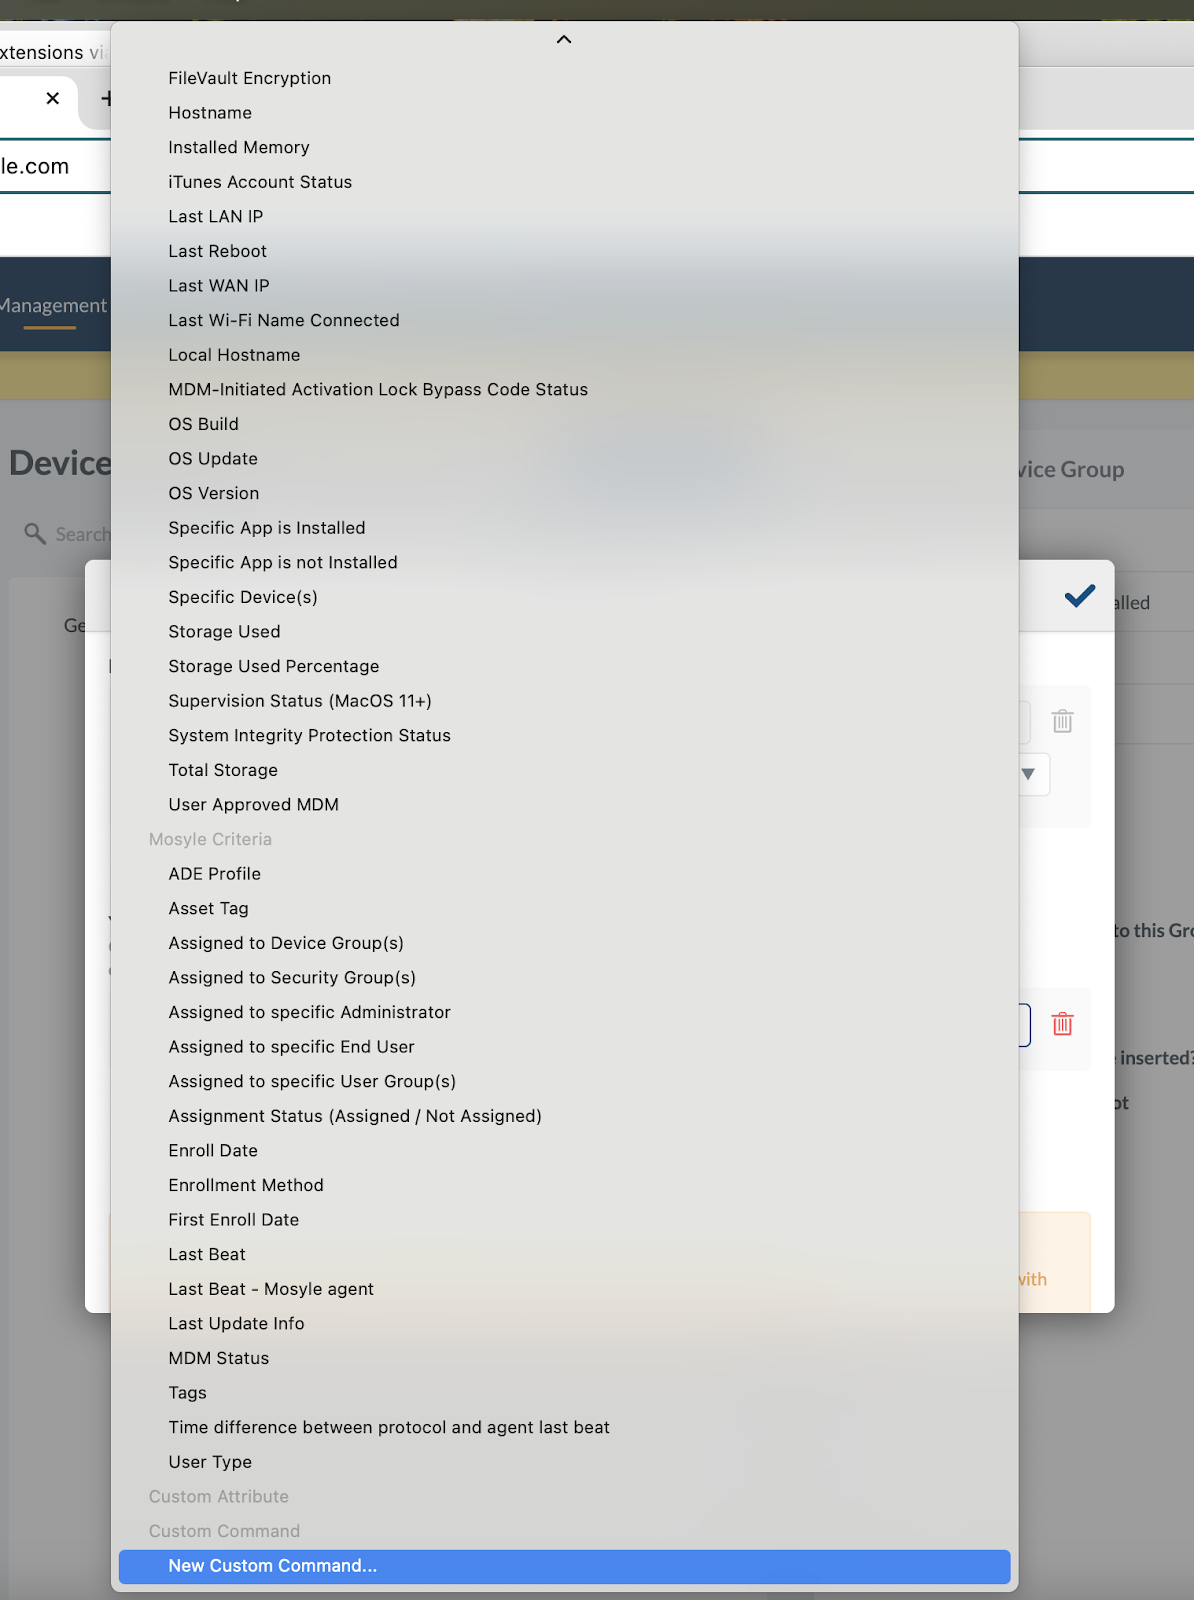
An edit combo box will be opened. Click the drop down.

This will open a list of available criterias. Scroll down till you see the Custom Command. Select the option New Custom Command…
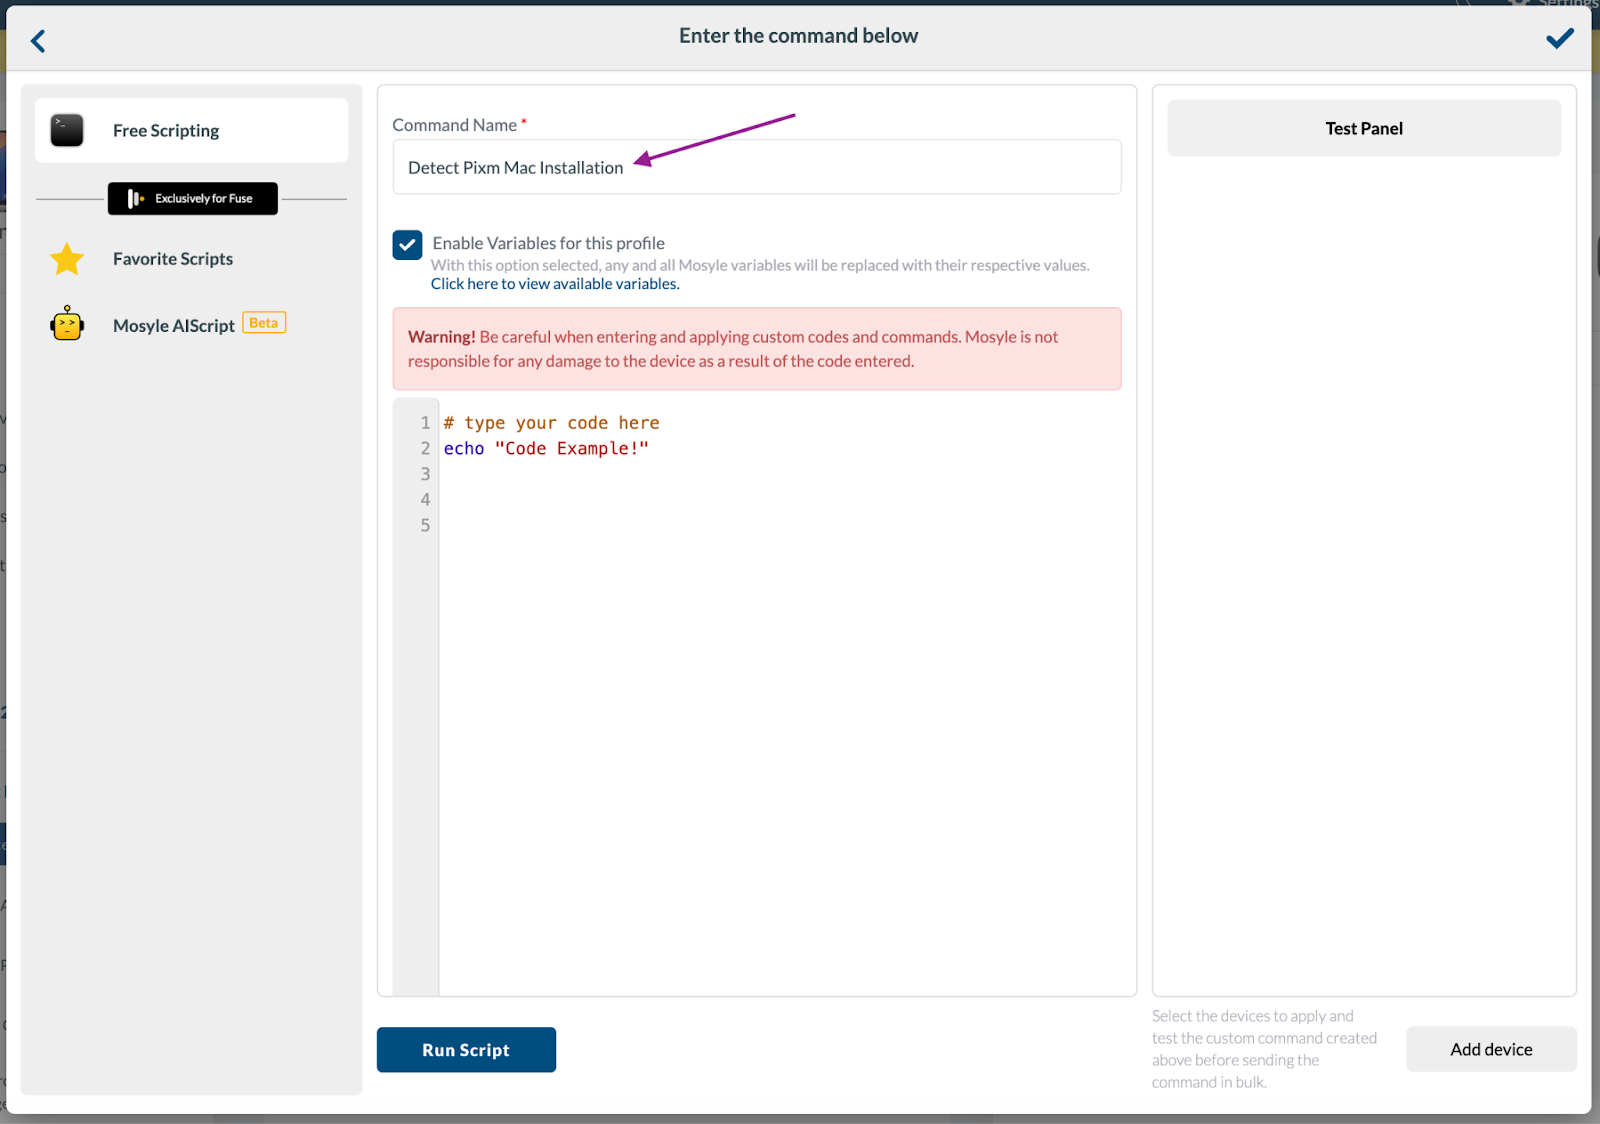
This will open a Free Scripting dialog. Enter “Detect Pixm Mac Installation” for Command Name.
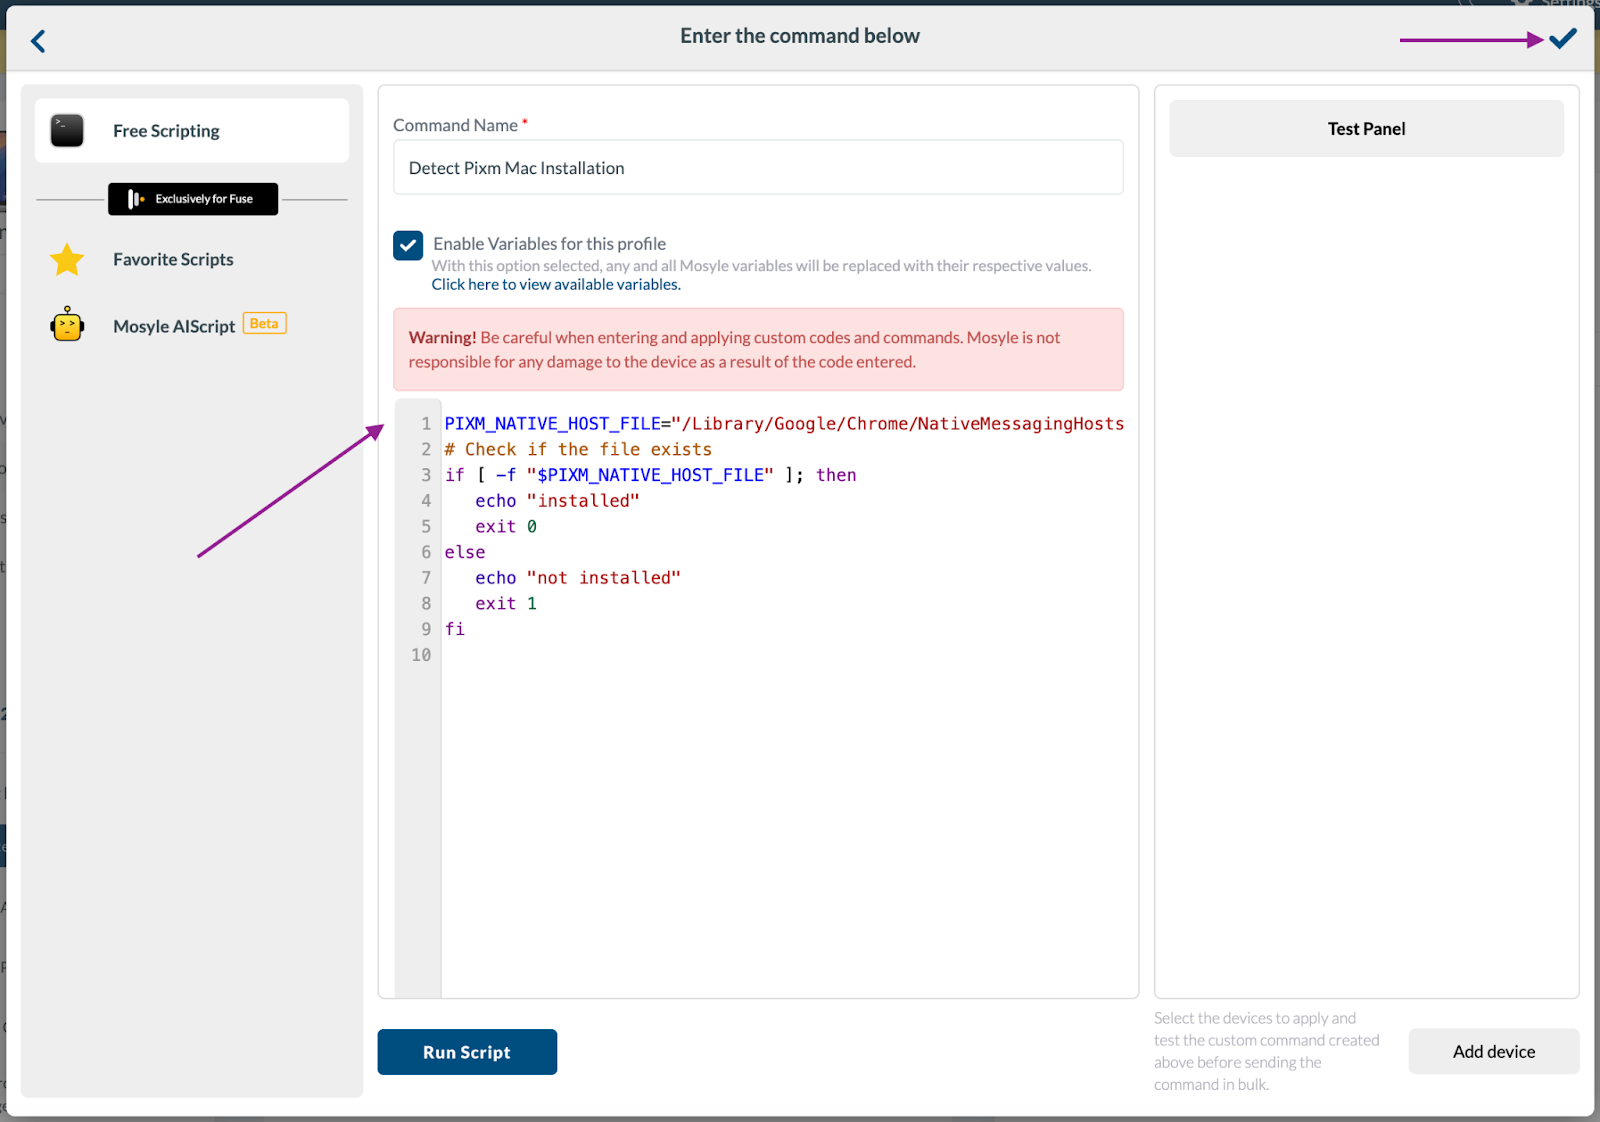
In the script editor, located below the warning message, delete the existing contents and copy-paste the following script code:
PIXM_NATIVE_HOST_FILE="/Library/Google/Chrome/NativeMessagingHosts/com.pixminc.pixm.json"
# Check if the file exists
if [ -f "$PIXM_NATIVE_HOST_FILE" ]; then
echo "installed"
exit 0
else
echo "not installed"
exit 1
fi
Once the script code is entered, click the ✔ on the top right corner of the dialog. This will save the custom command and this dialog will be dismissed.
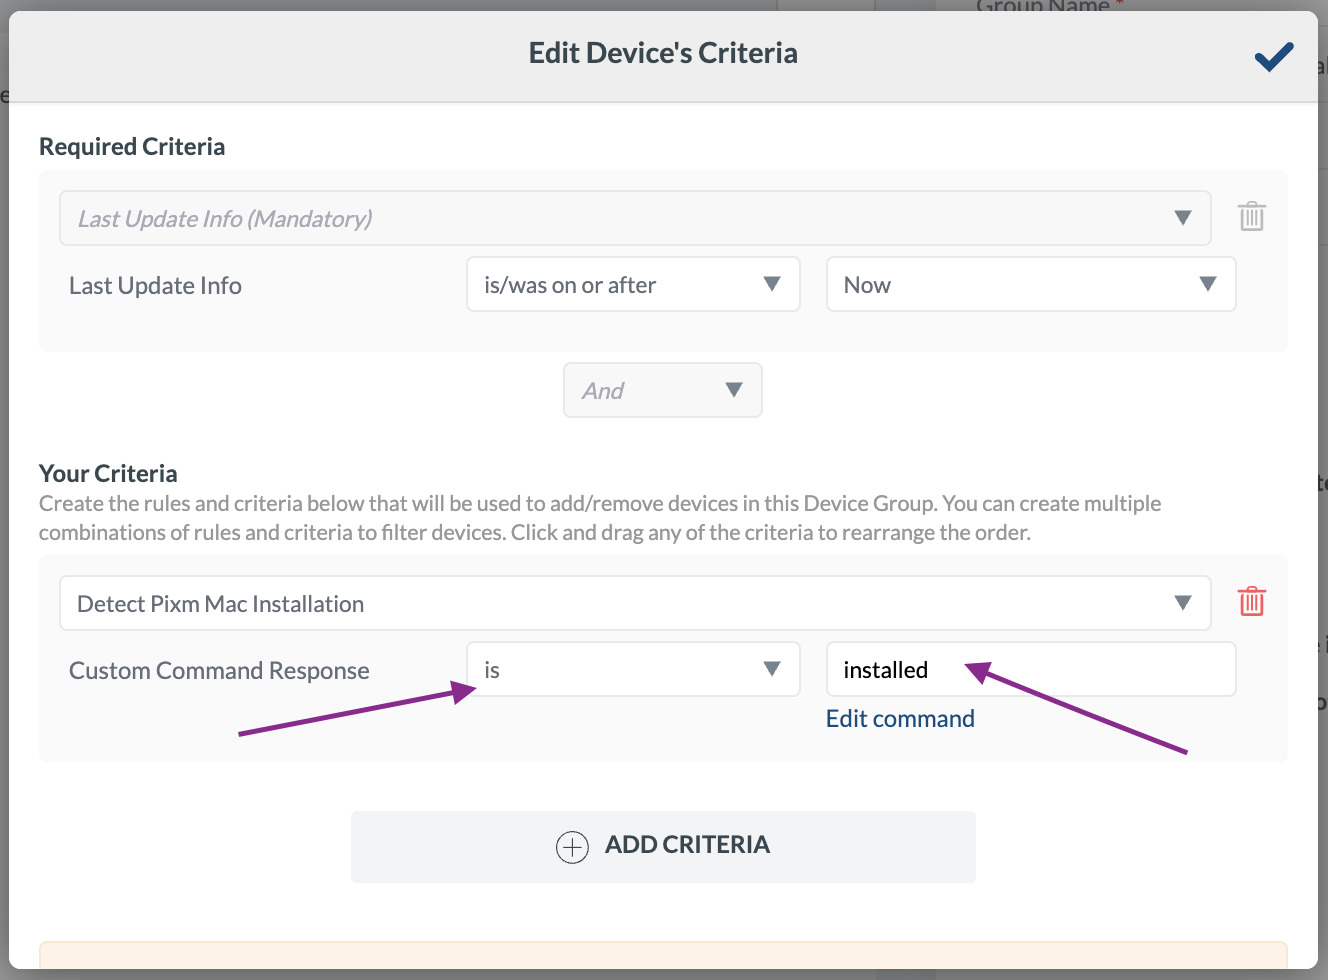
Next, on the Edit Device’s Criteria dialog, form the Custom Command Response as follows:
Select is in the drop box and enter installed in the text box as shown in the following screenshot.
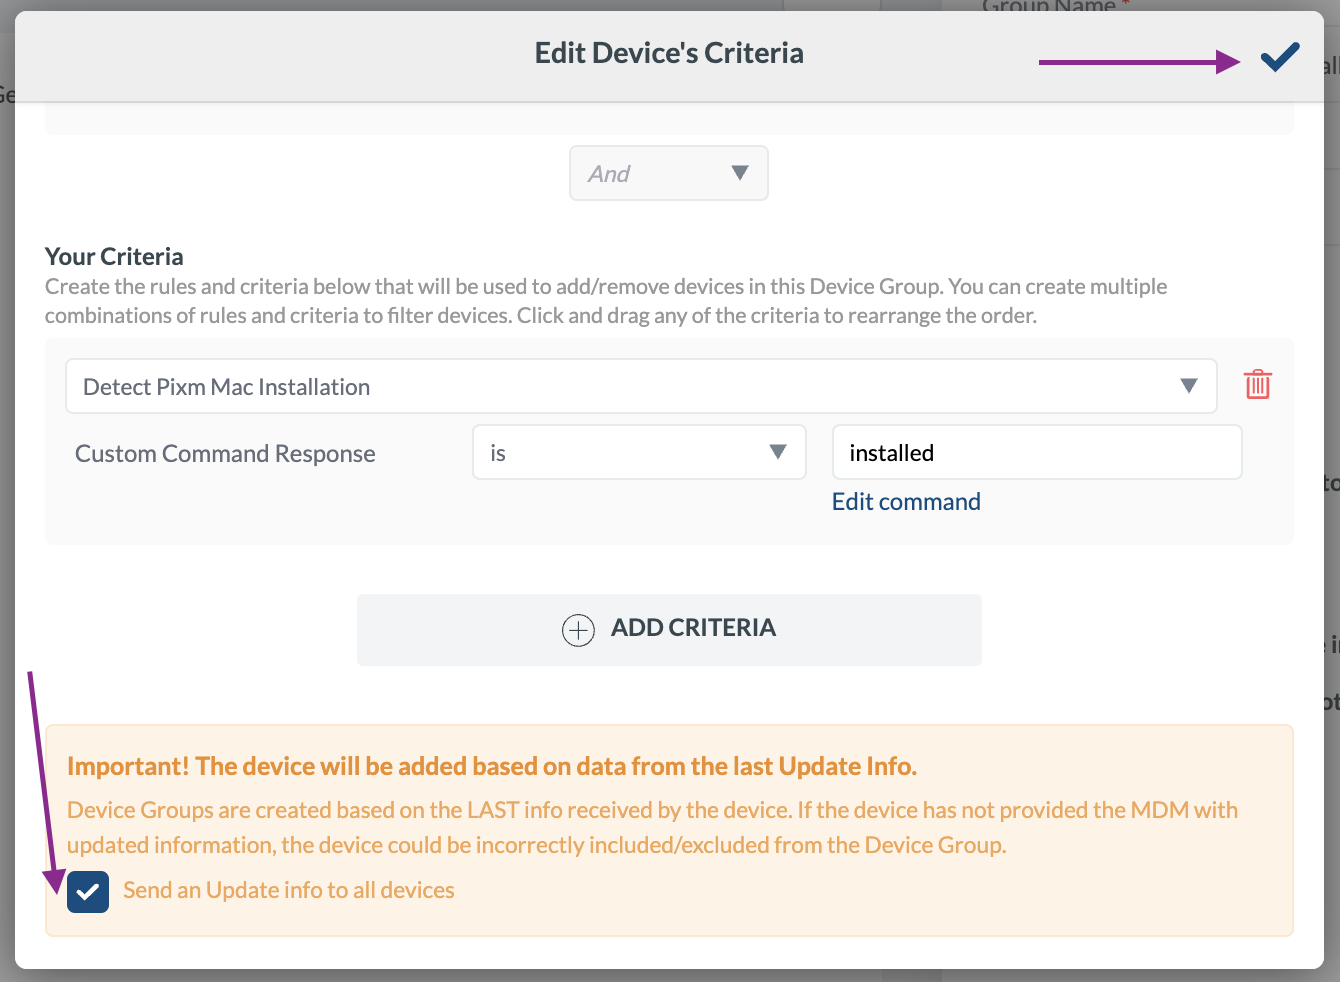
Select the check box “Send an Update info to all devices”. Click ✔ on the top right corner of the dialog to save the Device Criteria.
Click Save, this will create a new Custom Device Group. This group dynamically tracks the Mac devices to which the PixmMacInstaller is deployed.
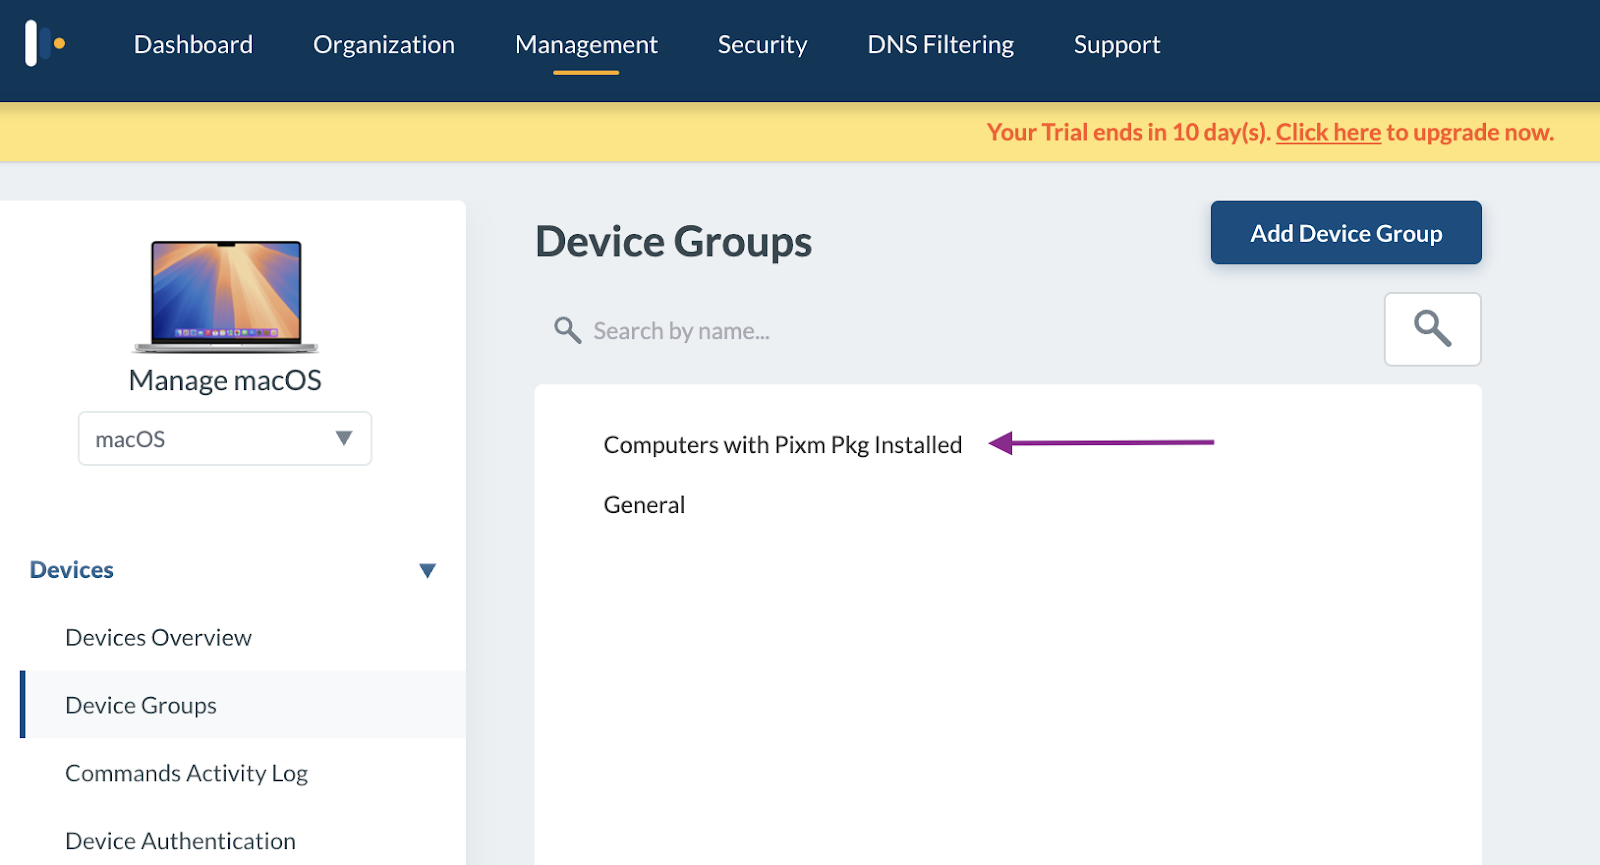
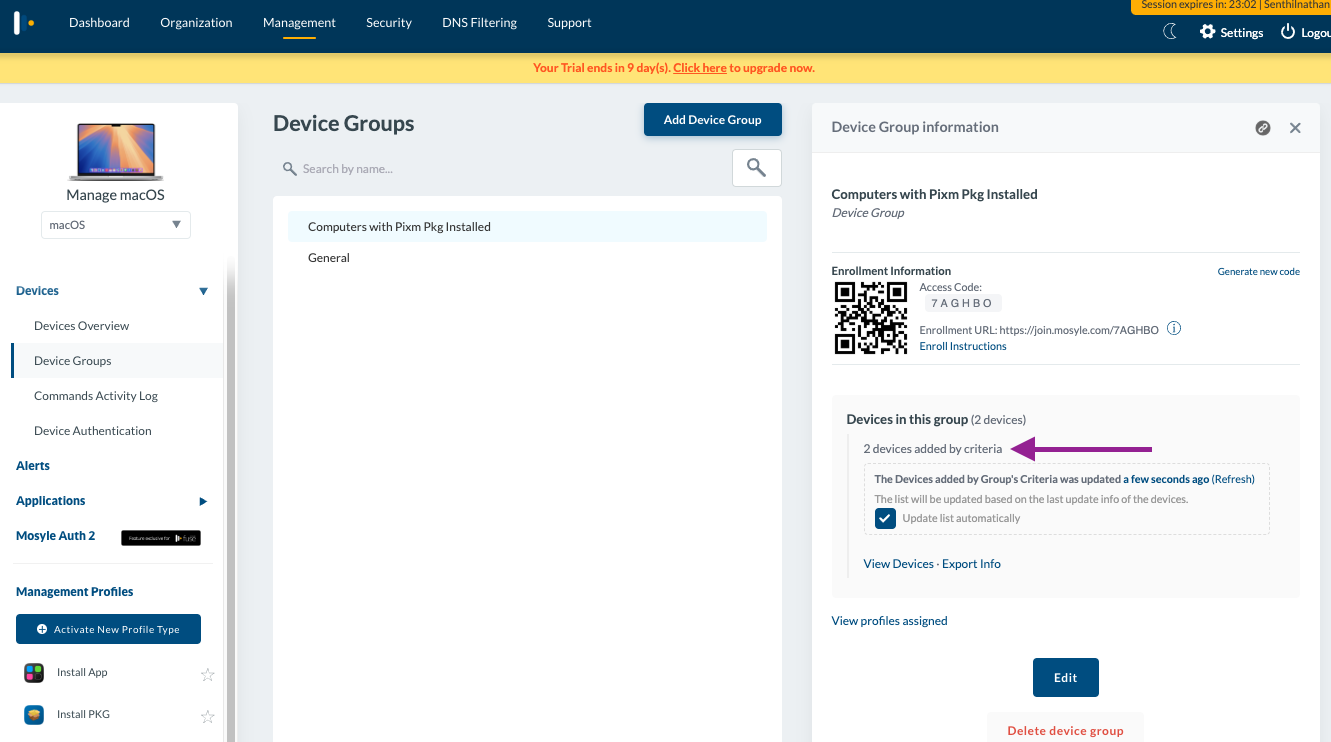
You can click on the device group name “Computers with Pixm Pkg Installed” to see the members of this custom device group. This group will contain the Macs once the PixmMacInstaller package is deployed to them.
This custom device group is configured to automatically update its device list. However, based on our testing, after deploying PixmMacInstaller (as explained in Step 4: Deploying Pixm Mac Installer). Please note that the criteria for this device group is automatically updated once every 24 hours. However, if you want to update this custom device group immediately, you can click the "Refresh" link to update it based on the current status of the PixmMacInstaller deployment.

Device list updated in the custom device group after refresh.
Deploying Pixm Mac Installer
The Pixm Mac installer and uninstaller packages are deployed using Custom Commands instead of Profiles because they lack a native Mac app file (.app) with a valid application bundle ID, which Mosyle requires.
If we deploy the installer using a package identifier instead of an app bundle ID, Mosyle initially reports the installation as successful. However, during the next update, it checks the Applications inventory for the app bundle ID. Since only the package identifier is provided, Mosyle cannot find the app and marks the installation as removed or failed.
To avoid this issue, we use Custom Commands to deploy the Pixm Mac installer and uninstaller packages instead of Mosyle Pkg profiles.
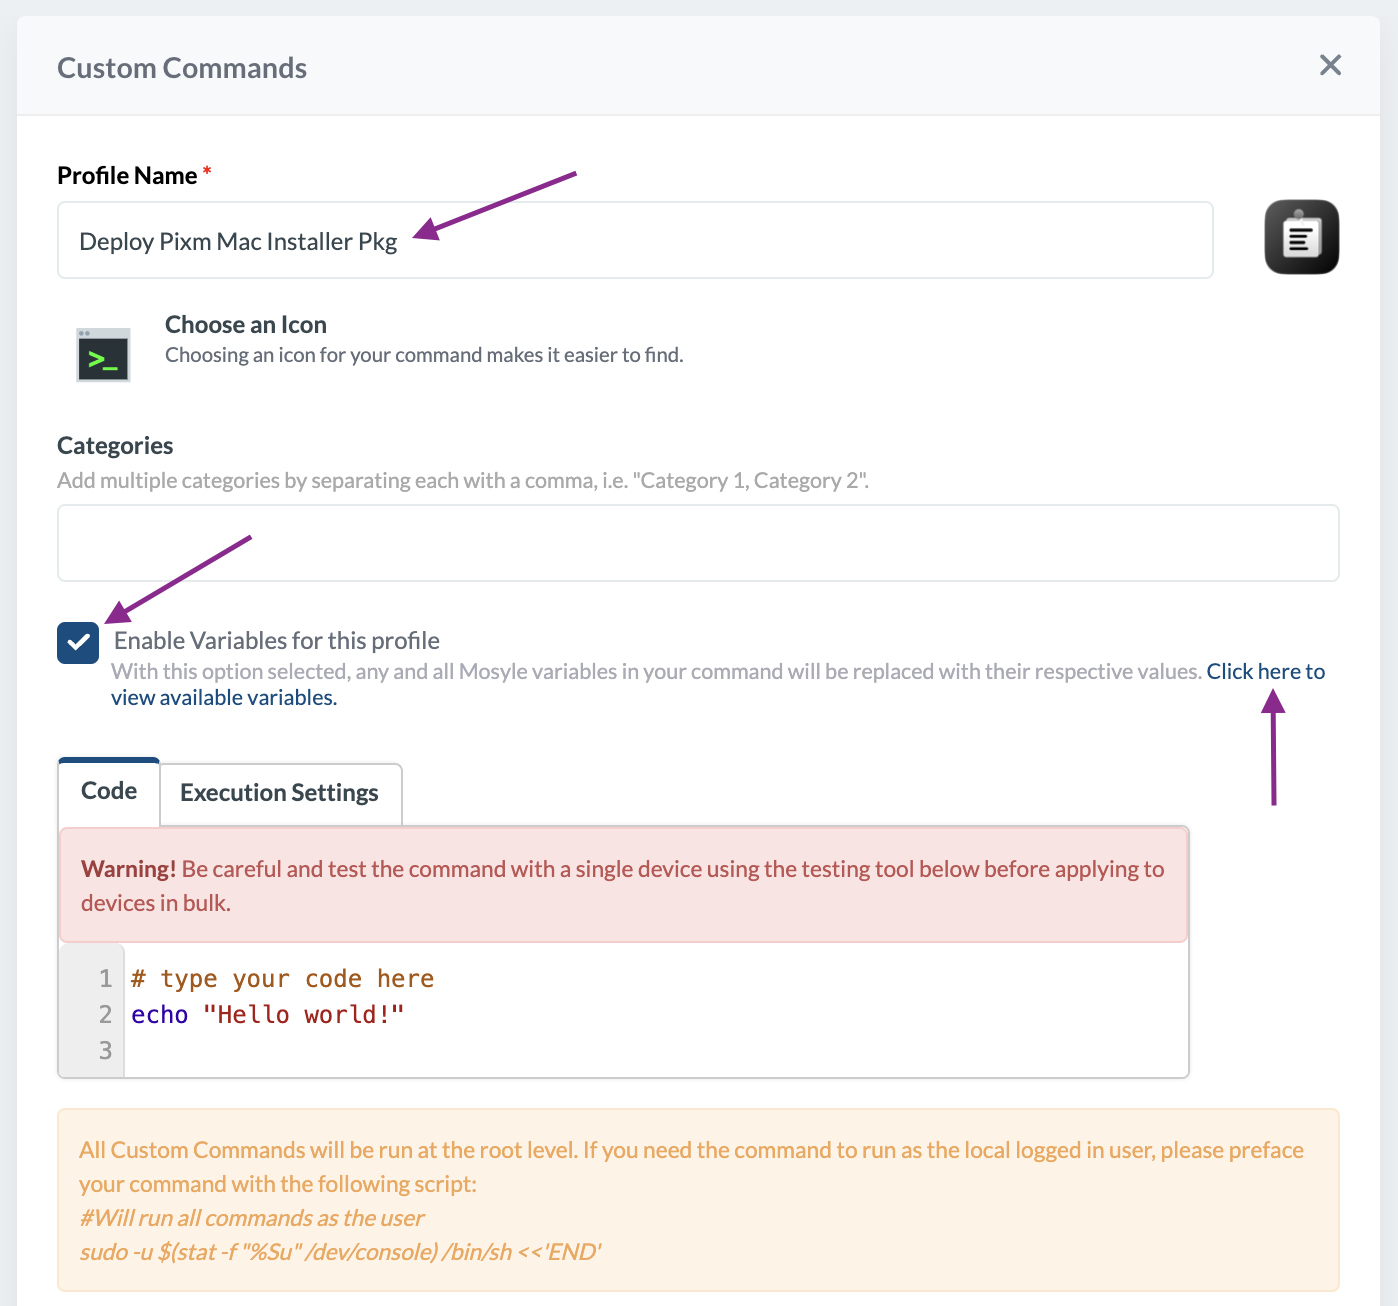
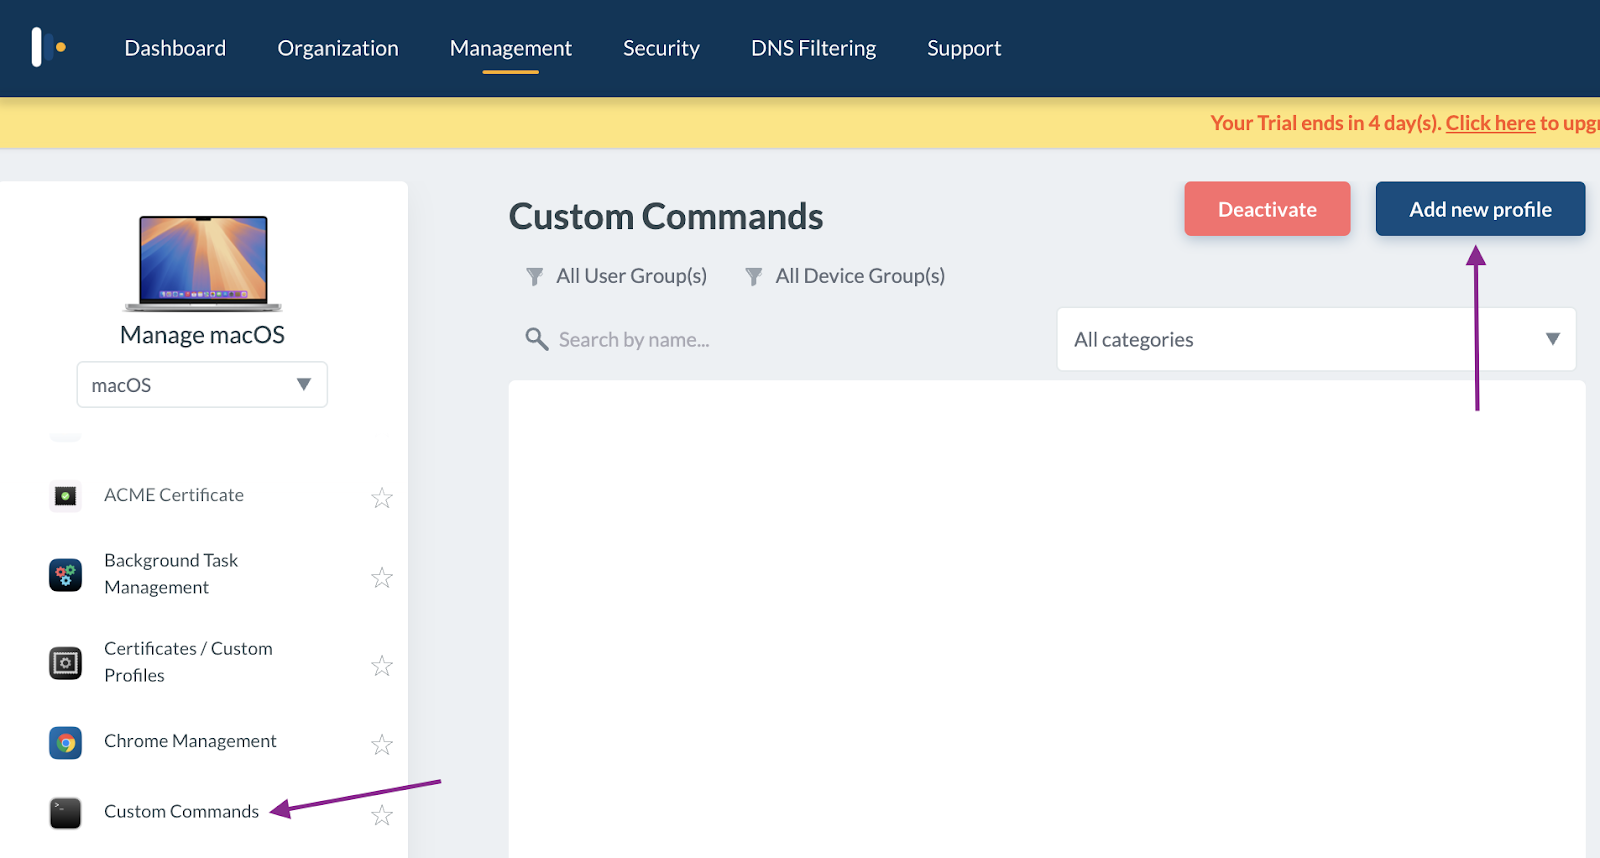
On the Management page, click Custom Commands under Management Profiles in the left panel. Click Add new profile.
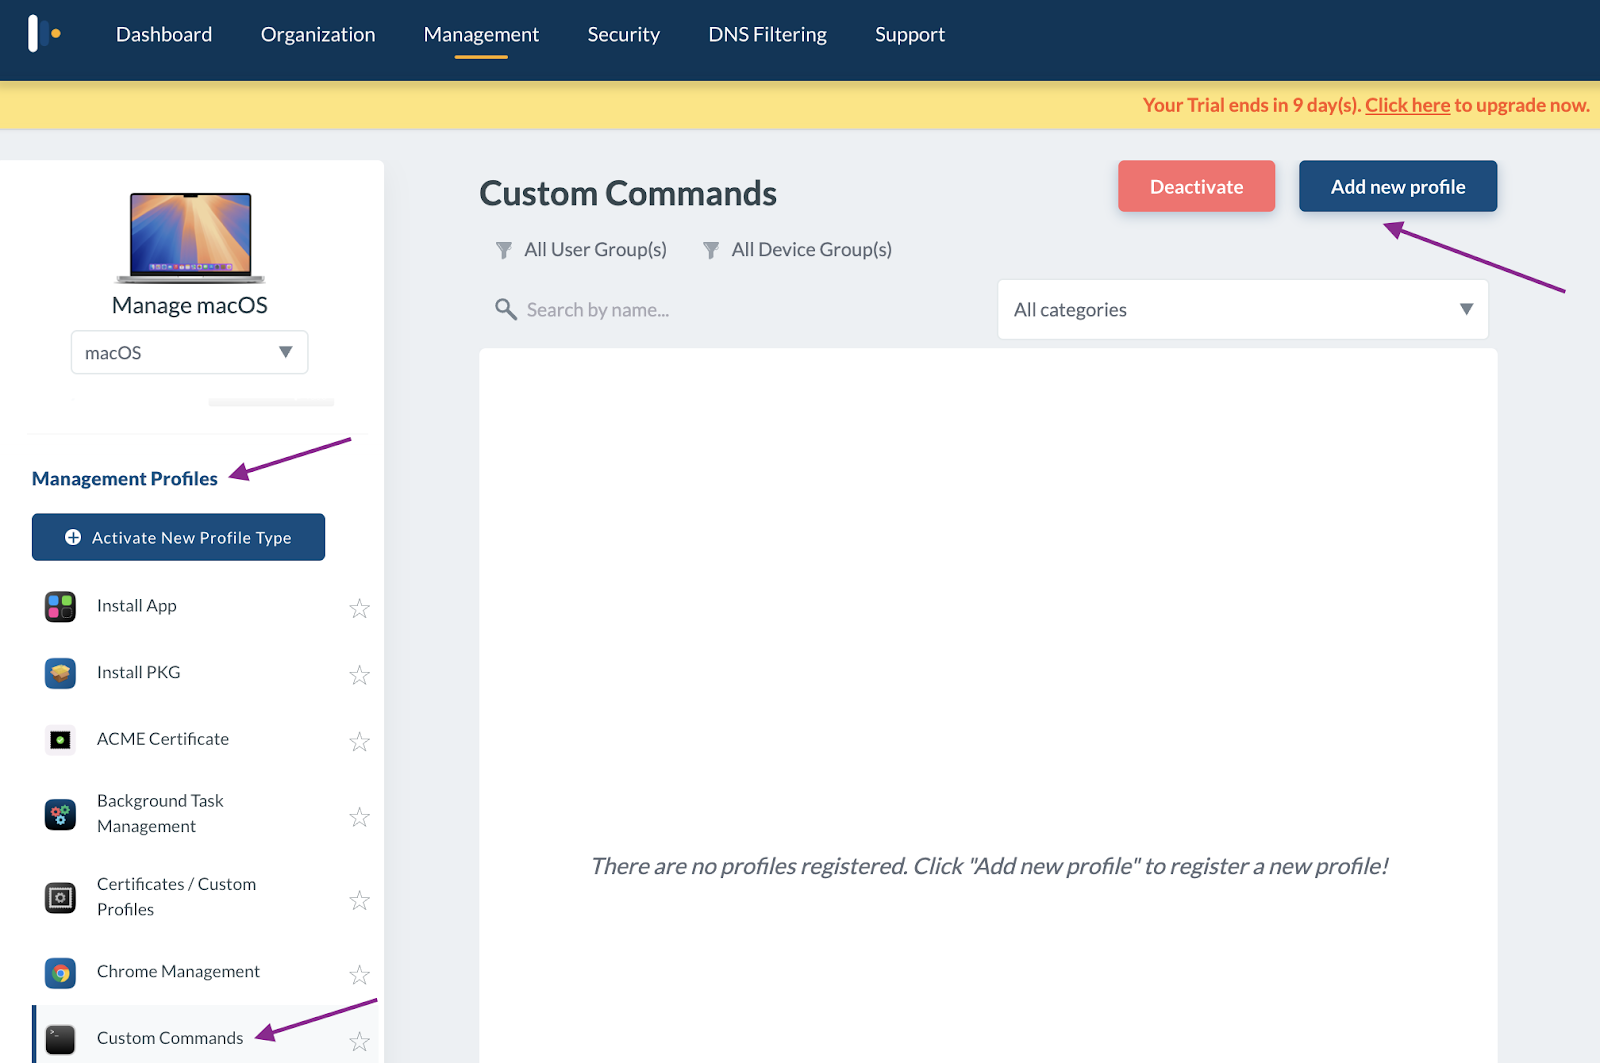
A new Custom Commands configuration panel will open on the right.
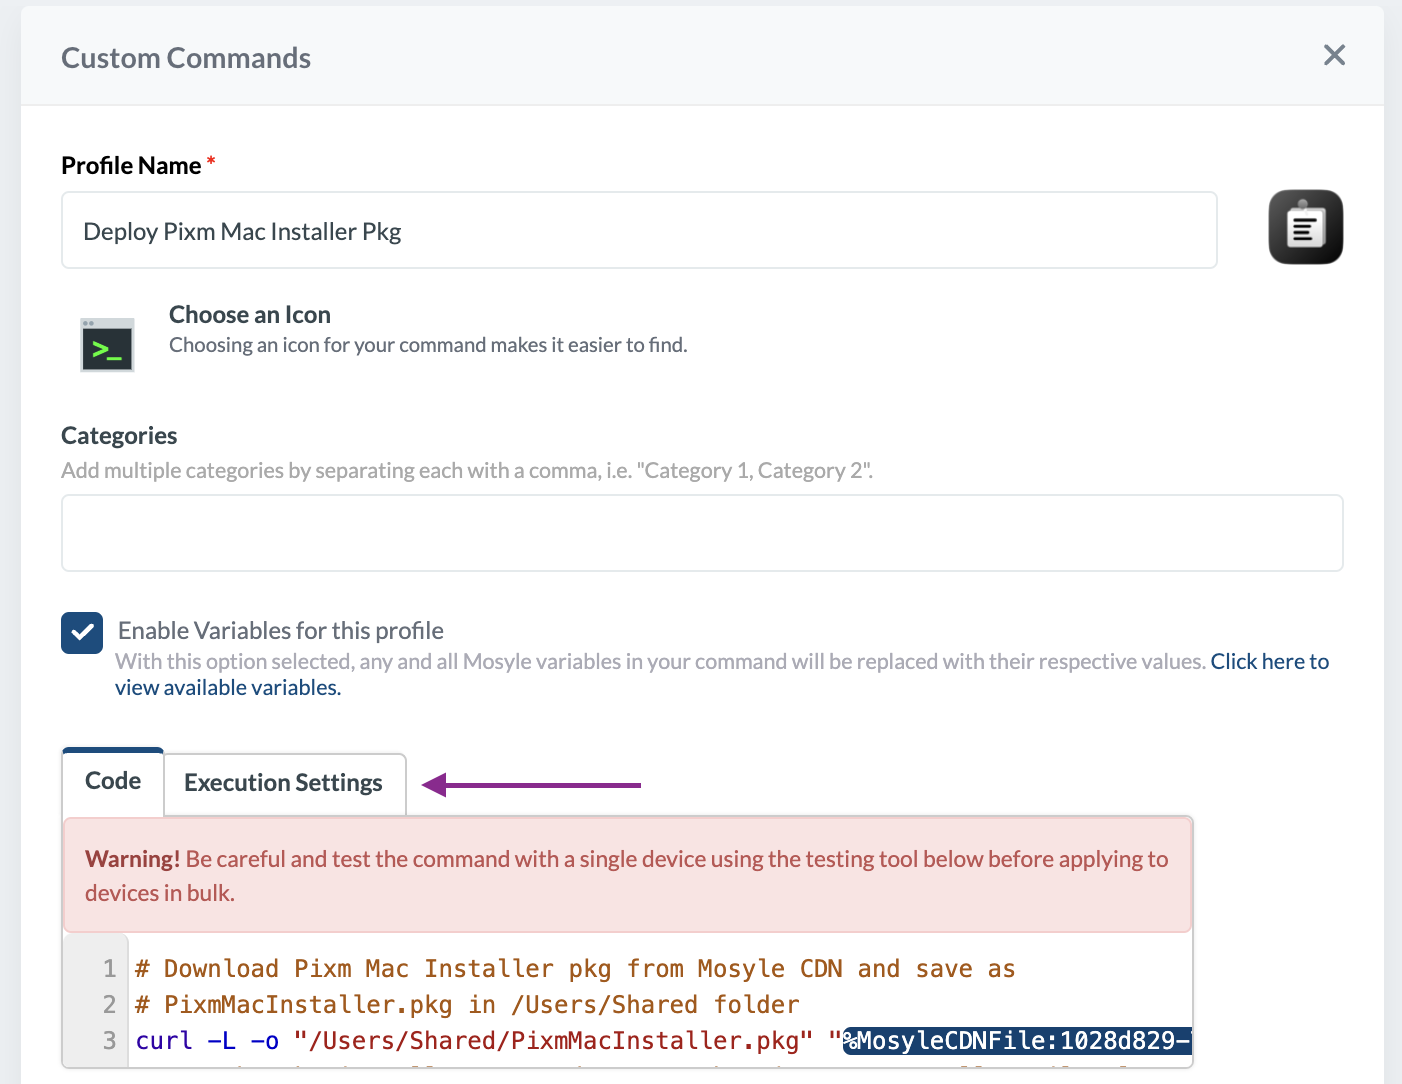
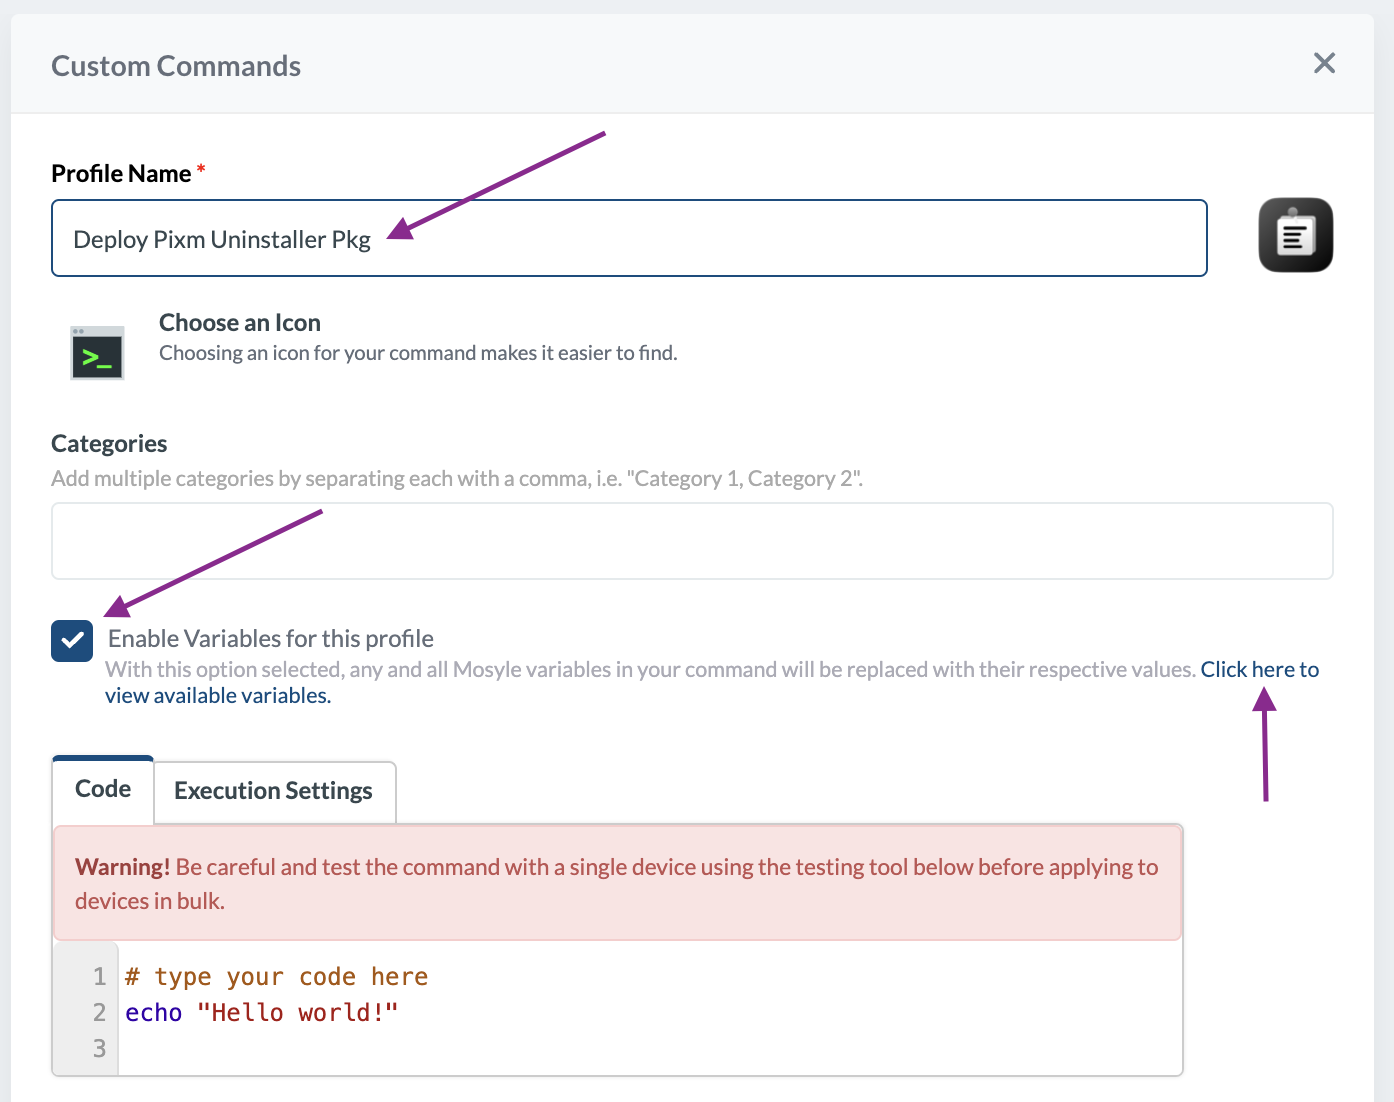
Enter “Deploy Pixm Mac Installer Pkg” as Profile Name. Enable the checkbox “Enable Variables for this profile”. Then click on the text link “Click here to view available variables.”
On the next dialog - Variables available for Custom Command, click “View Mosyle CDN Variables”.
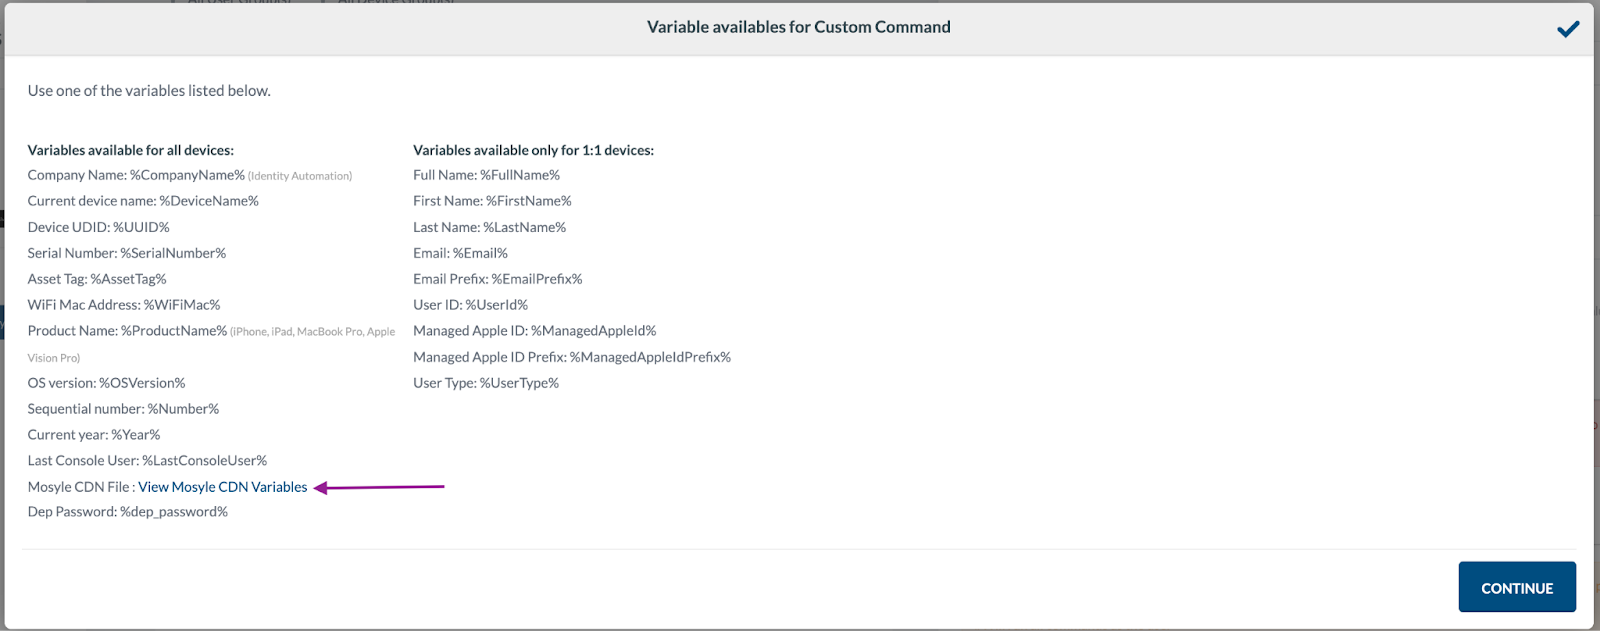
This will open a dialog displaying the Mosyle CDN variables. Here, confirm the variable values for the PixmMacInstaller and PixmMacUninstaller packages, as noted in Step 2: Uploading Pixm Mac Installer and Uninstaller Packages to Mosyle. Dismiss this dialog and go back to the Custom Commands panel.
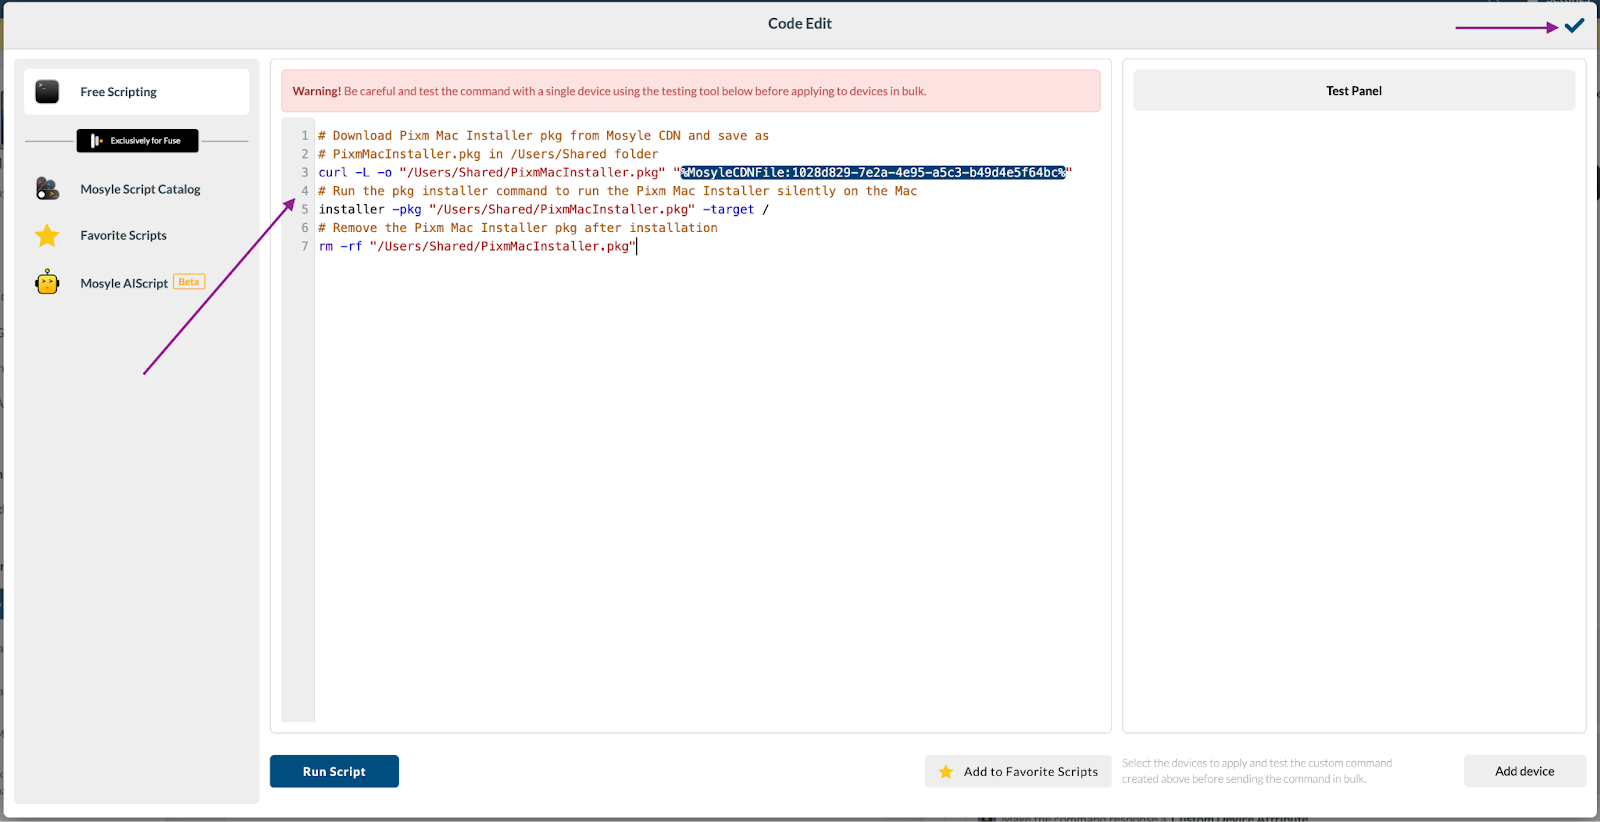
Click on the Code section to open the Code Edit dialog.
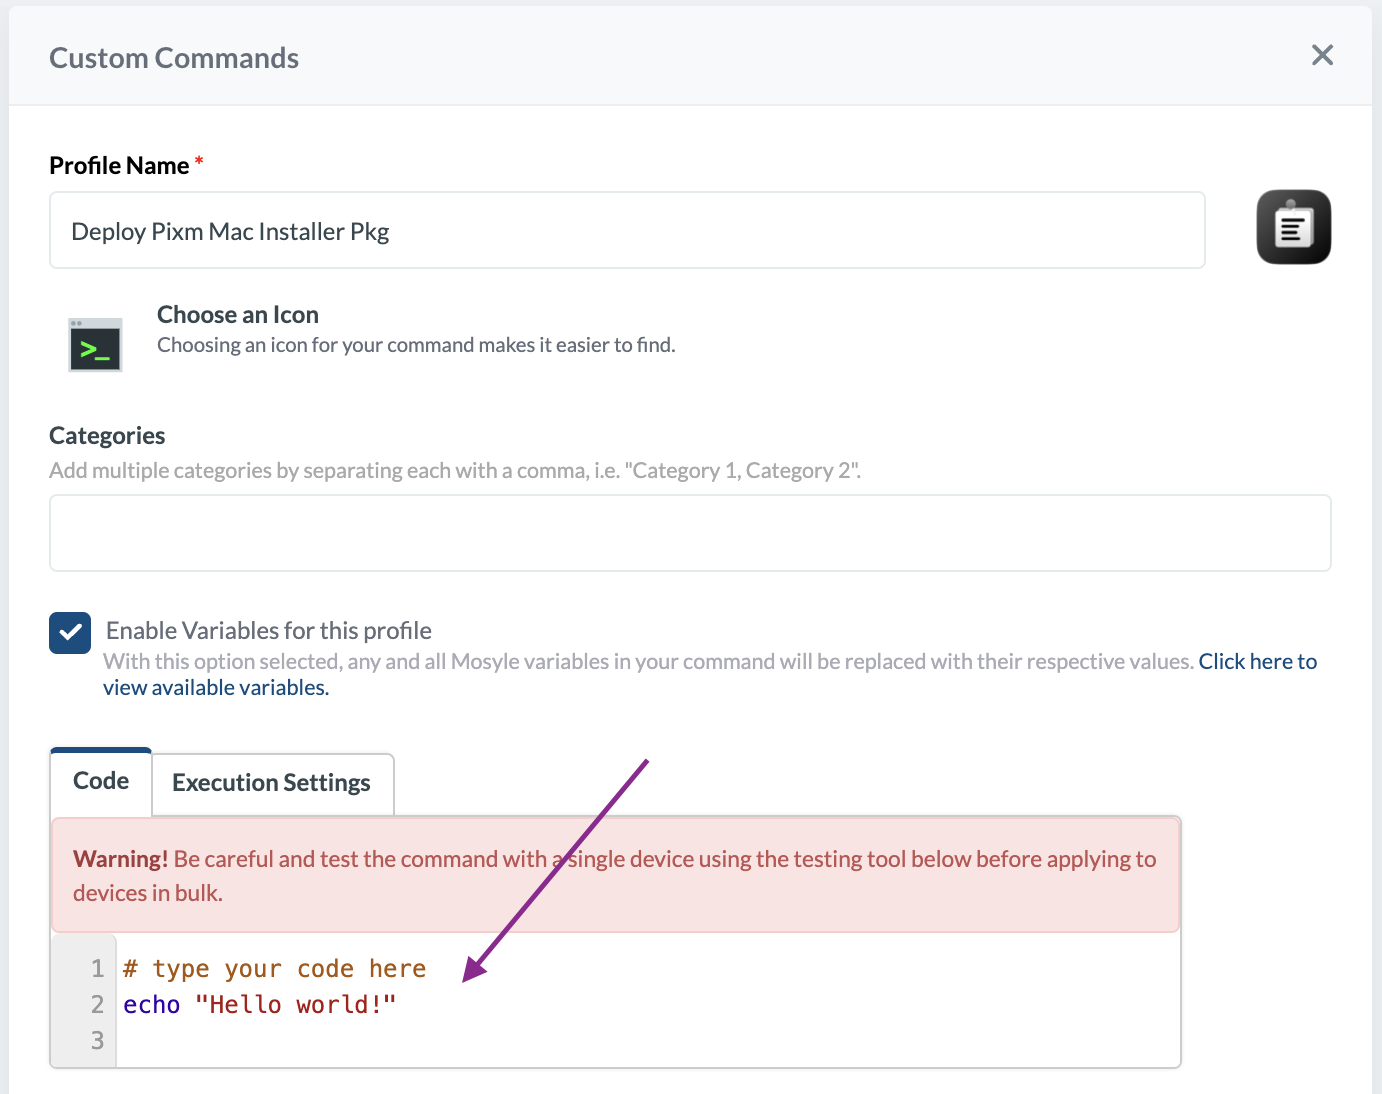
In the Code Edit dialog, select Free Scripting, remove any sample script if present, and then copy and paste the following script.
# Download Pixm Mac Installer pkg from Mosyle CDN and save as
# PixmMacInstaller.pkg in /Users/Shared folder
curl -L -o "/Users/Shared/PixmMacInstaller.pkg" "%MosyleCDNFile:1028d829-7e2a-4e95-a5c3-b49d4e5f64bc%"
# Run the pkg installer command to run the Pixm Mac Installer silently on the Mac
installer -pkg "/Users/Shared/PixmMacInstaller.pkg" -target /
# Remove the Pixm Mac Installer pkg after installation
rm -rf "/Users/Shared/PixmMacInstaller.pkg"
Verify the Mosyle variable value corresponding to the PixmMacInstaller package in the Mosyle CDN Variables dialog.
Now, click the ✔ in the top right corner to save the command.
Click Execution Settings
Click the Execute command drop-down box and select the value “Immediately when saving the profile, upon assignment, or based on schedule or events”. Select the “Every Device Info” update under Event. Select “Only once (Event Required)” under Schedule.
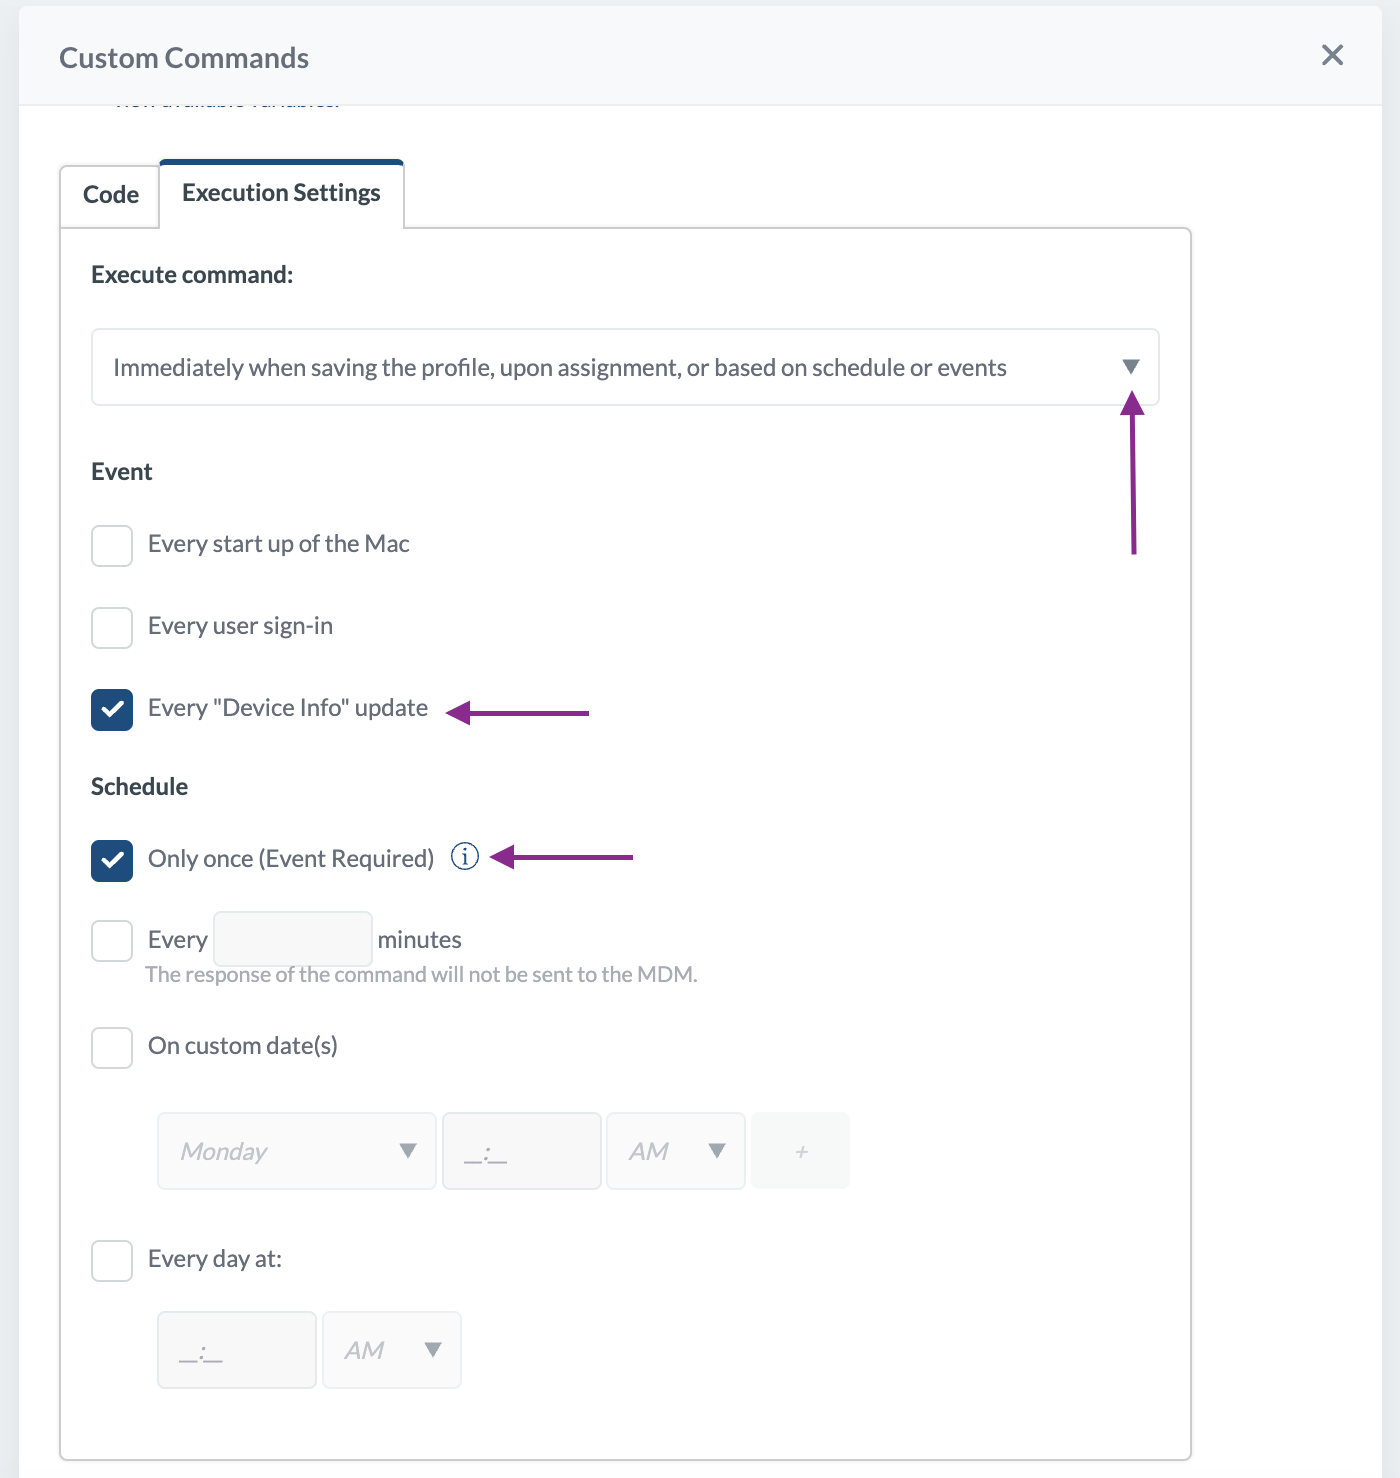
This is the optimized Execution Settings configuration for the PixmMacInstaller package. This ensures the package is installed only once on a Mac. The command will not be sent repeatedly during every Device Info update unless the Command Response Results are cleared or the Mac is removed from MDM and reassigned.
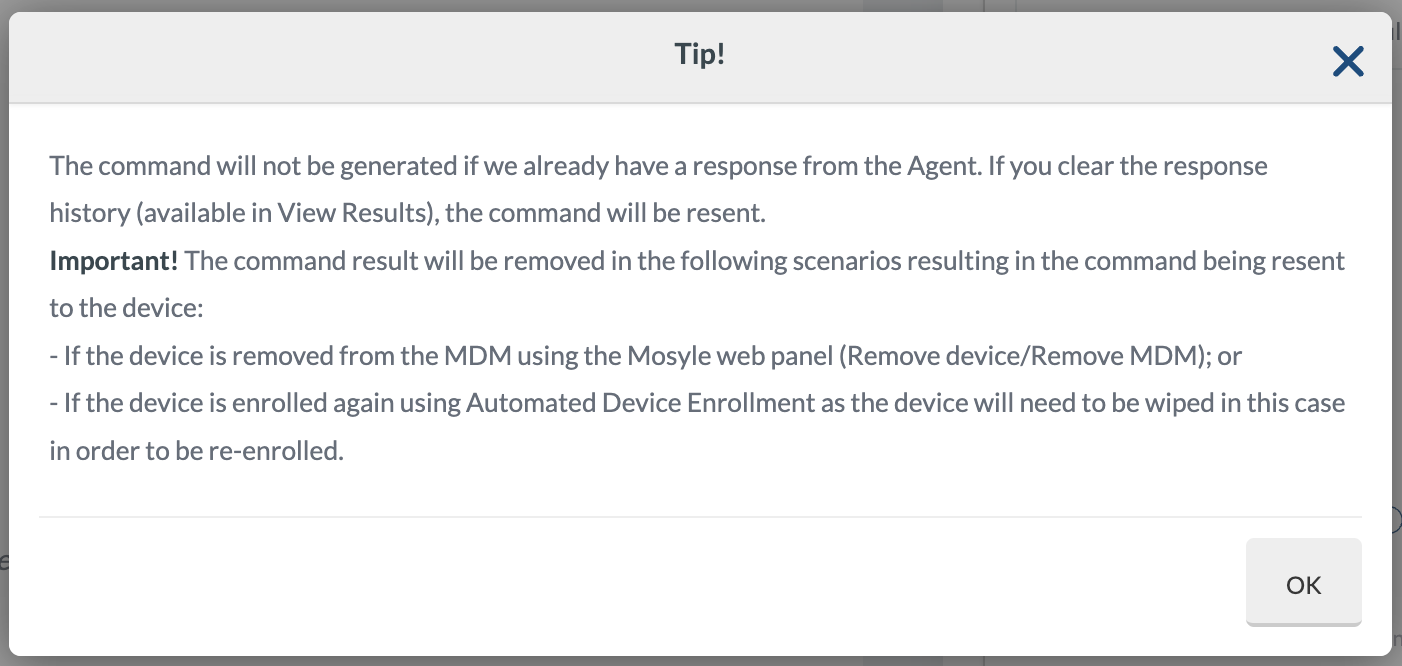
This can be explained by the following tip, which appears when you click the icon next to the Schedule option: “Only once (Event Required)”.
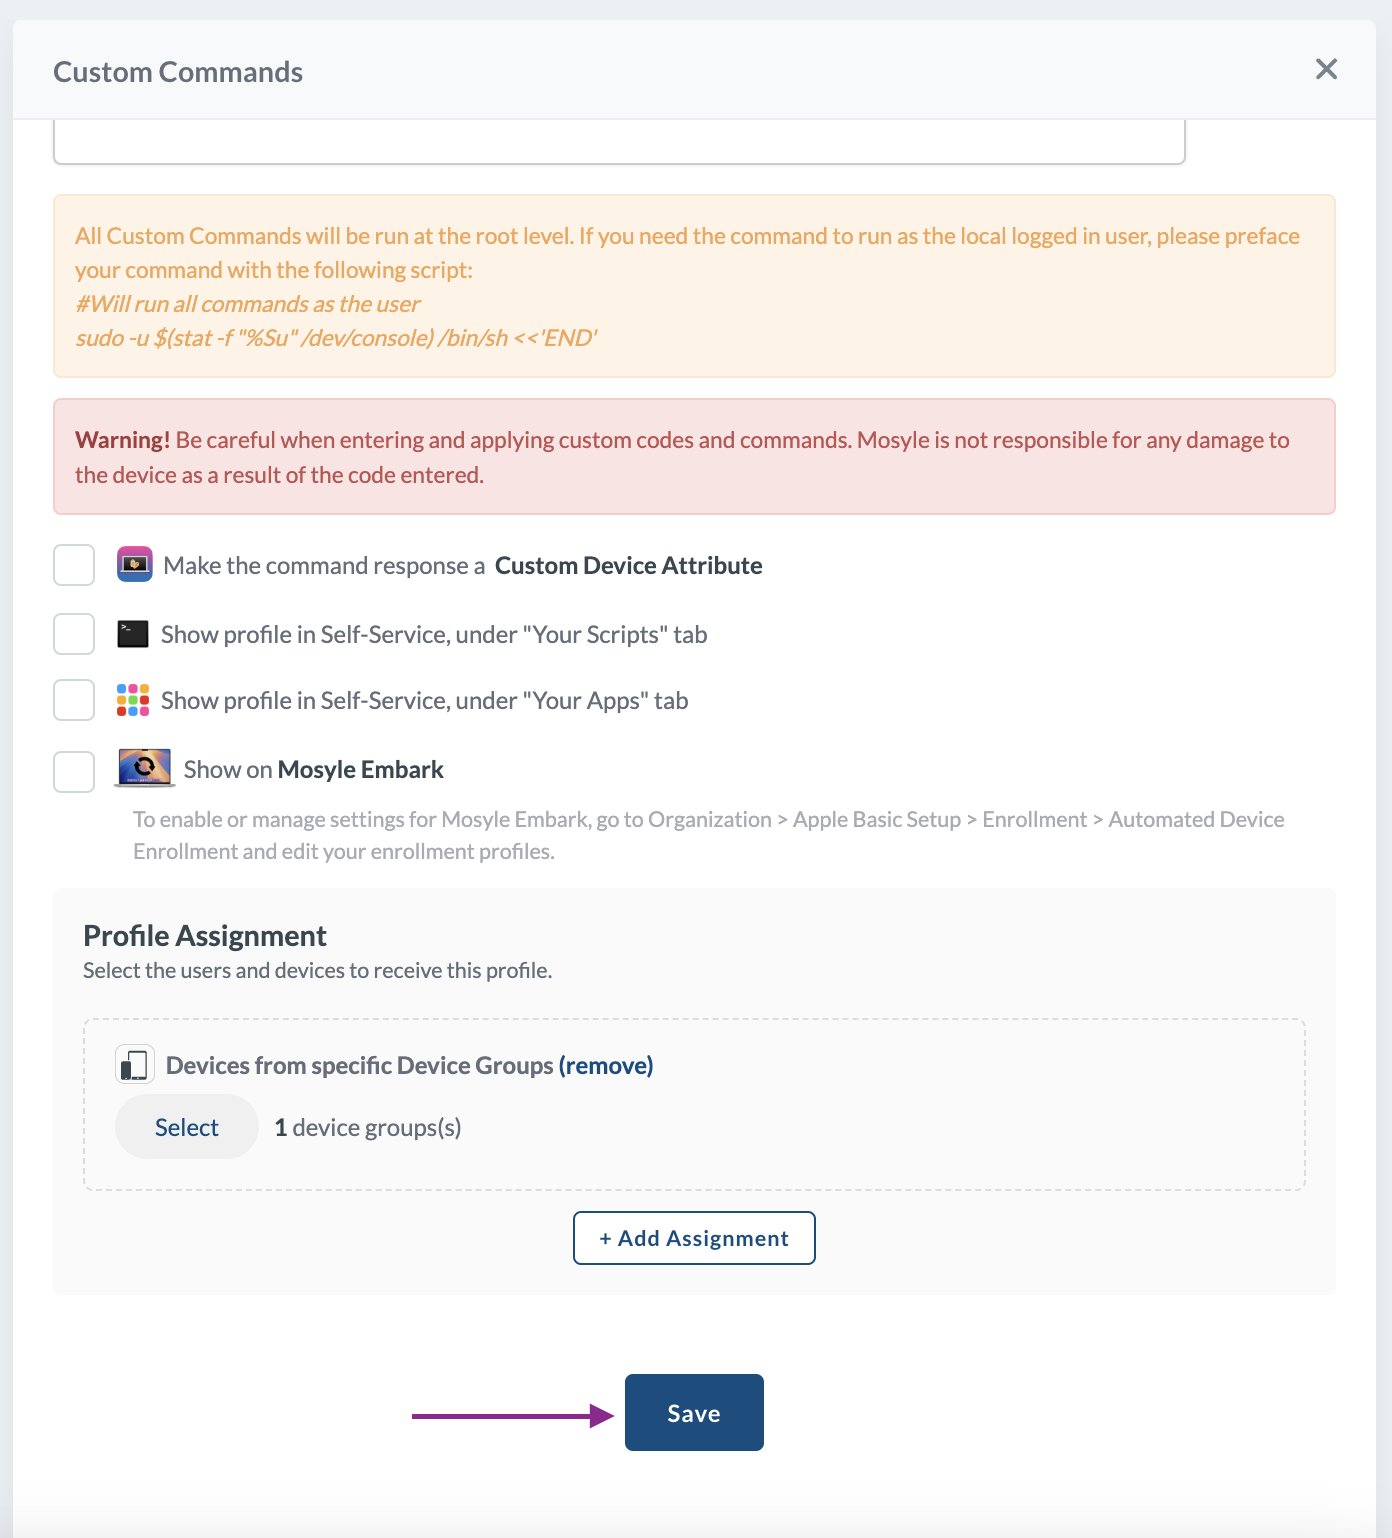
Now, scroll down the Custom Commands panel to assign the profile to the enrolled Macs. You can assign the profile to either a group of Macs or specific individual Macs.
Click Add Assignment to open the device assignment dialog. We selected “Devices from specific Device Groups” in this example deployment.

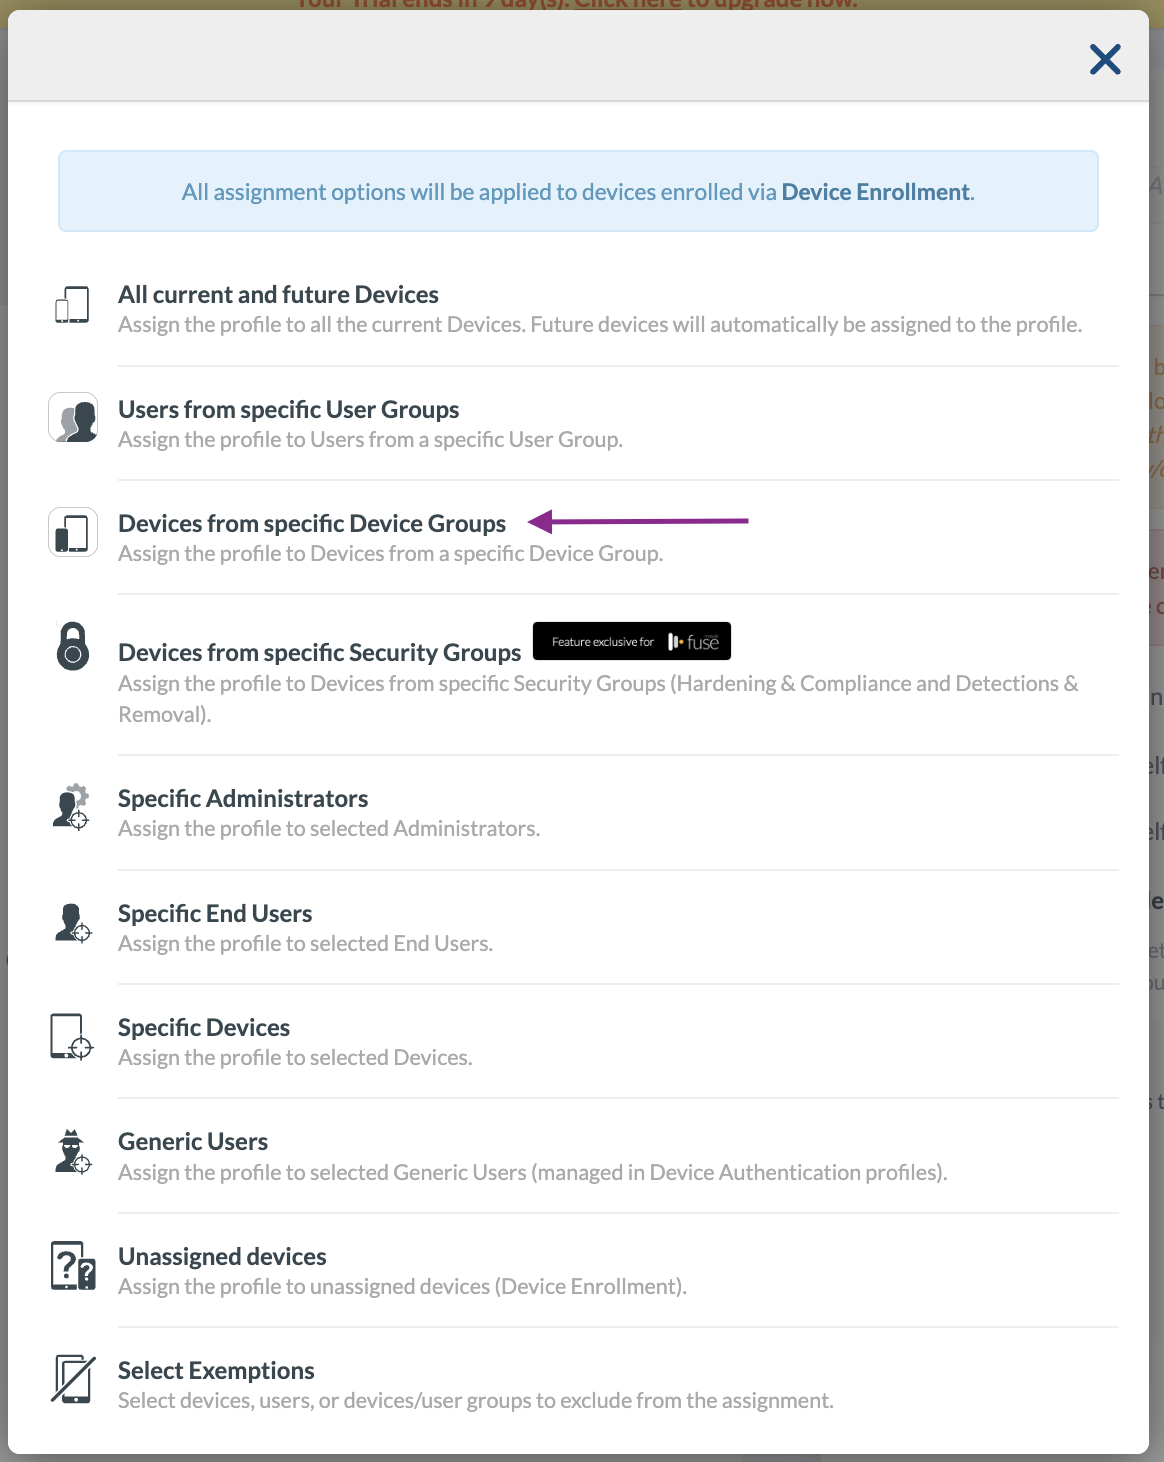
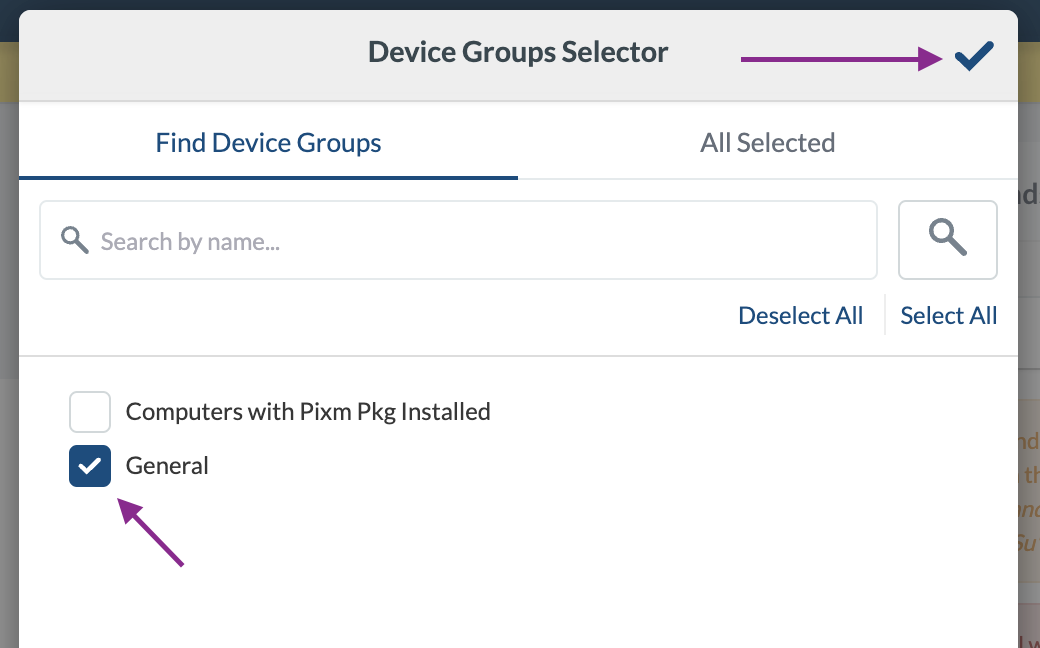
This will open the Device Groups Selector dialog. Here, select any or all groups except the group named "Computers with Pixm Pkg Installed." This group will not contain any Macs because the PixmMacInstaller is being deployed exclusively through this custom command. In this case, we selected the group named "General."
Select the ✔️icon on the top right corner to dismiss this dialog.
Click Save on the Custom Commands panel.
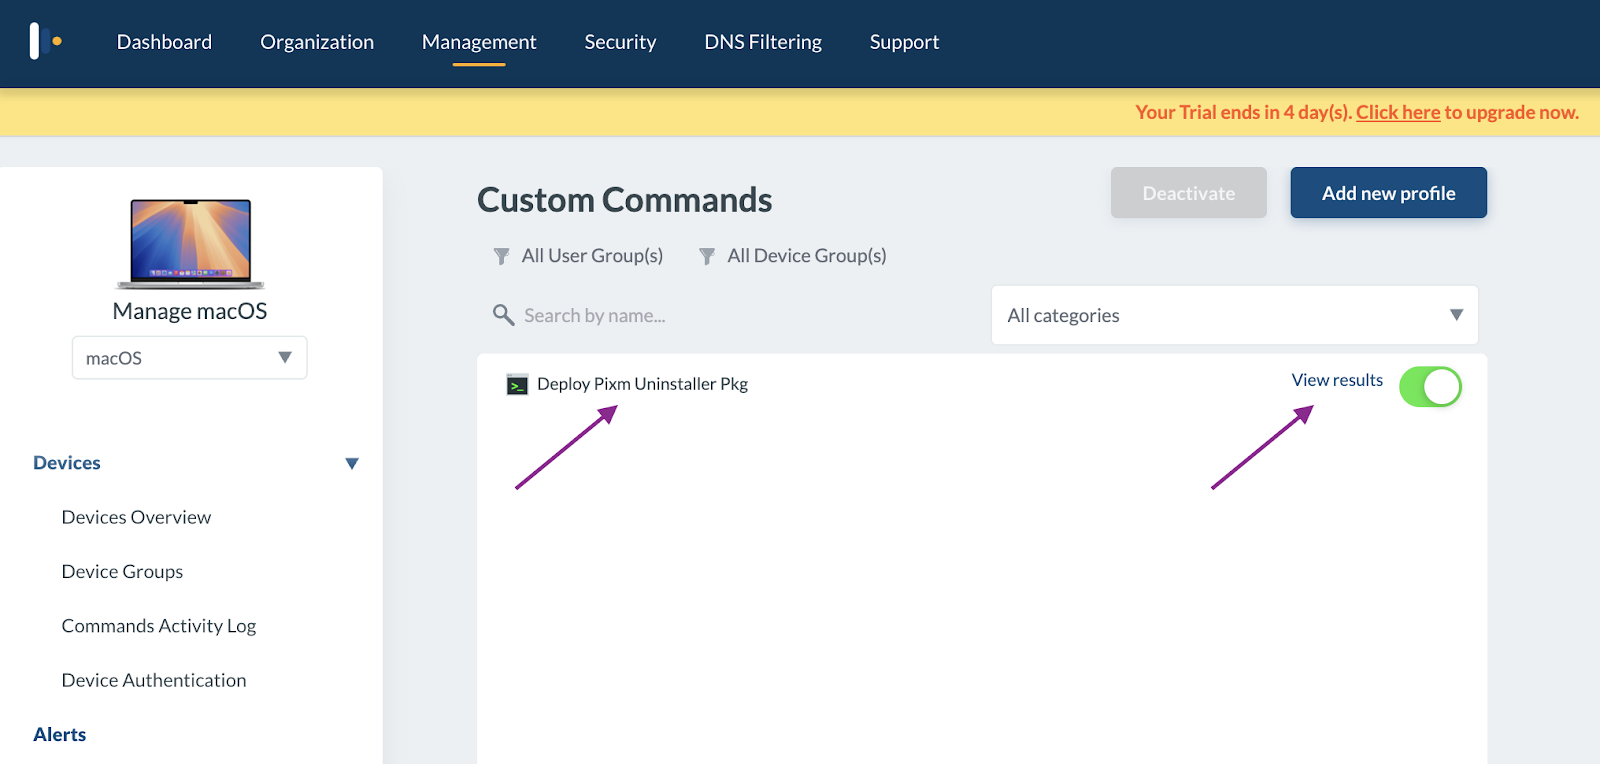
The command “Deploy Pixm Mac Installer Pkg” will now be listed under Custom Commands as shown below. Click the View Results link to check the installation status of the package.
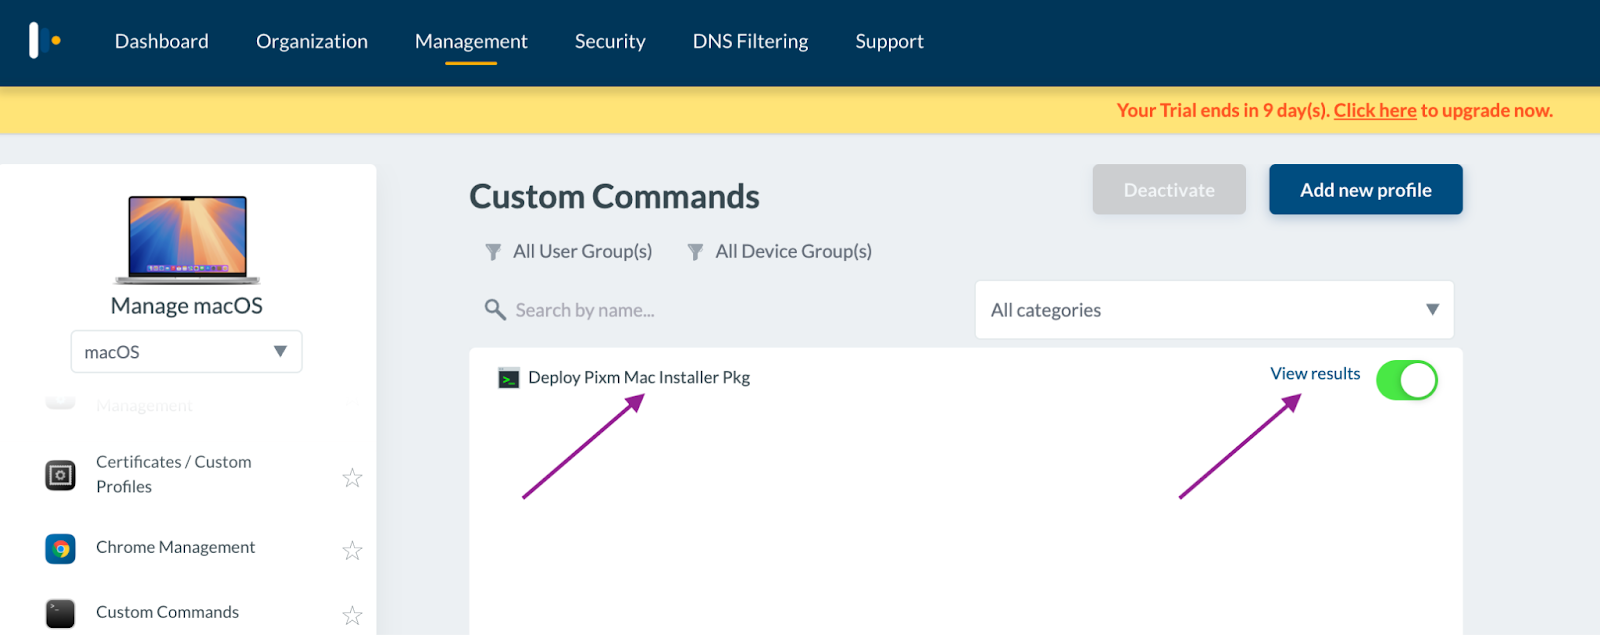
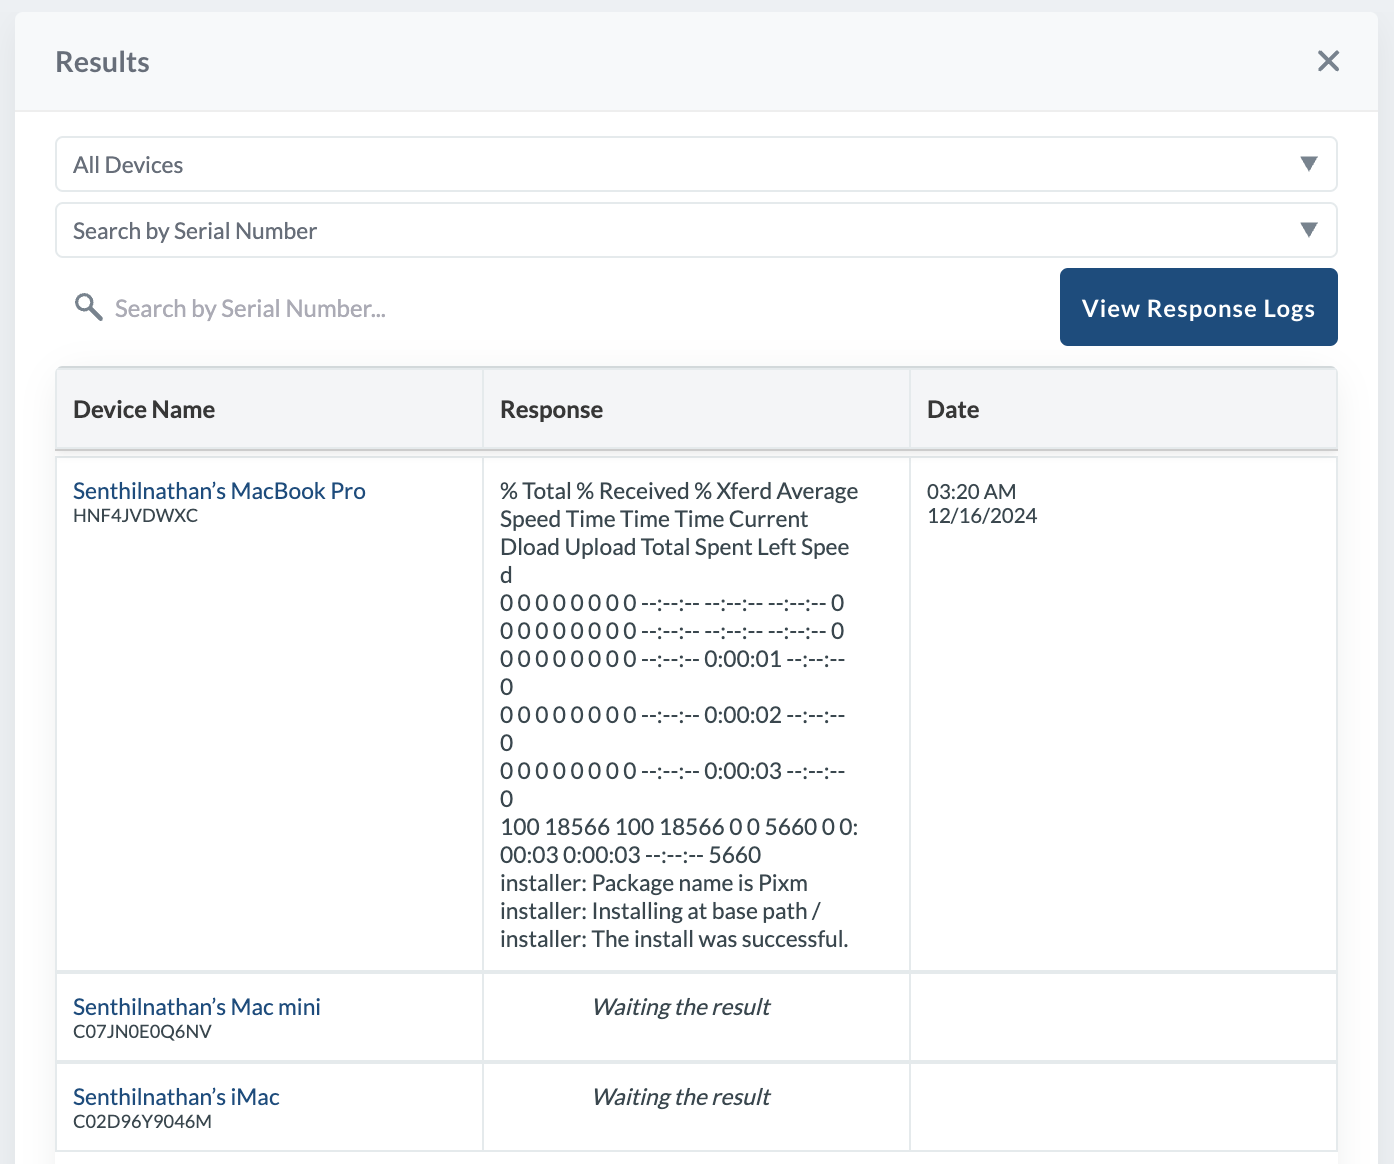
Here is the Results panel, which will open on the right side. The results will be logged for all Macs where the PixmMacInstaller.pkg has been deployed. The message “The install was successful” indicates that the PixmMacInstaller.pkg has been successfully deployed and executed on the Macs.
You don’t need to clear the response results. Clearing the logs will cause the deployment command to be resent unnecessarily.

Deploying Pixm Chrome Browser Extension
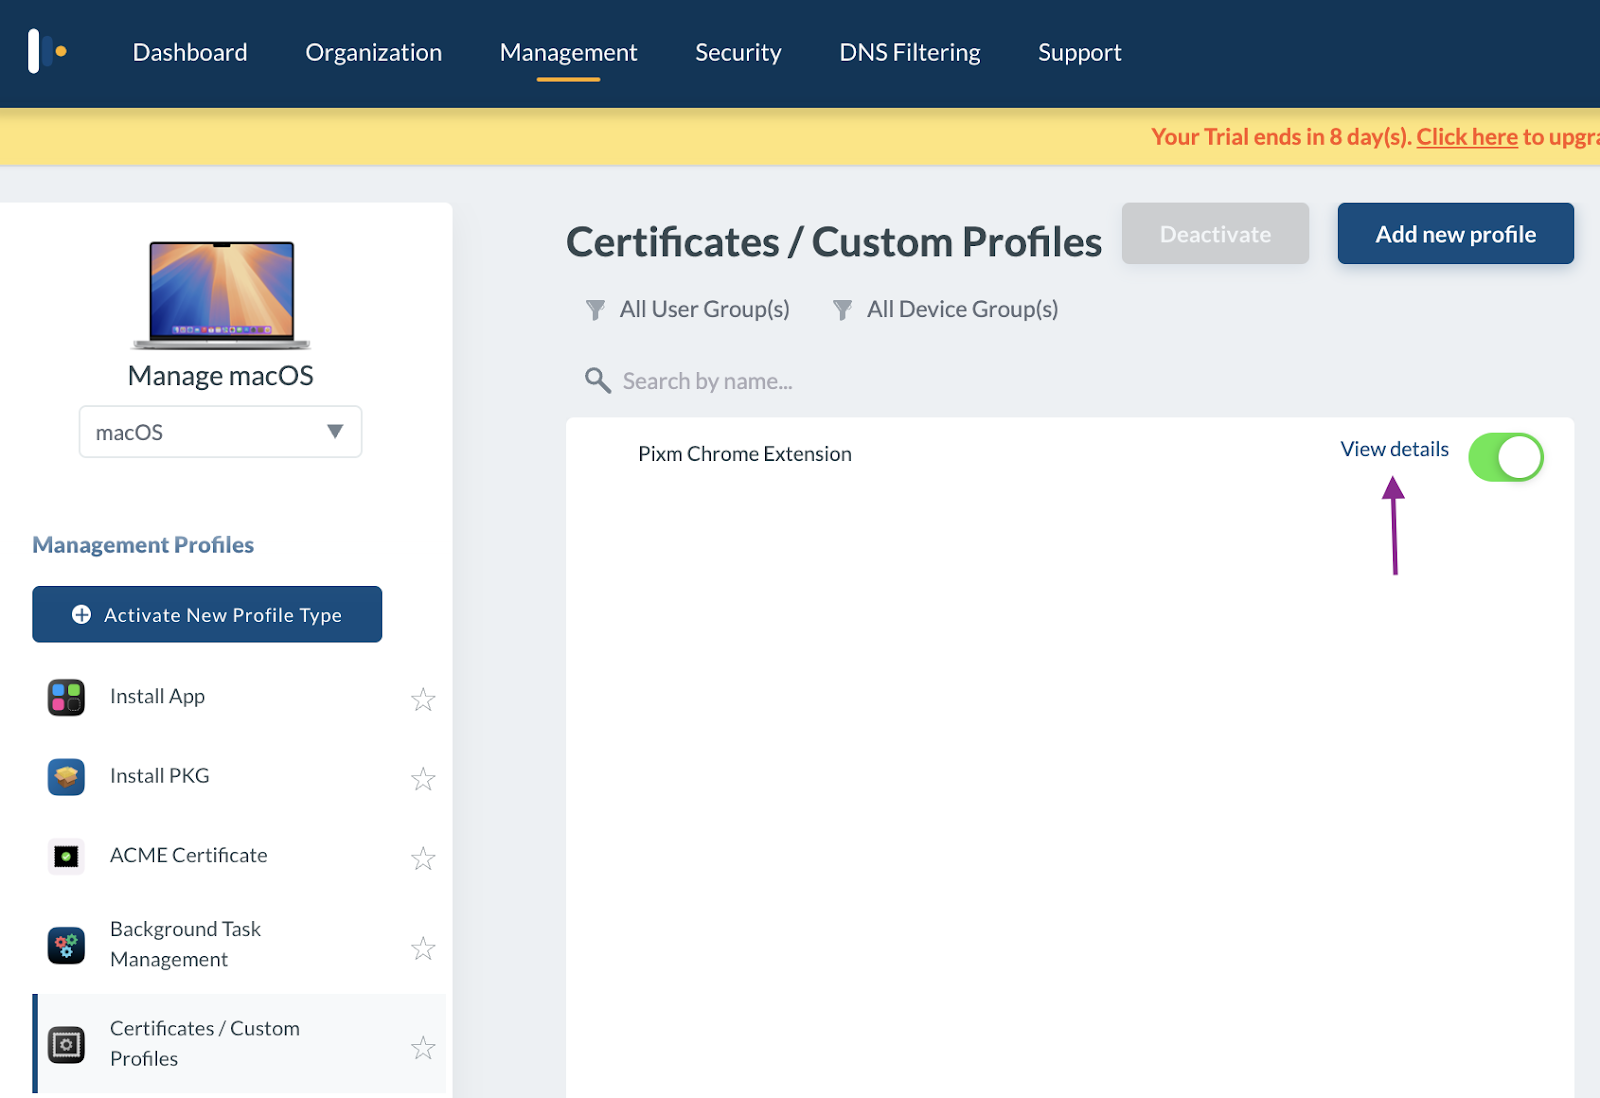
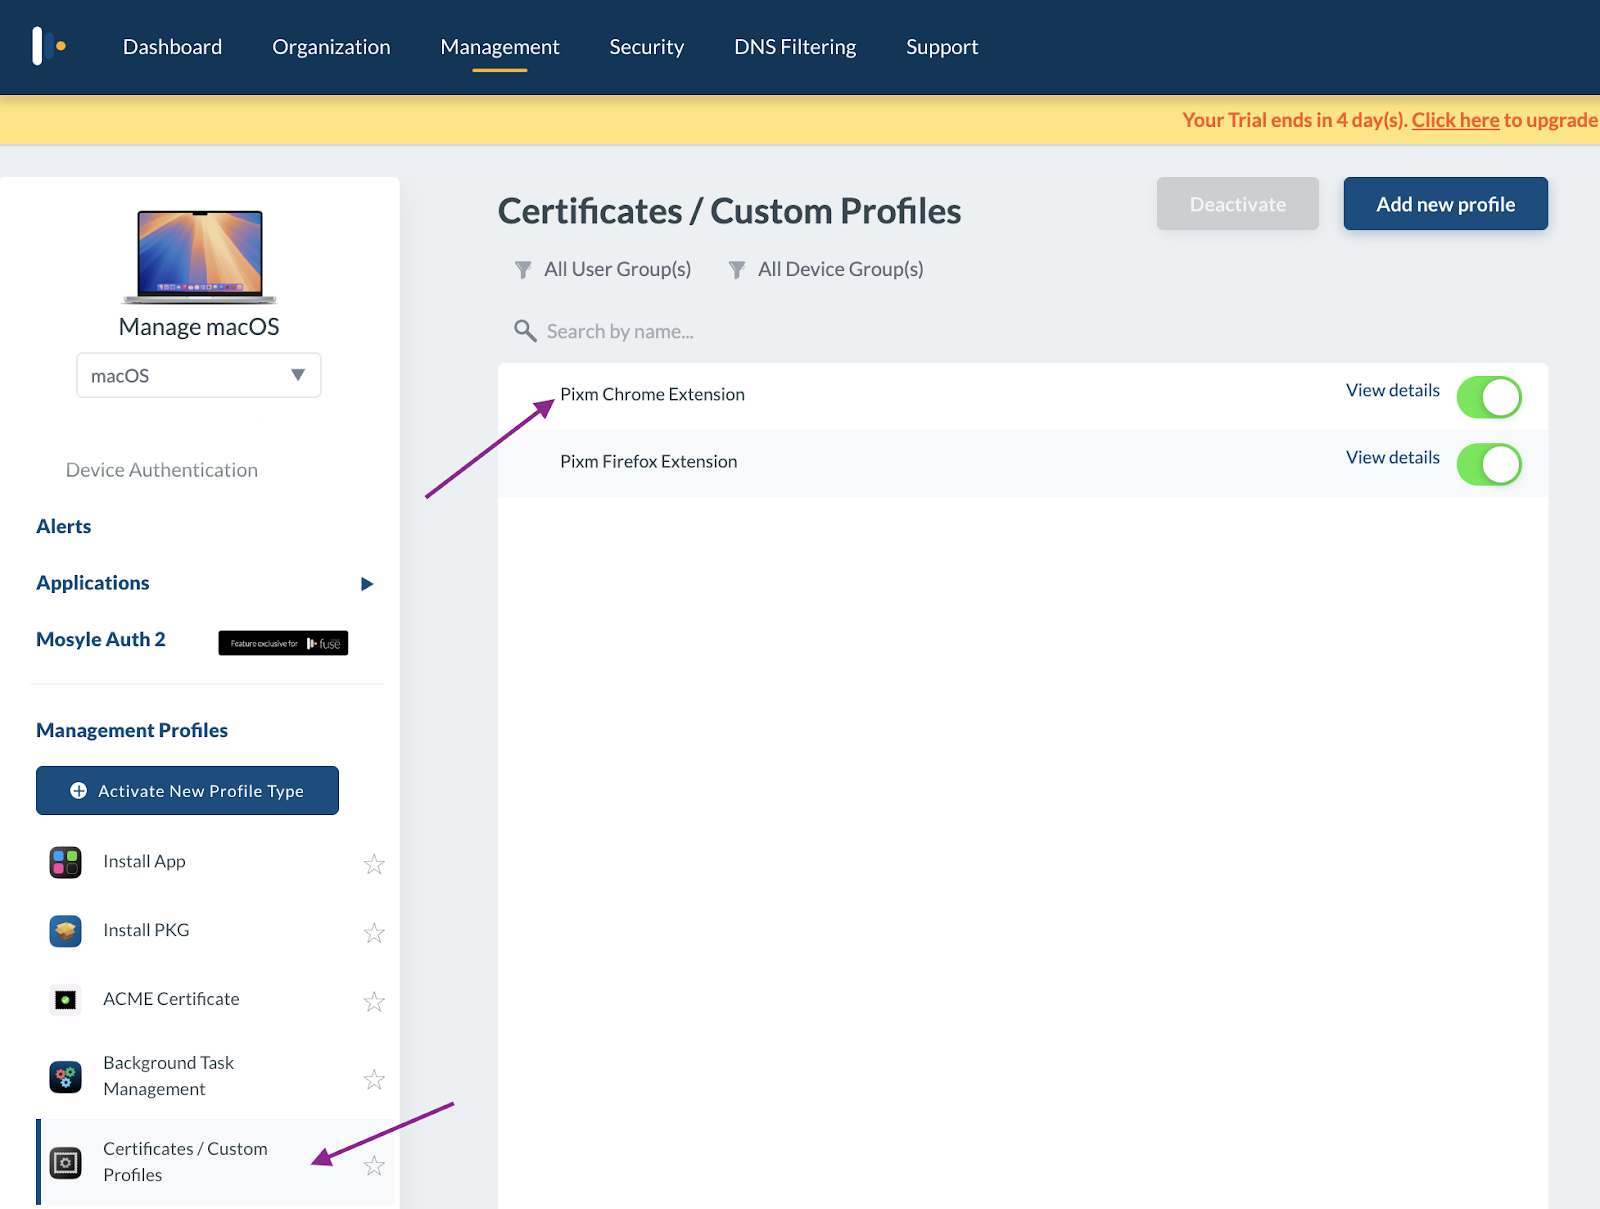
This section guides you through deploying the Pixm Chrome browser extension. On the Management page, click Certificates / Custom Profiles under Management Profiles in the left panel, then click Add new profile.

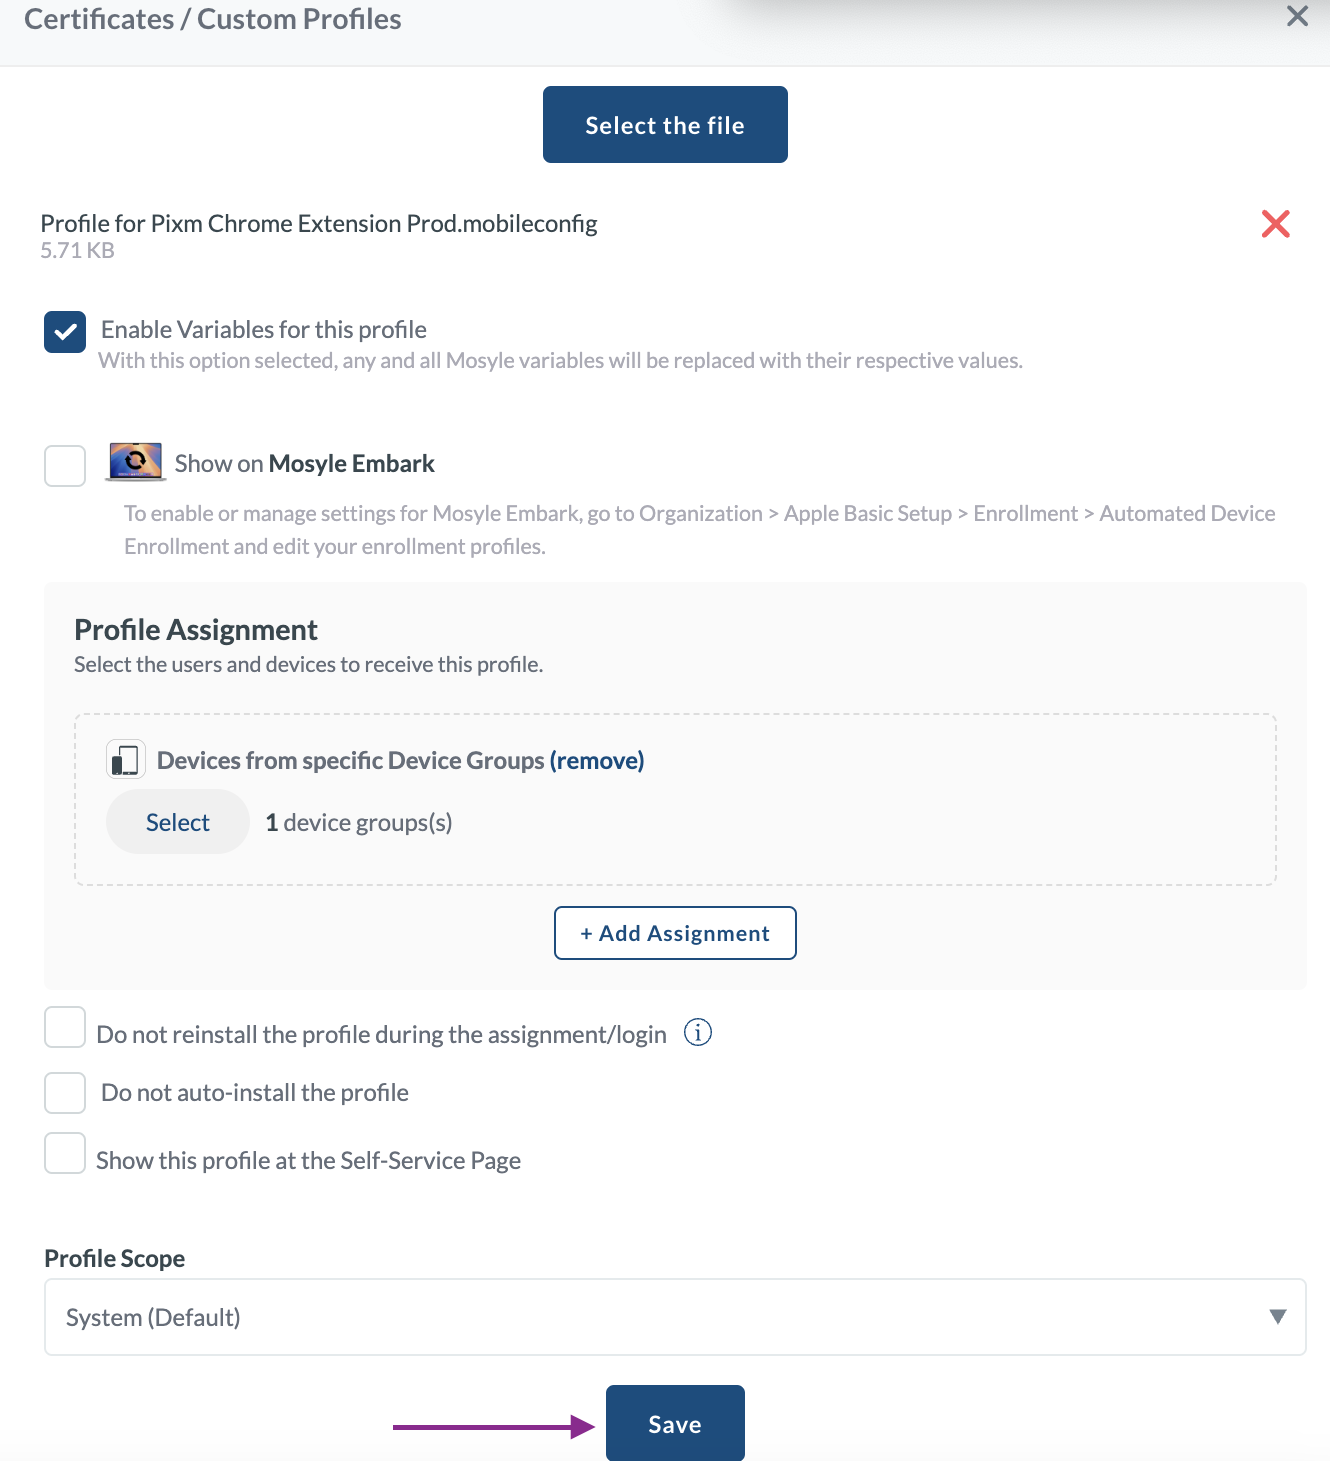
The Certificates / Custom Profiles panel will open on the right side. Enter Pixm Chrome Extension as the Profile Name. Click Select the file.
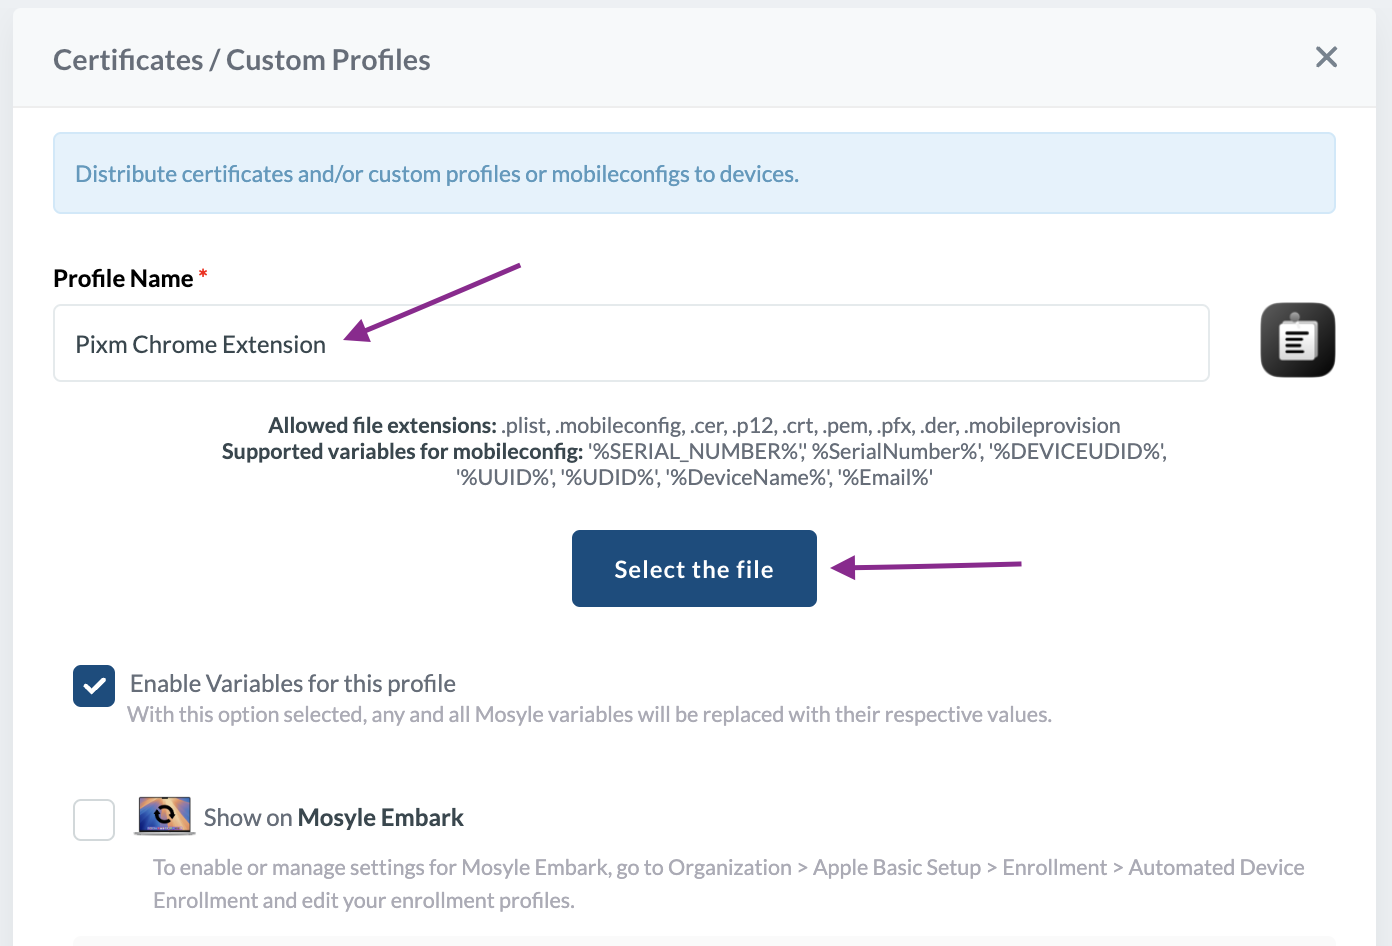
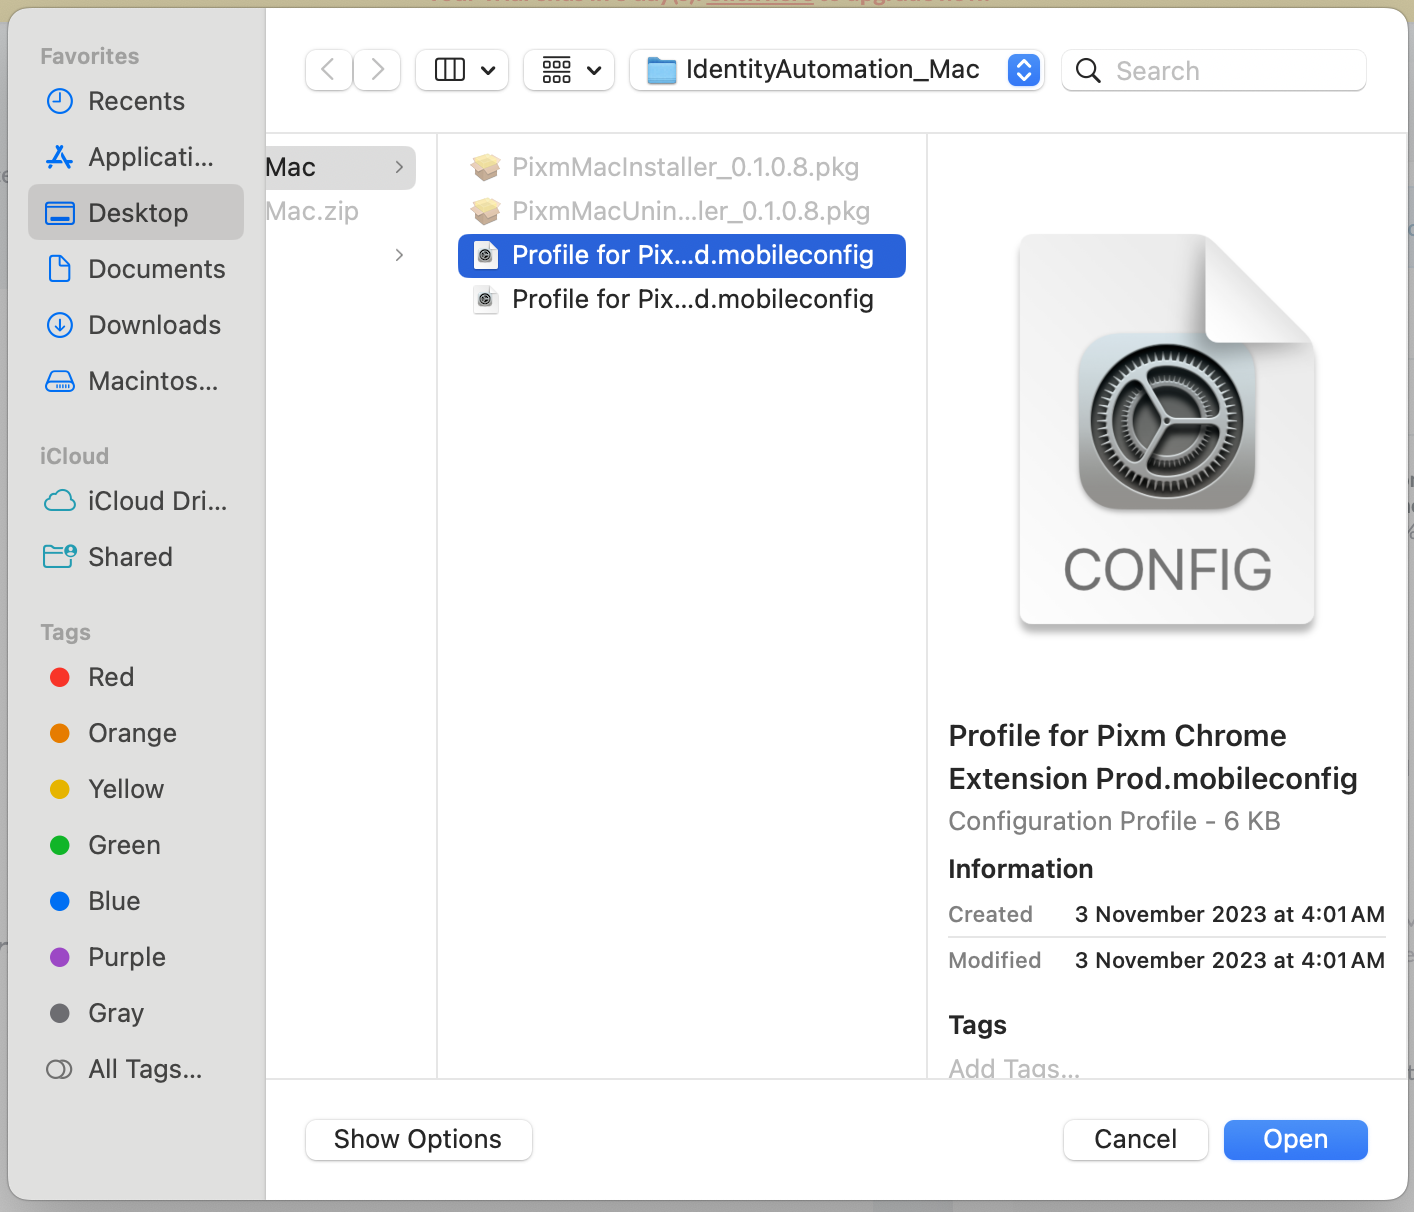
Browse to the folder containing the file “Profile for Pixm Chrome Extension Prod.mobileconfig”, select it, and click Open.
Click Add Assignment to open the device assignment dialog.
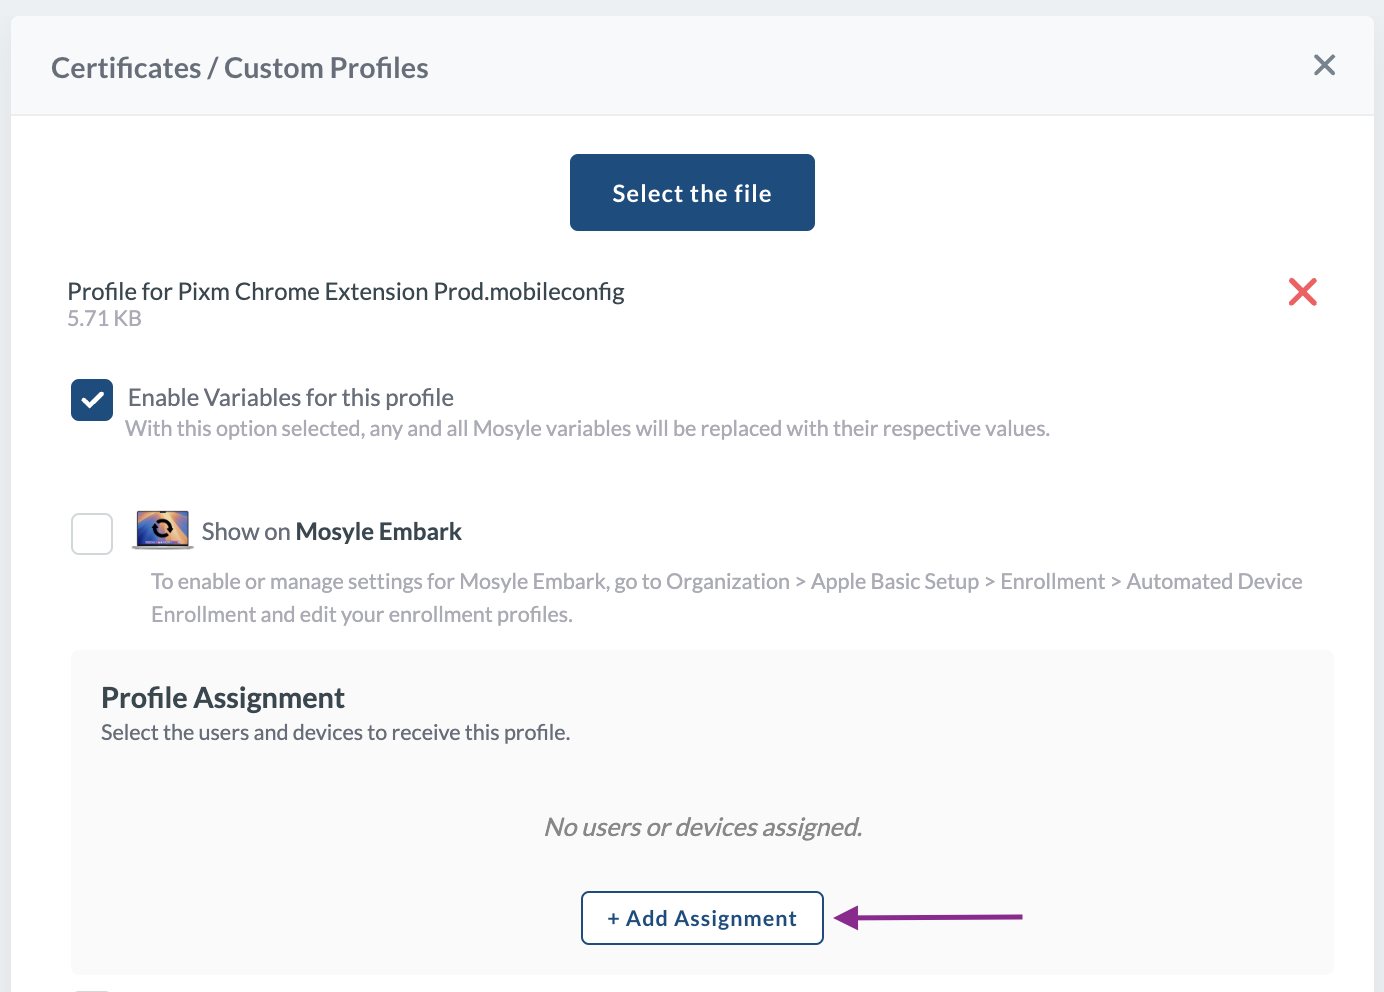
Select “Devices from specific Device Groups”.
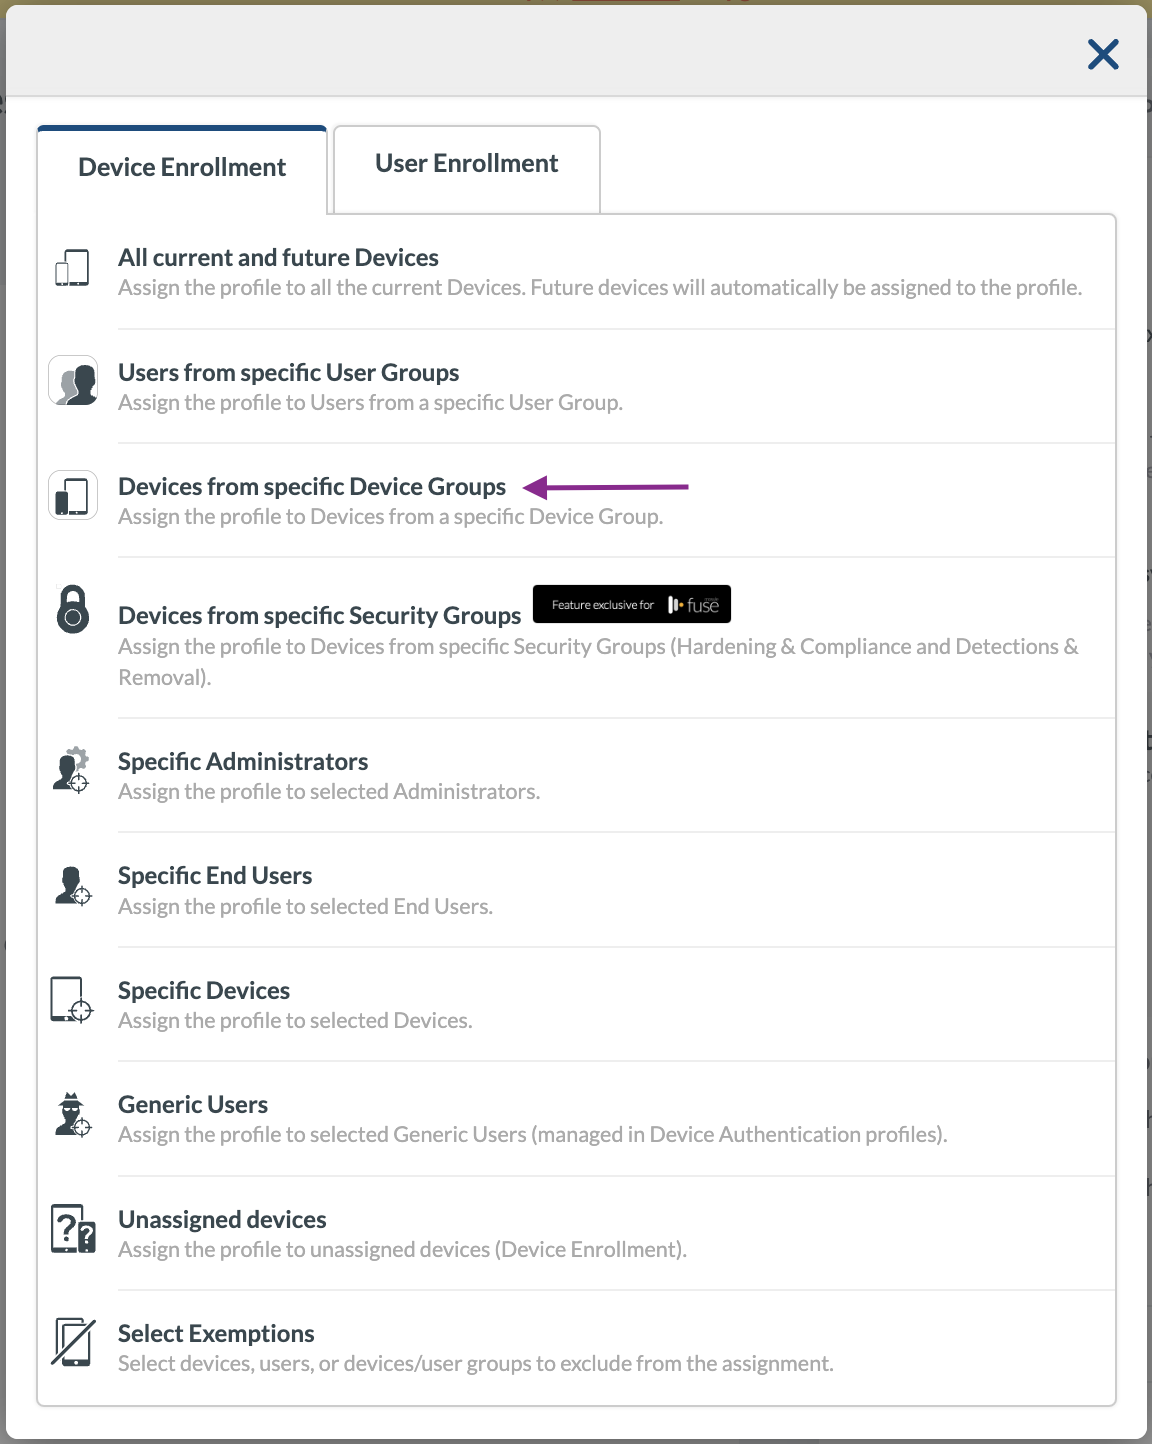
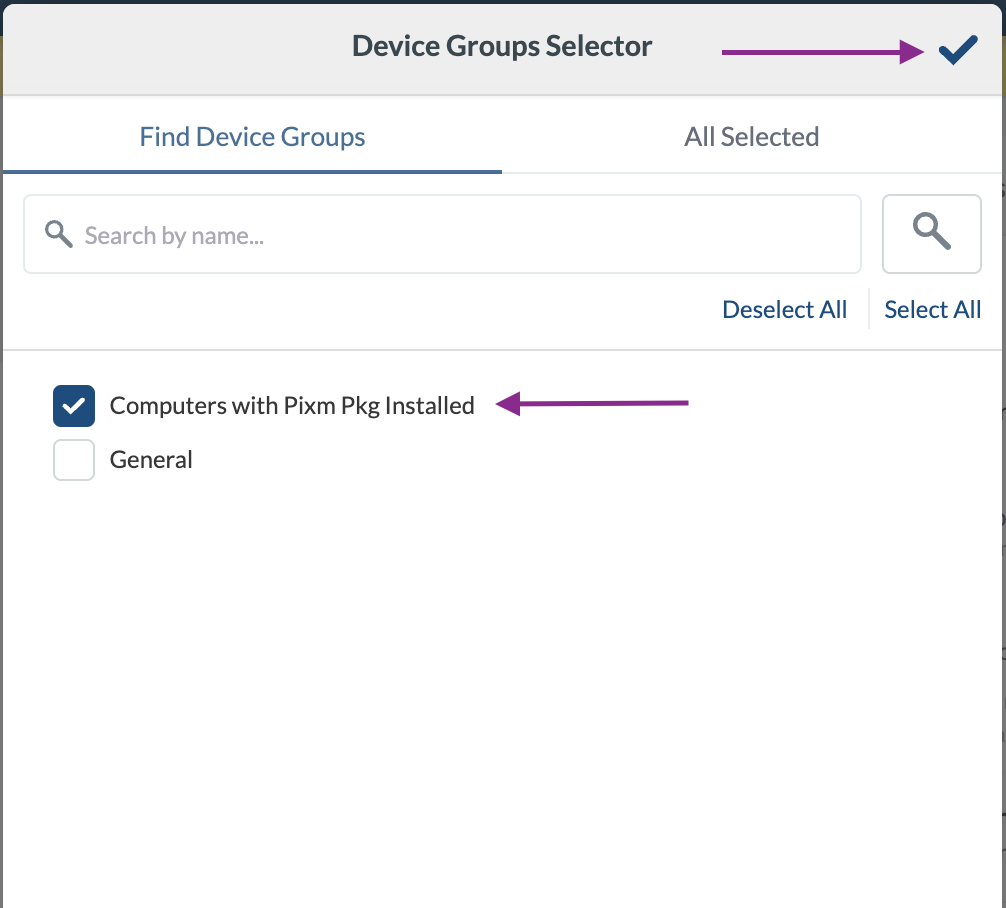
In the Device Groups Selector dialog, locate the custom device group “Computers with Pixm Pkg Installed”, select it, and click the ✔ icon to close the dialog. Please do not select any other groups.
Click Save. This will deploy the profile to the custom device group targets.
You can check the status of the profile deployment by clicking the View Details link.
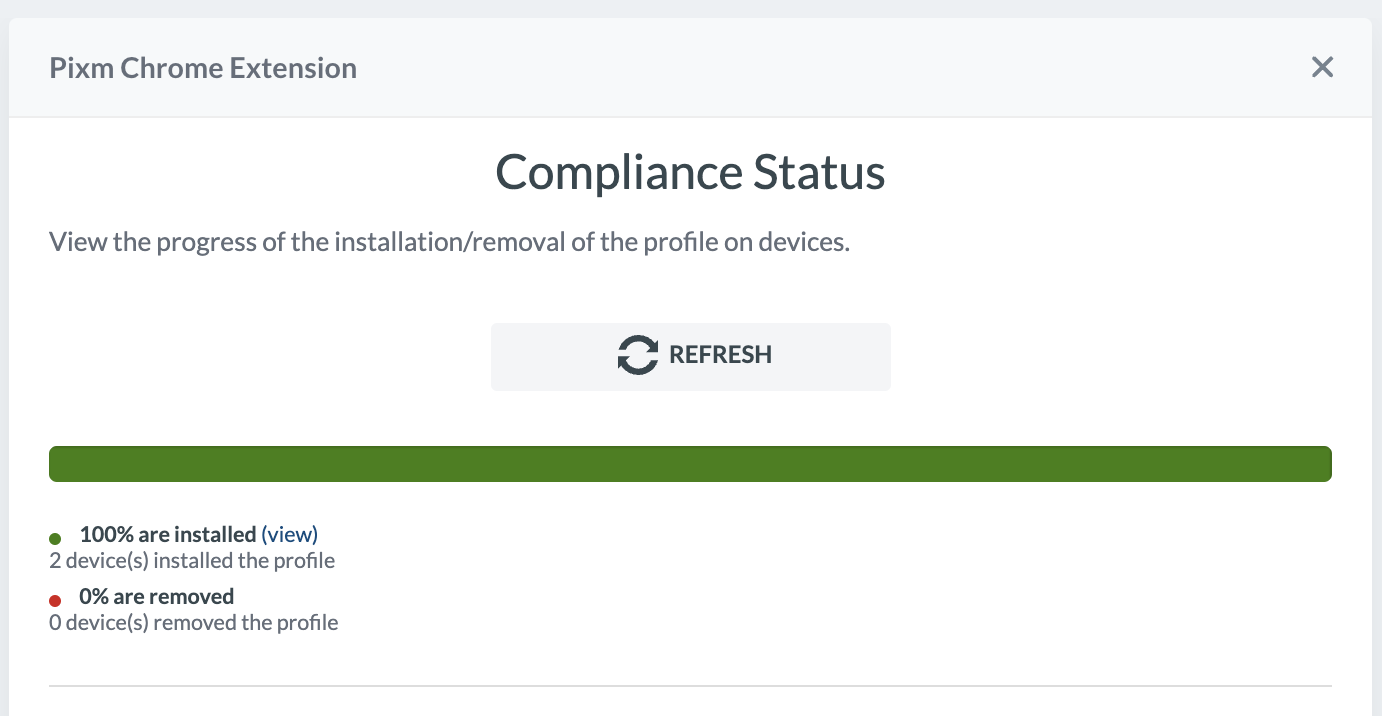
(Optional) After the profile is deployed to Chrome on a Mac, you can optionally validate the deployment on the device.
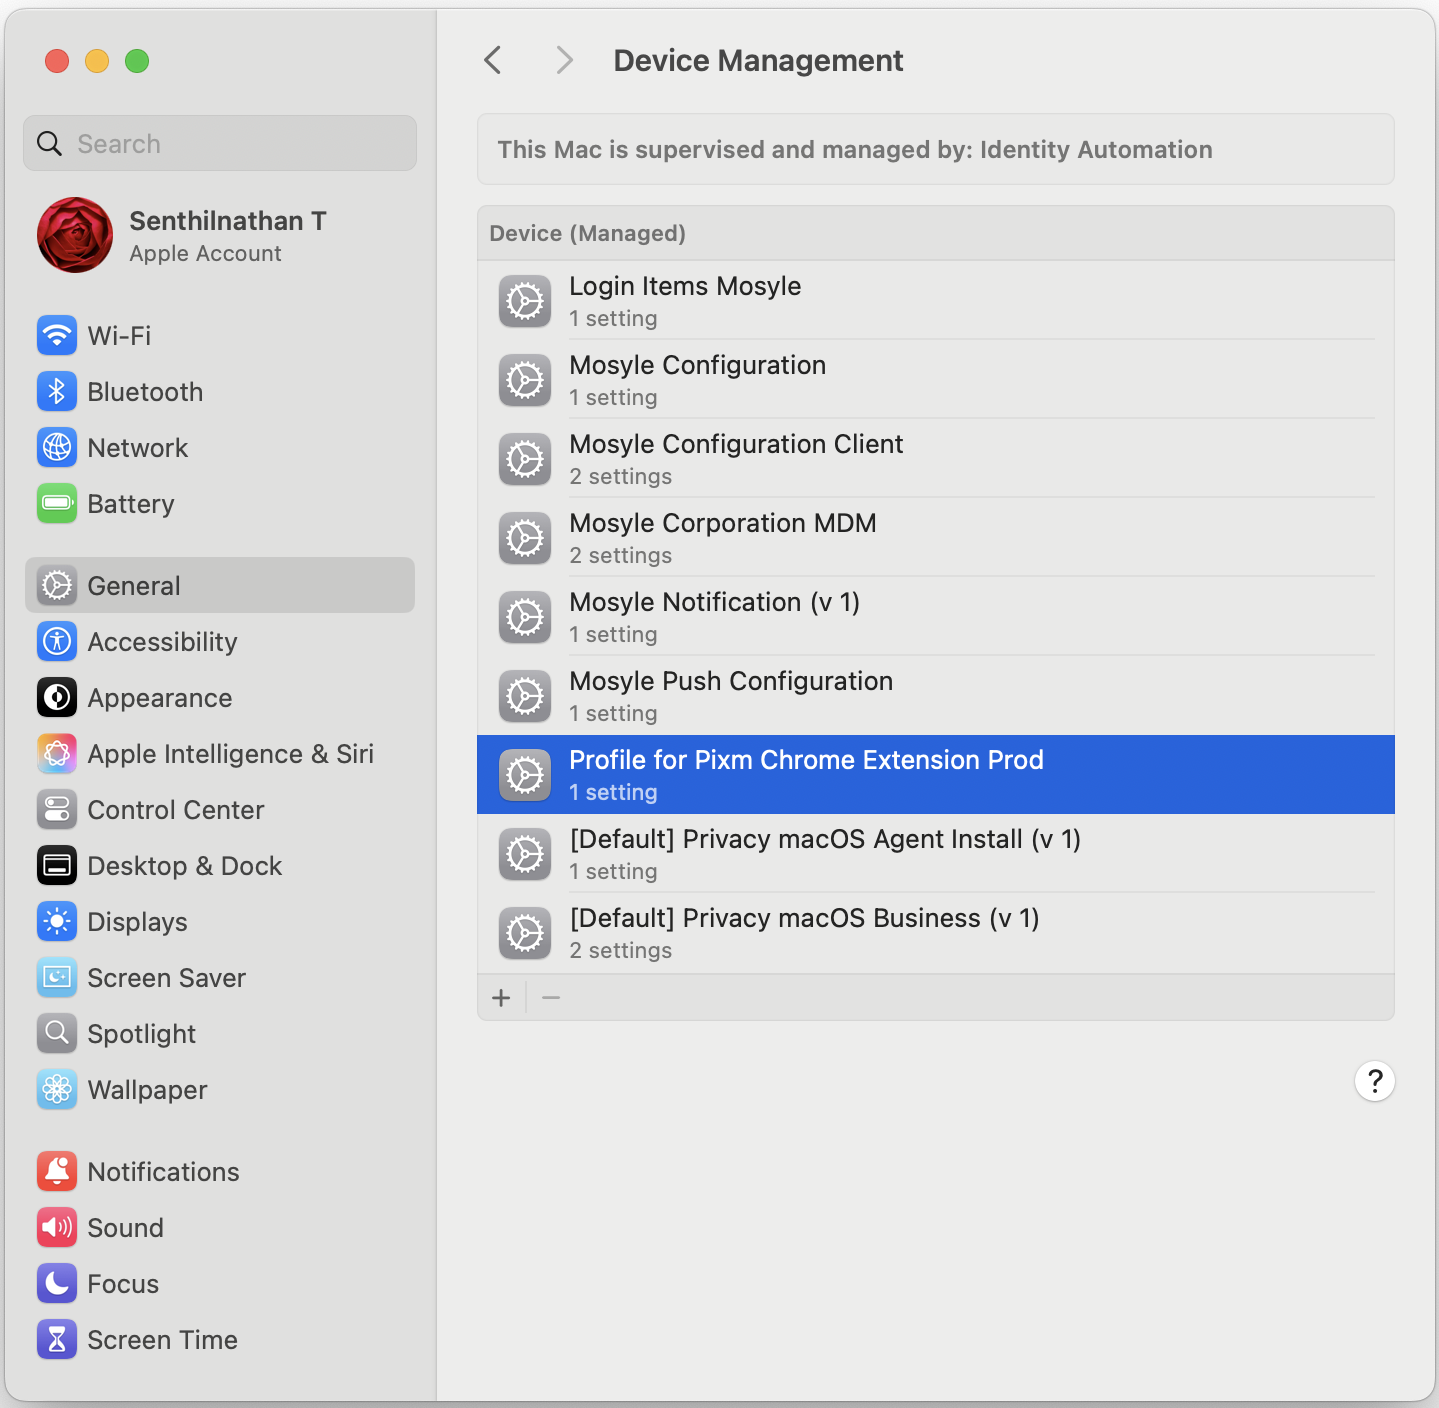
For macOS versions below Sequoia, the profile should appear in System Settings → Privacy & Security → Profiles.
For macOS Sequoia, the profile should appear in System Settings → General → Device Management.
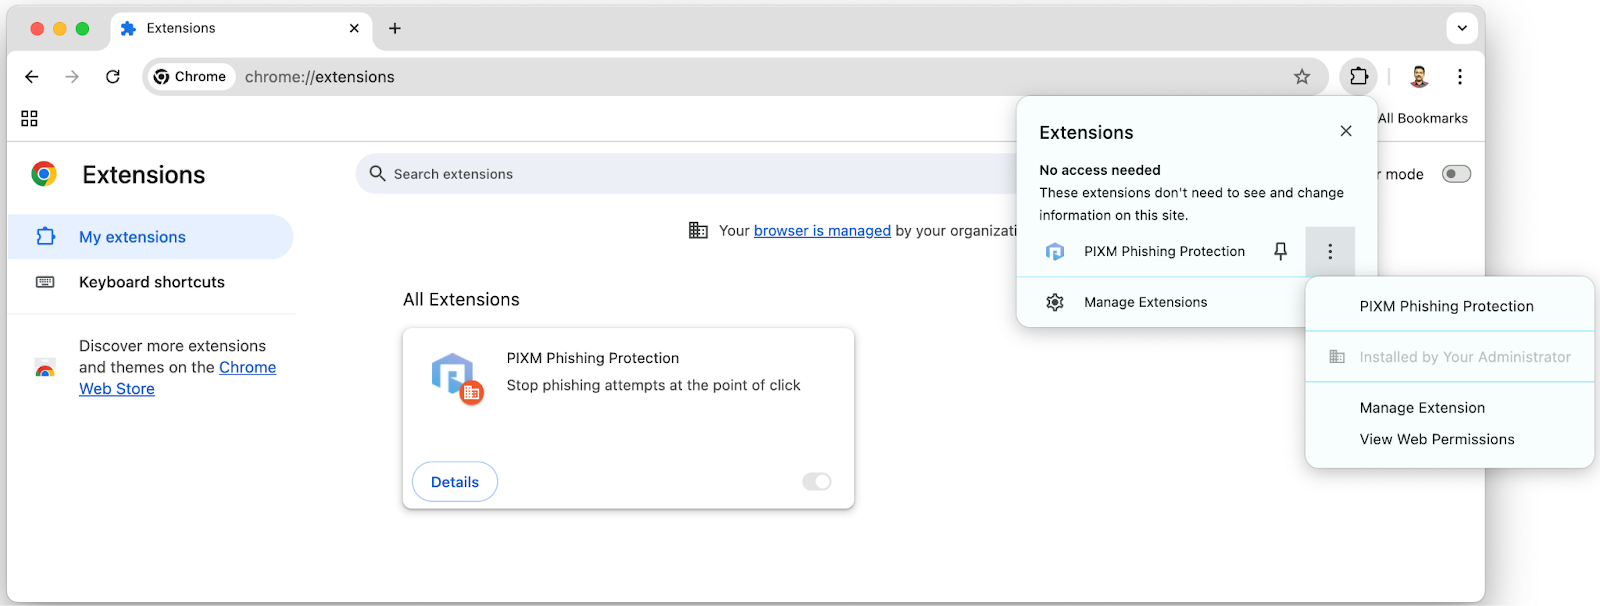
(Optional) To further validate the deployment, restart or open the Chrome browser. The blue hexagon Pixm extension icon should appear in the top-right corner of the browser. If it's not immediately visible, click the puzzle icon to locate it.
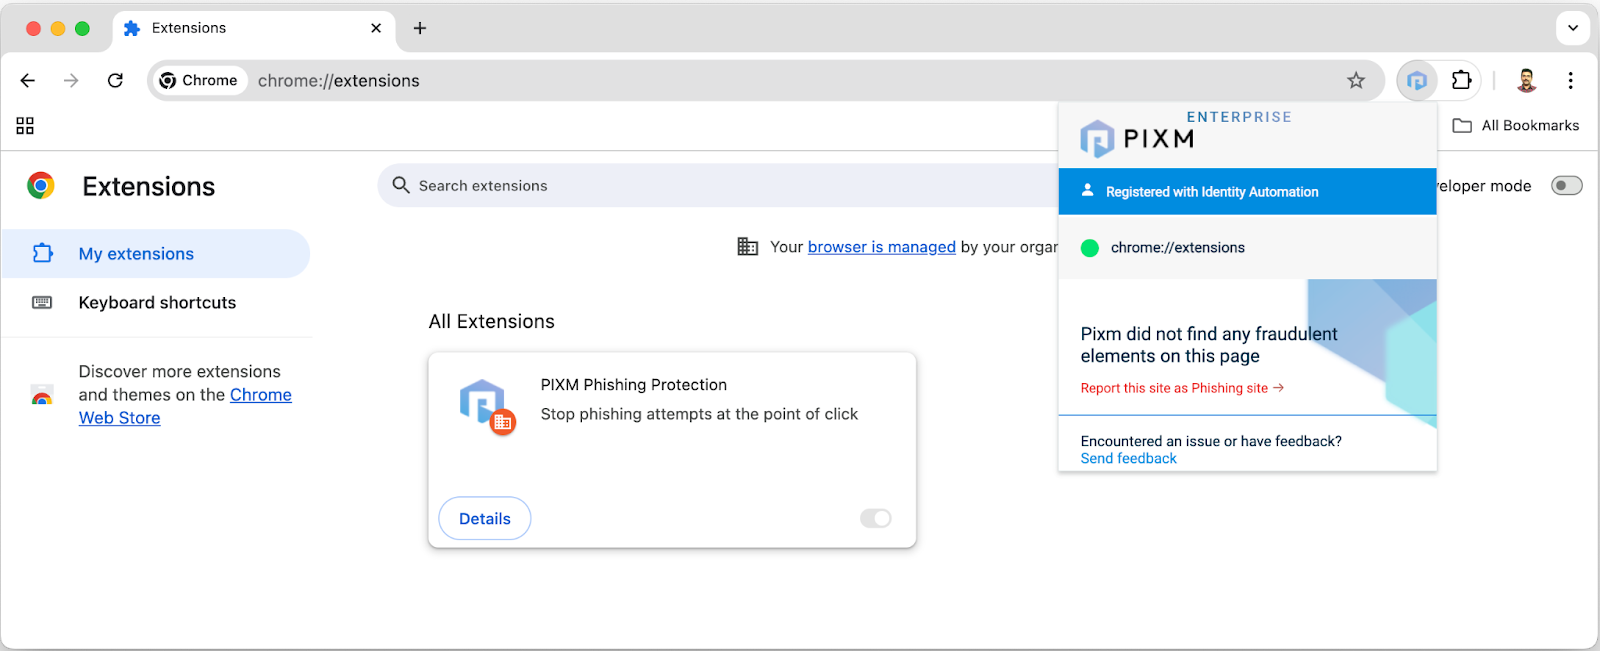
Click the extension icon to confirm that it is registered with the appropriate organization.
Deploying Pixm Firefox browser extension
The steps for deploying Pixm Firefox Browser extension are exactly the same as the steps in the Chrome section. The only change is that the “Profile for Pixm Firefox Extension Prod” file will be used instead.
Deploying Pixm Safari browser extension
Admins should be aware before proceeding: due to Apple’s Systems Integrity Protocol, completing Safari extension deployment will require consent steps from end users. This section covers those consent steps at the end.
Deploying the Pixm Safari extension on Mosyle requires access to an Apple Business Manager (or Apple School Manager) account and adding the Volume Purchase Program (VPP) token to your organization’s Mosyle account. Before proceeding, ensure these requirements are met.
For this demonstration, we used the Pixm Inc’s Apple Business Manager account as an example.
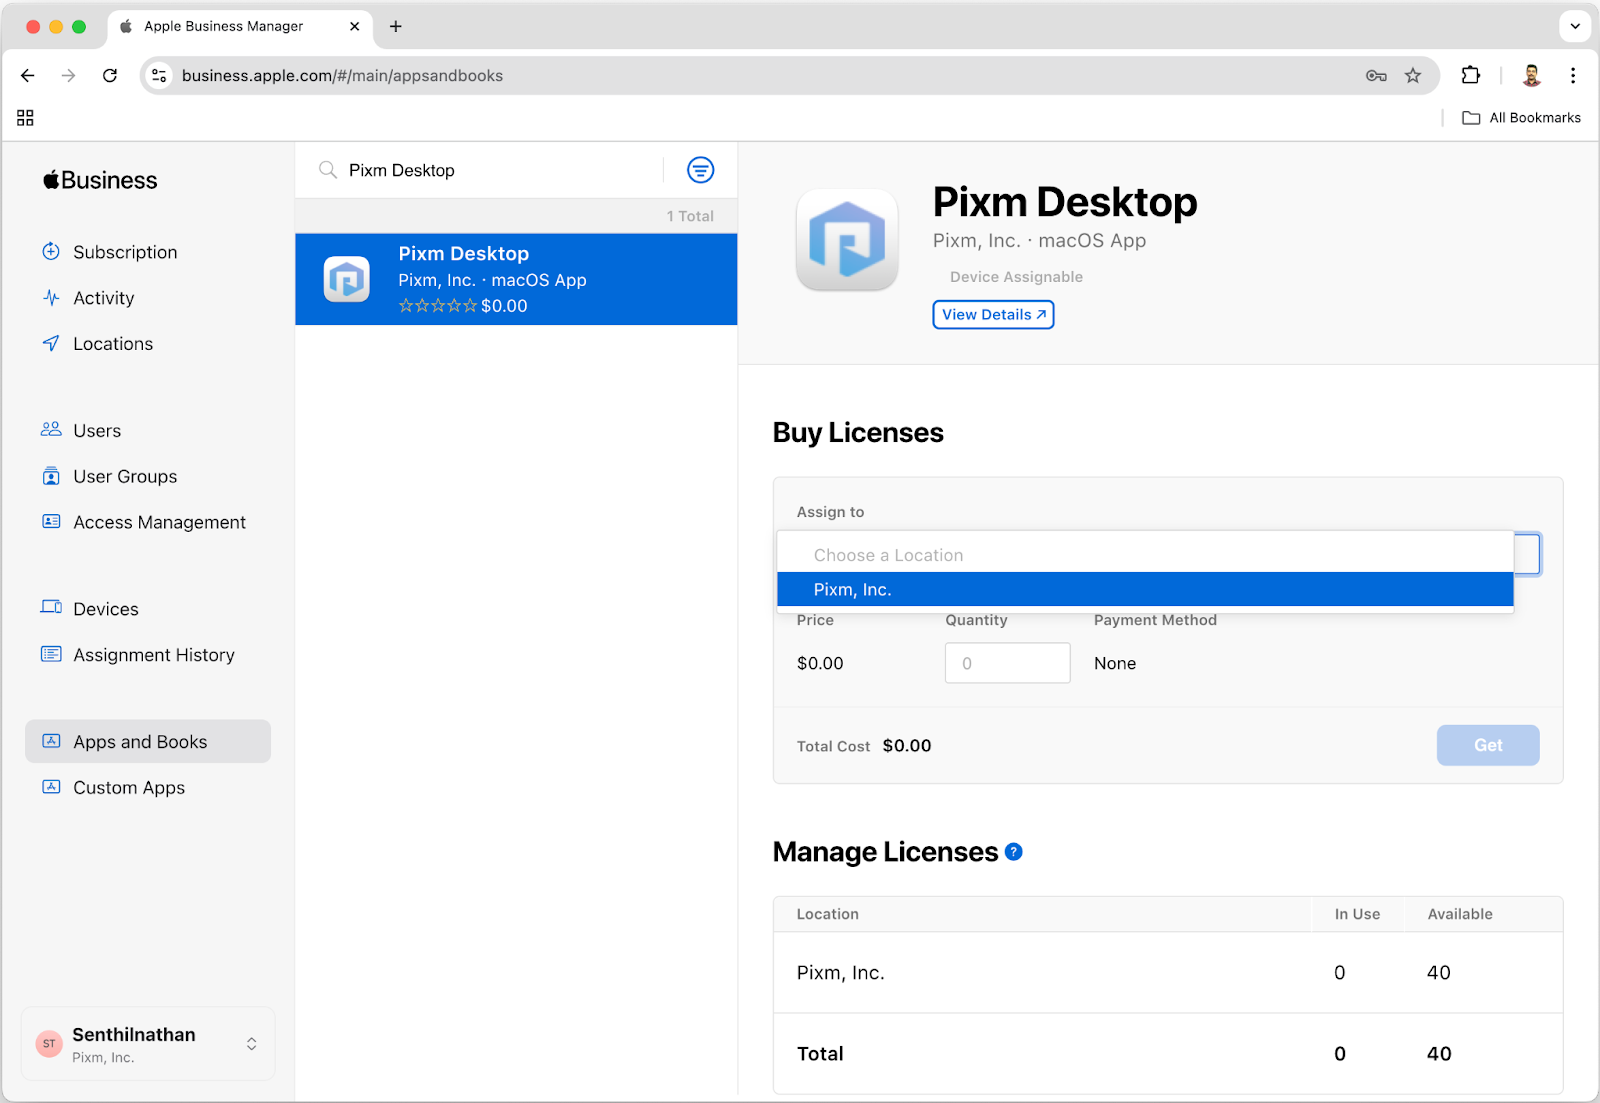
Log in to Apple Business Manager at https://business.apple.com, then click on the Apps and Books option in the left panel. Search for Pixm Desktop, and the app will appear in the list.
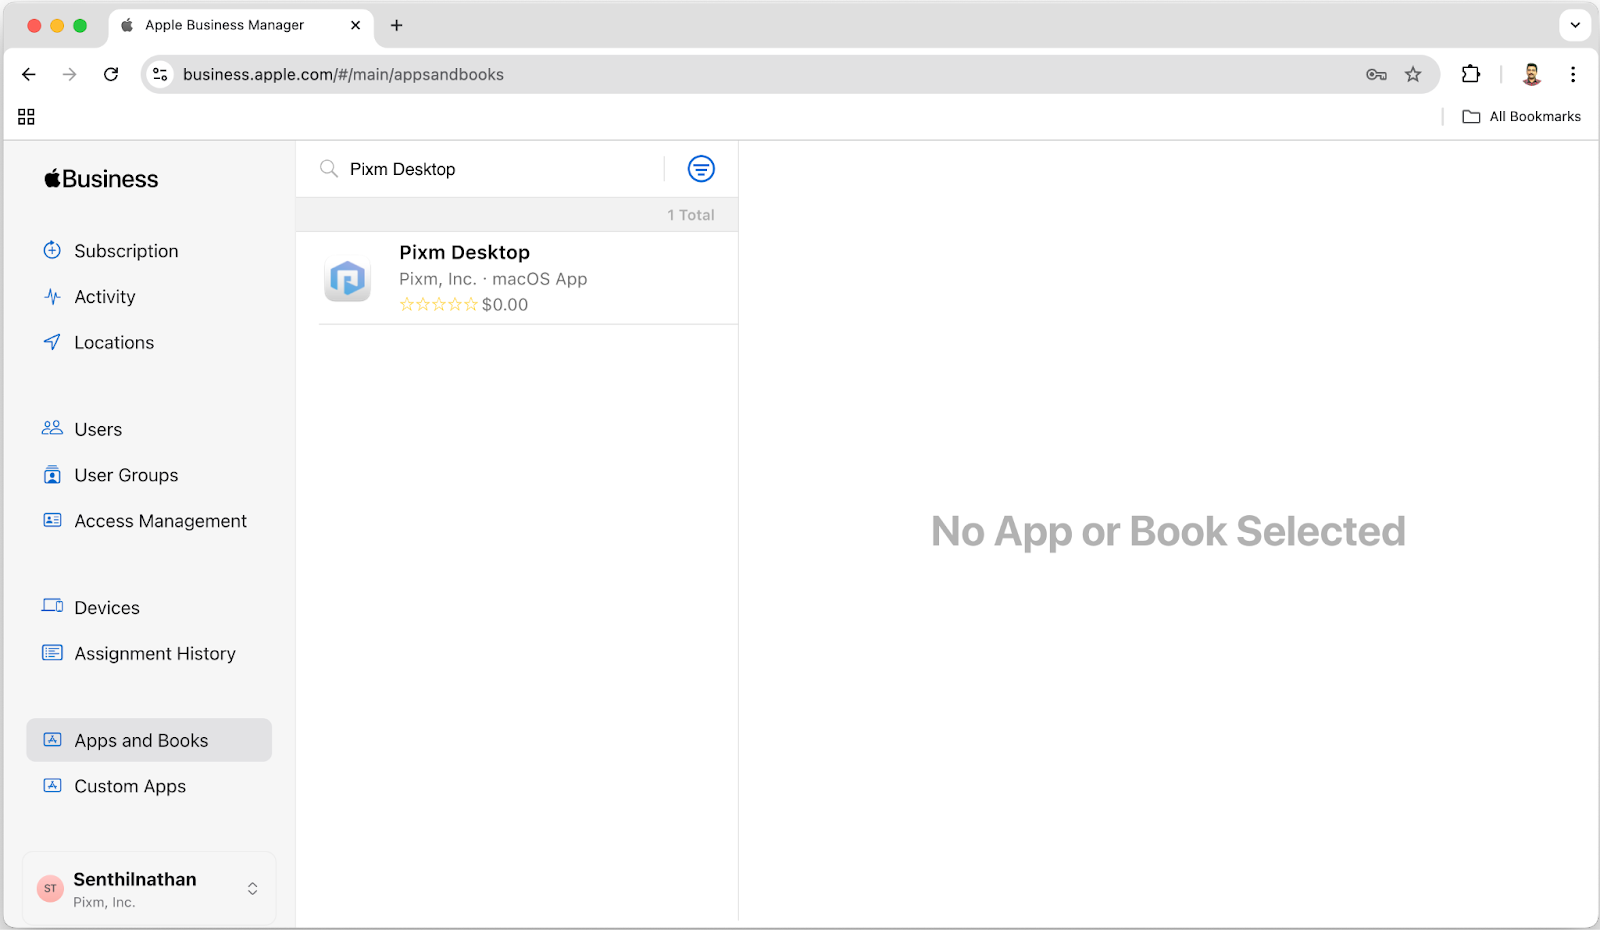
Select the Pixm Desktop app, and in the panel on the right, choose your Organization name (here Pixm, Inc.) In the Quantity text box, enter the total number of Mac devices to which you wish to deploy the app.
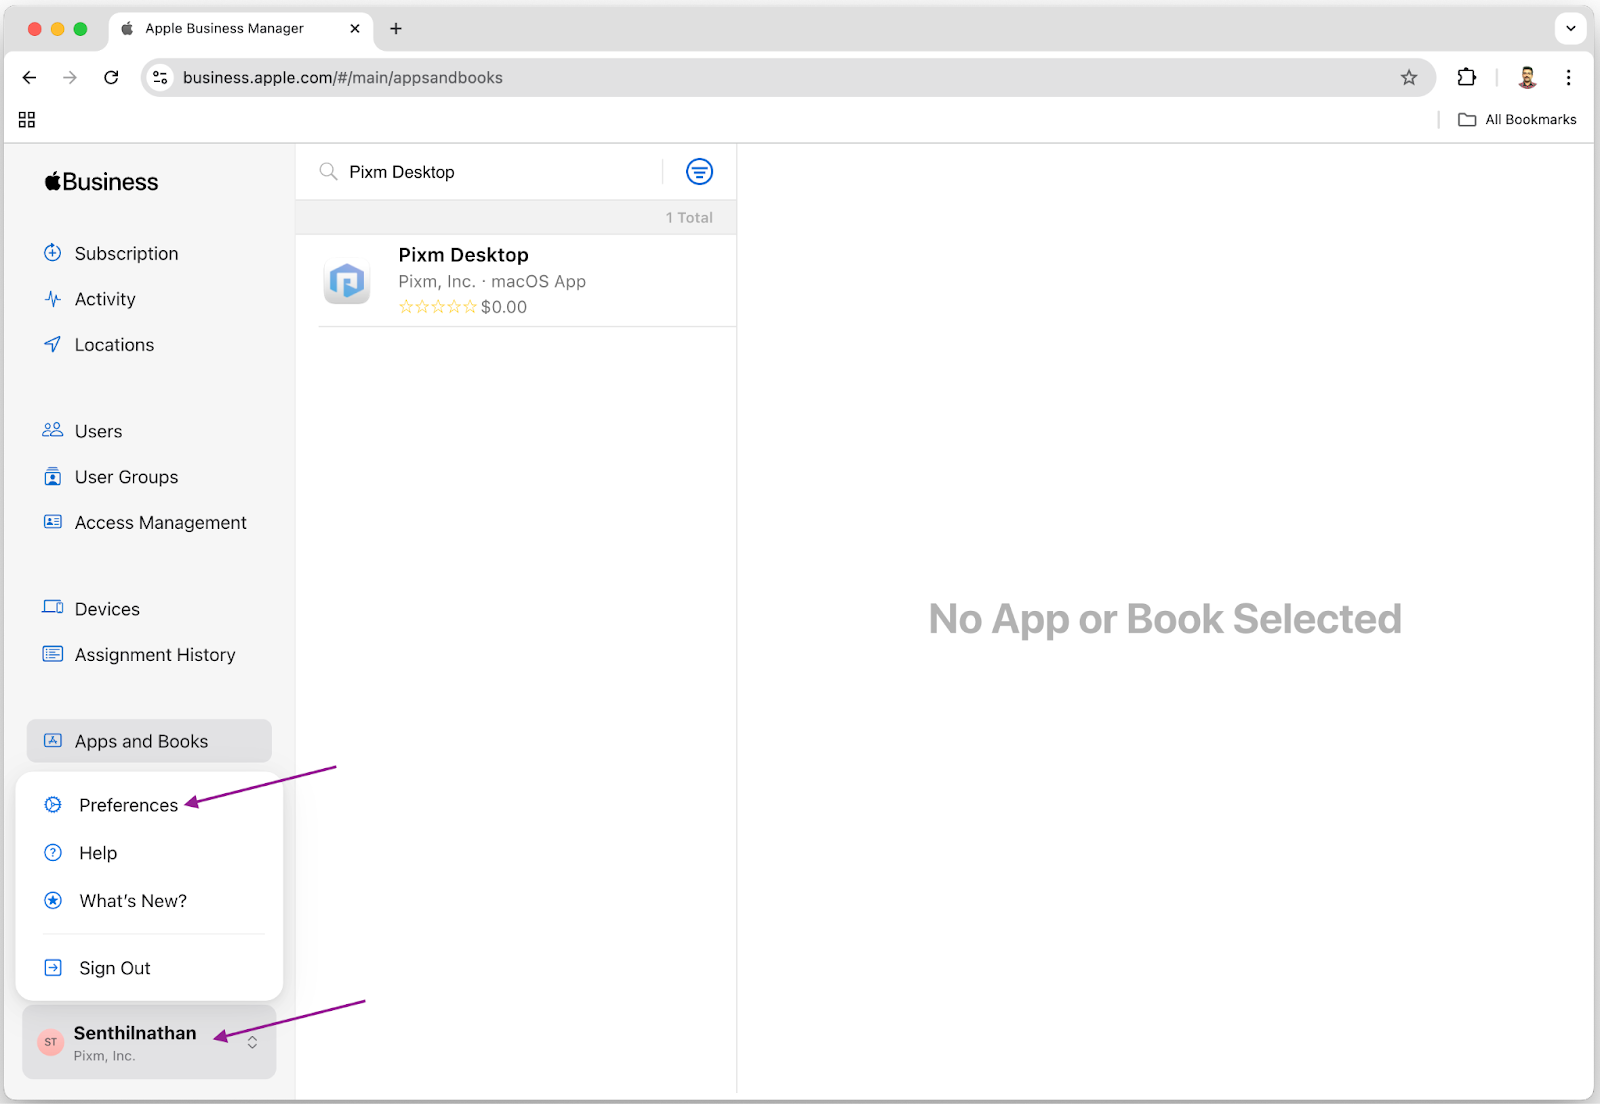
Next, add the VPP token from your Apple Business Manager account to your Mosyle account. Click your name in the bottom-left corner of the Apple Business Manager page, then select the Preferences option from the menu.
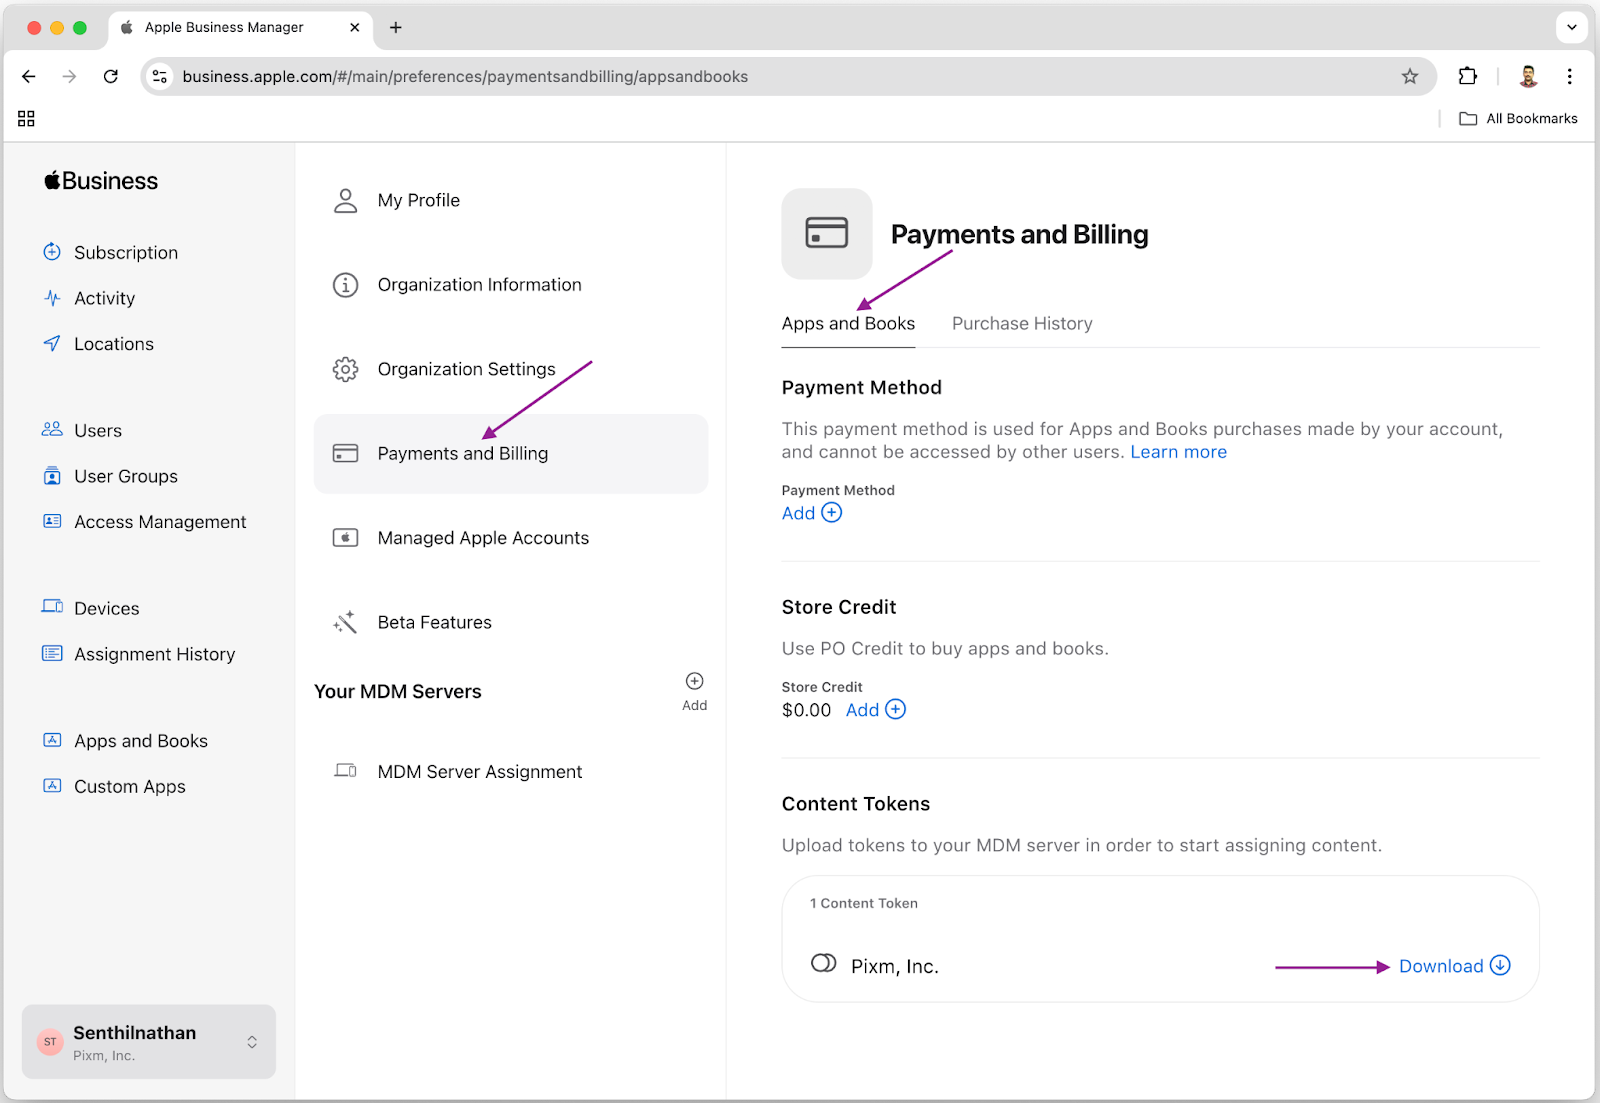
Select Payments and Billing, then navigate to the Apps and Books tab. Scroll to the bottom to find your organization’s Content Token, and click Download.
A file with the extension .vpptoken will be downloaded. This is your Volume Purchase Program (VPP) token, which you need to add to your Mosyle account.
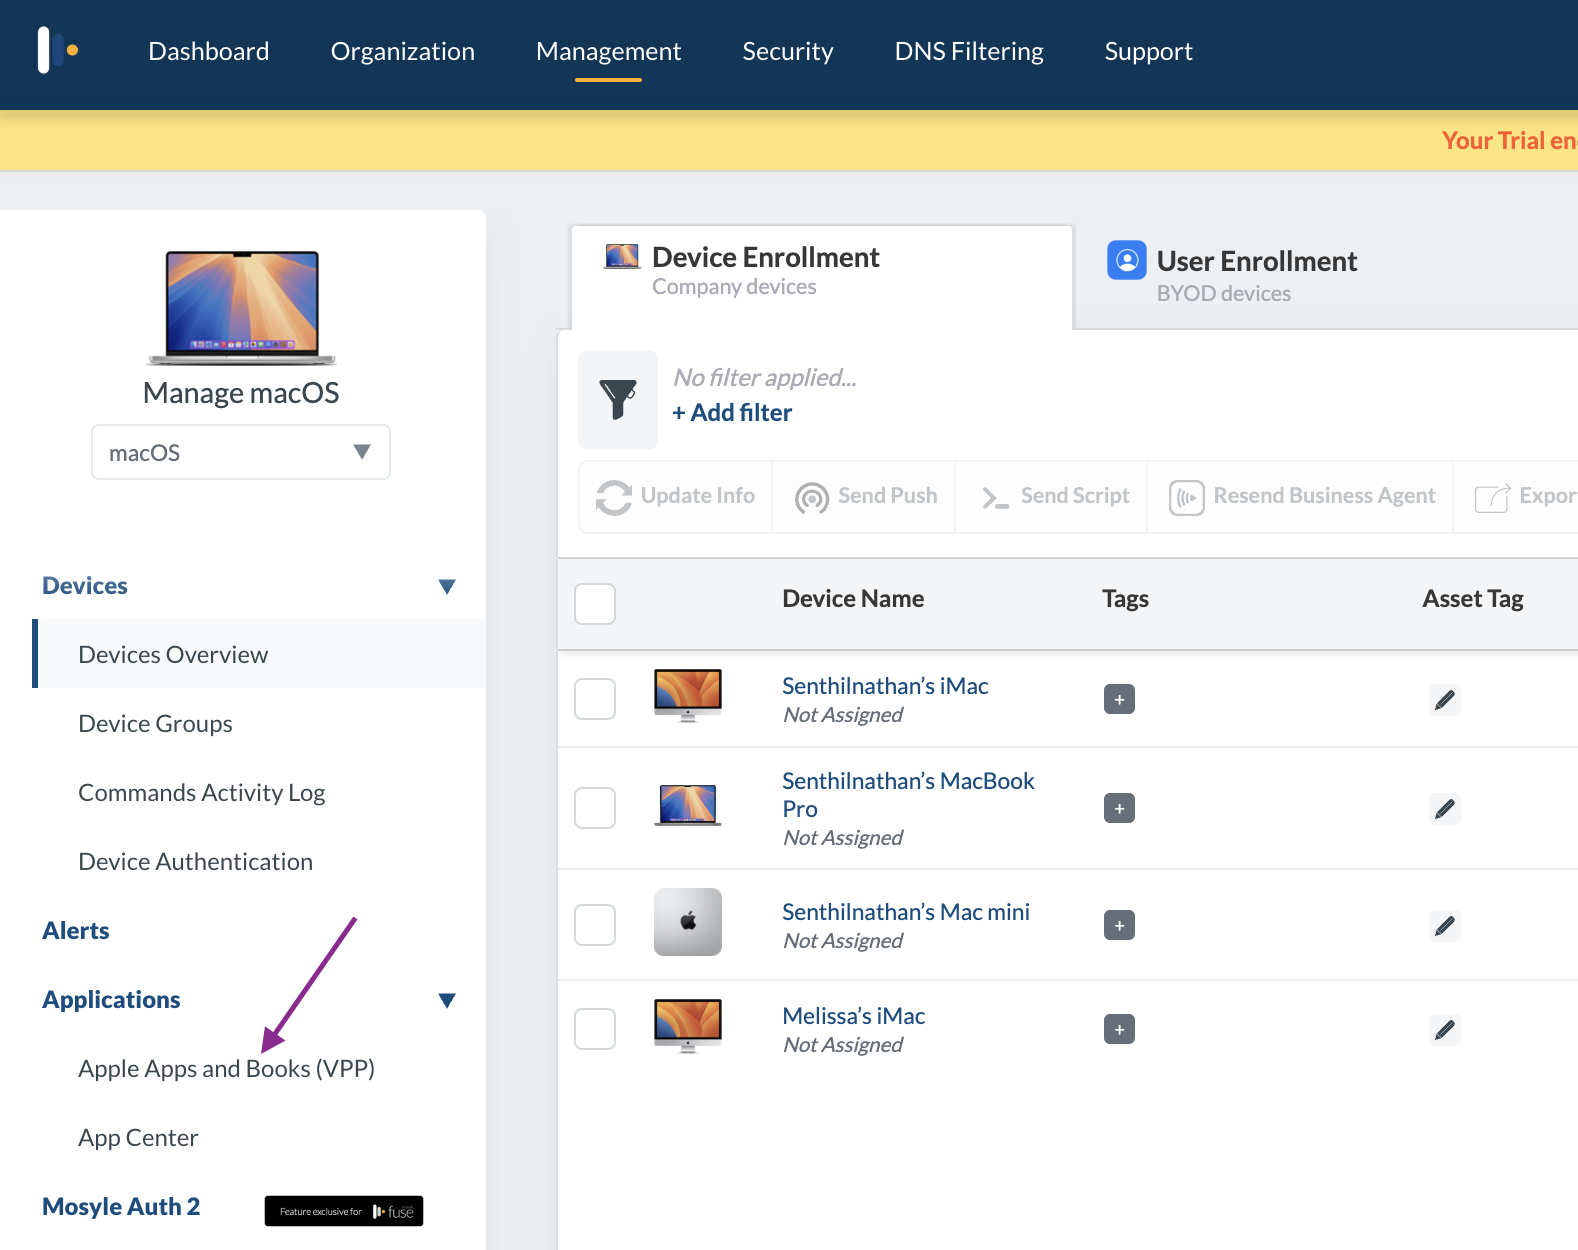
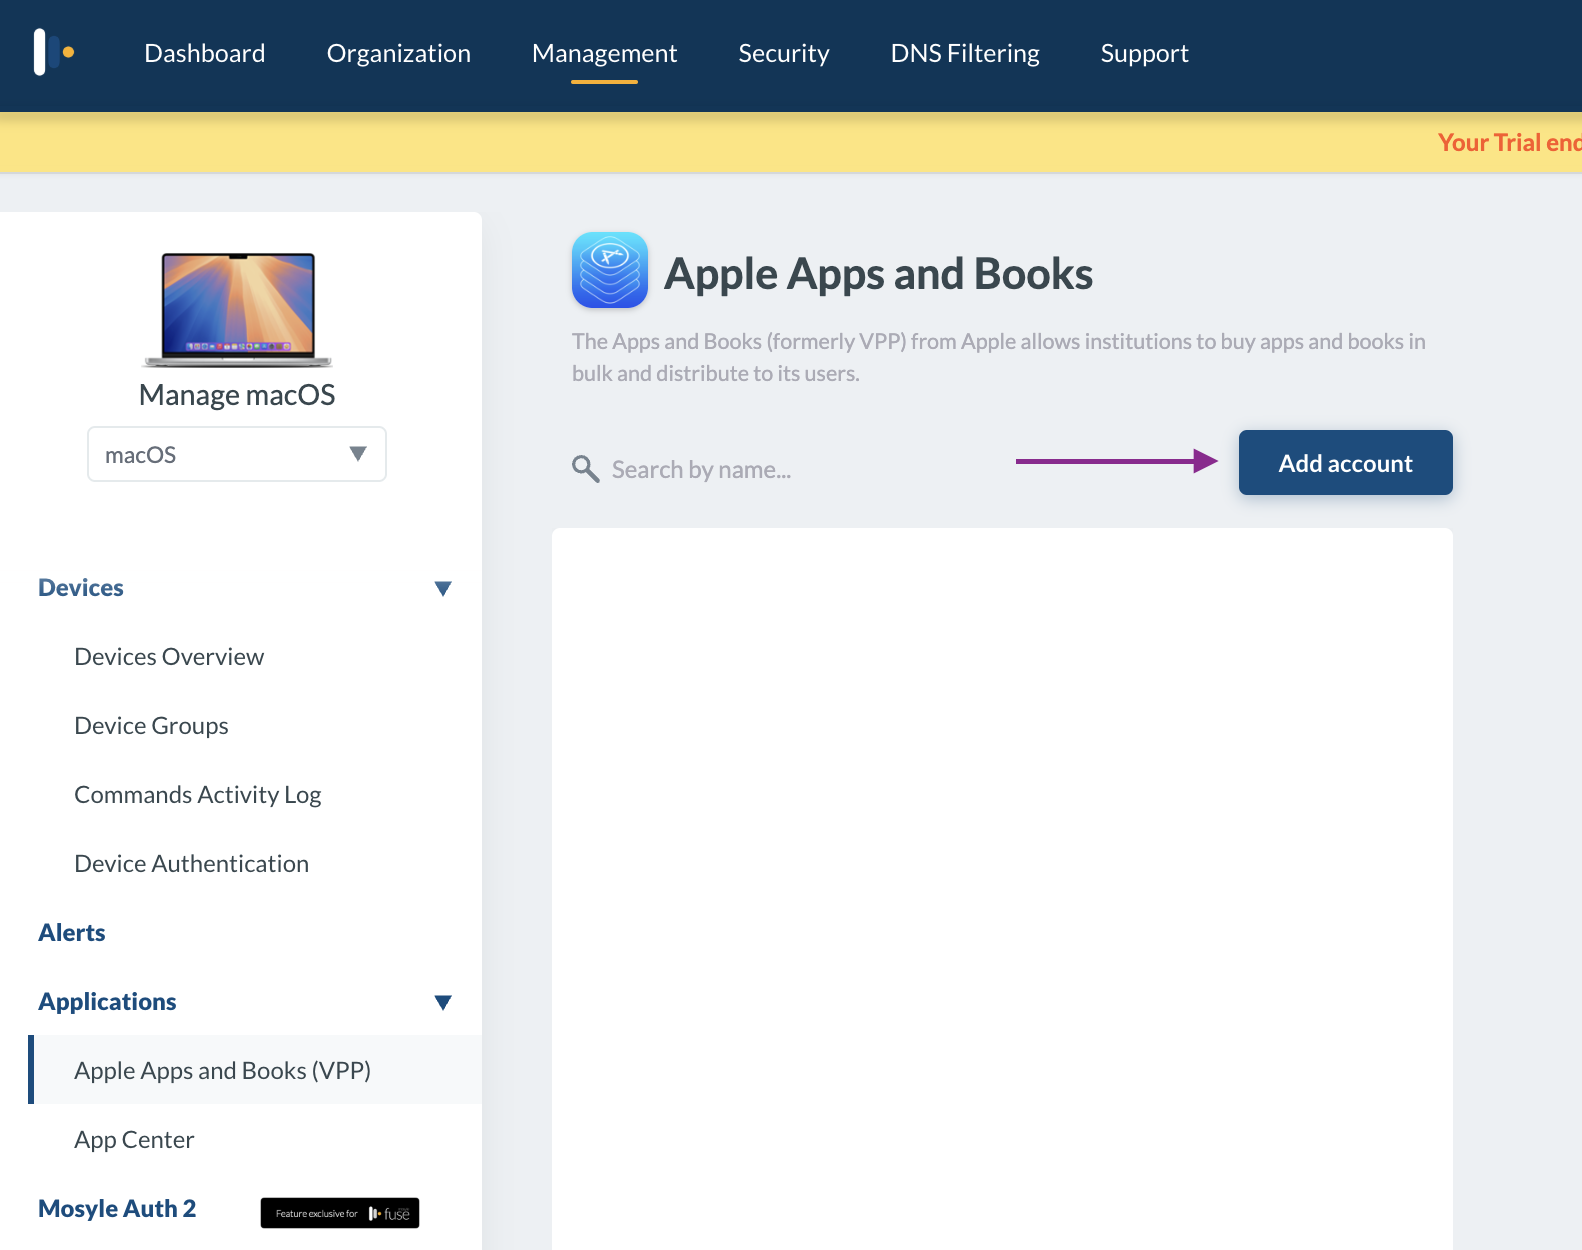
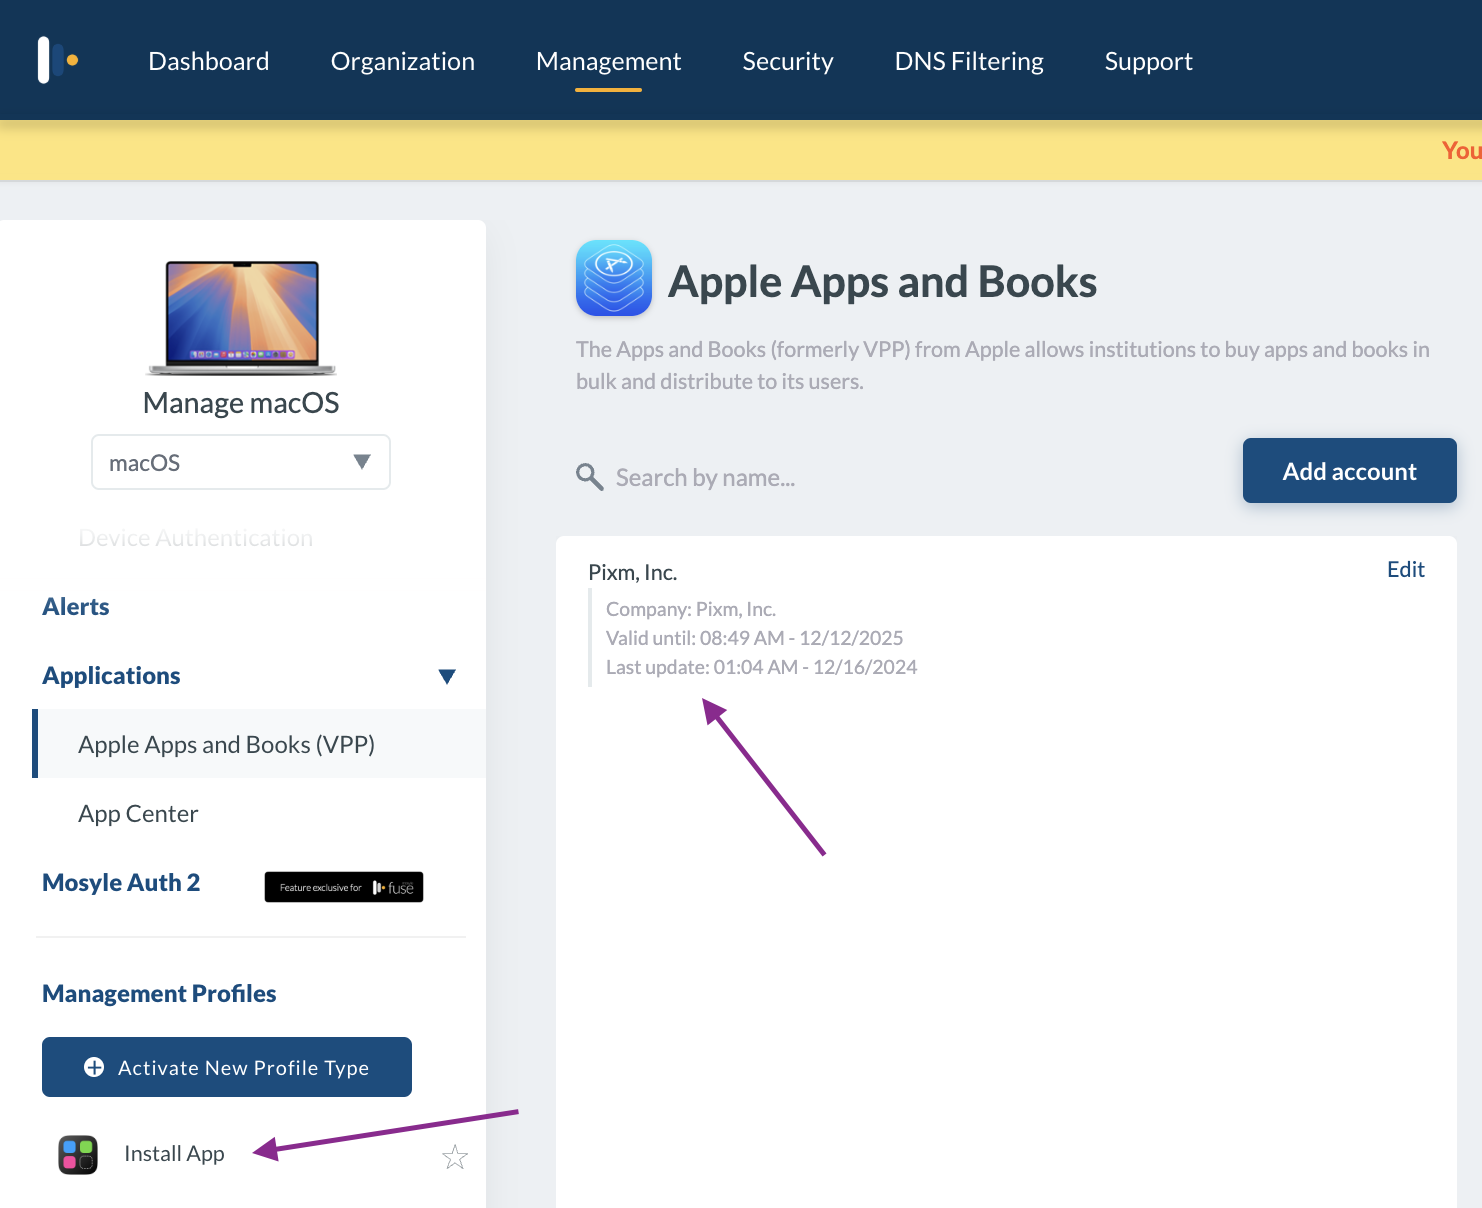
Return to the Mosyle portal. Click on the Management tab, navigate to the Applications menu, expand it, and select Apple Apps and Books (VPP).
Click Add account.
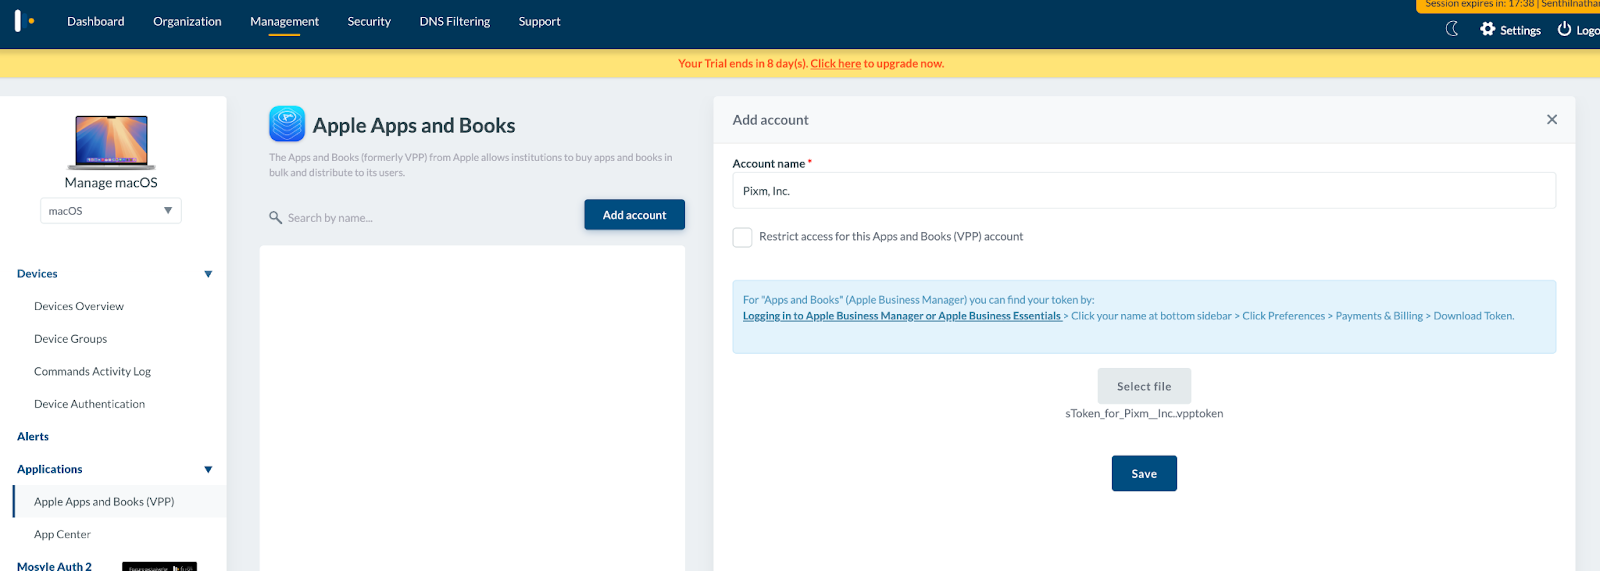
Enter your Organization name as the Account name. Click Select file.
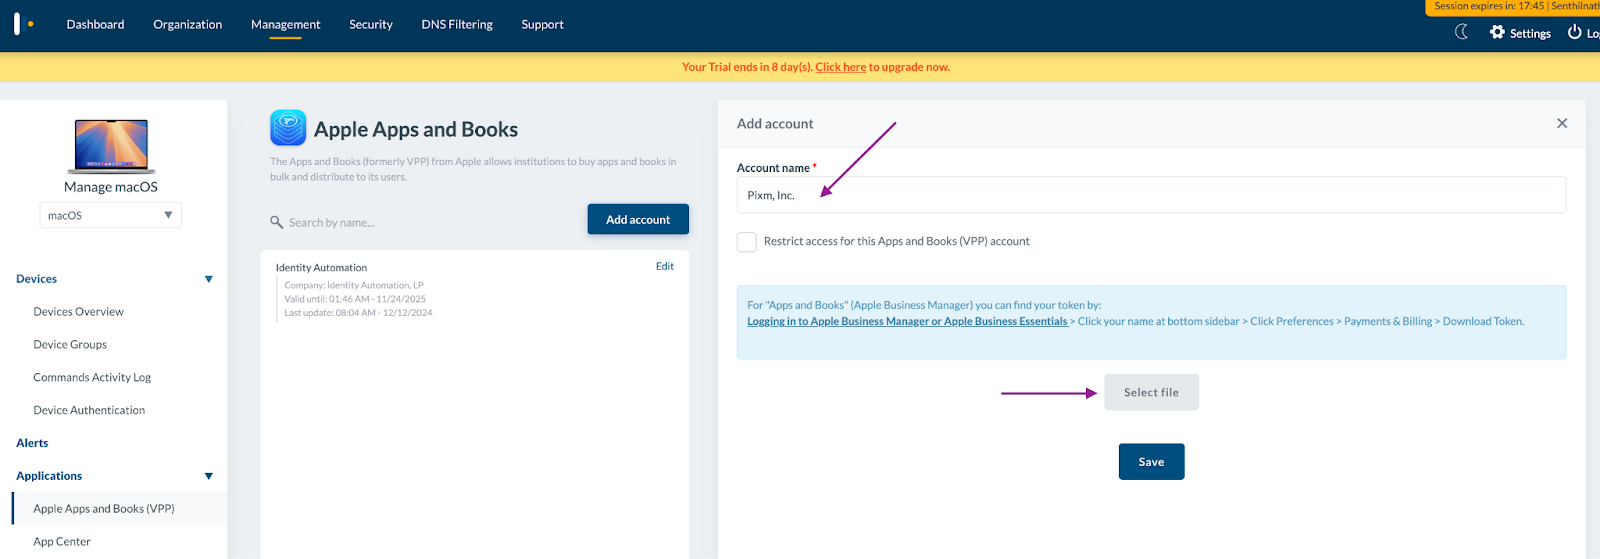
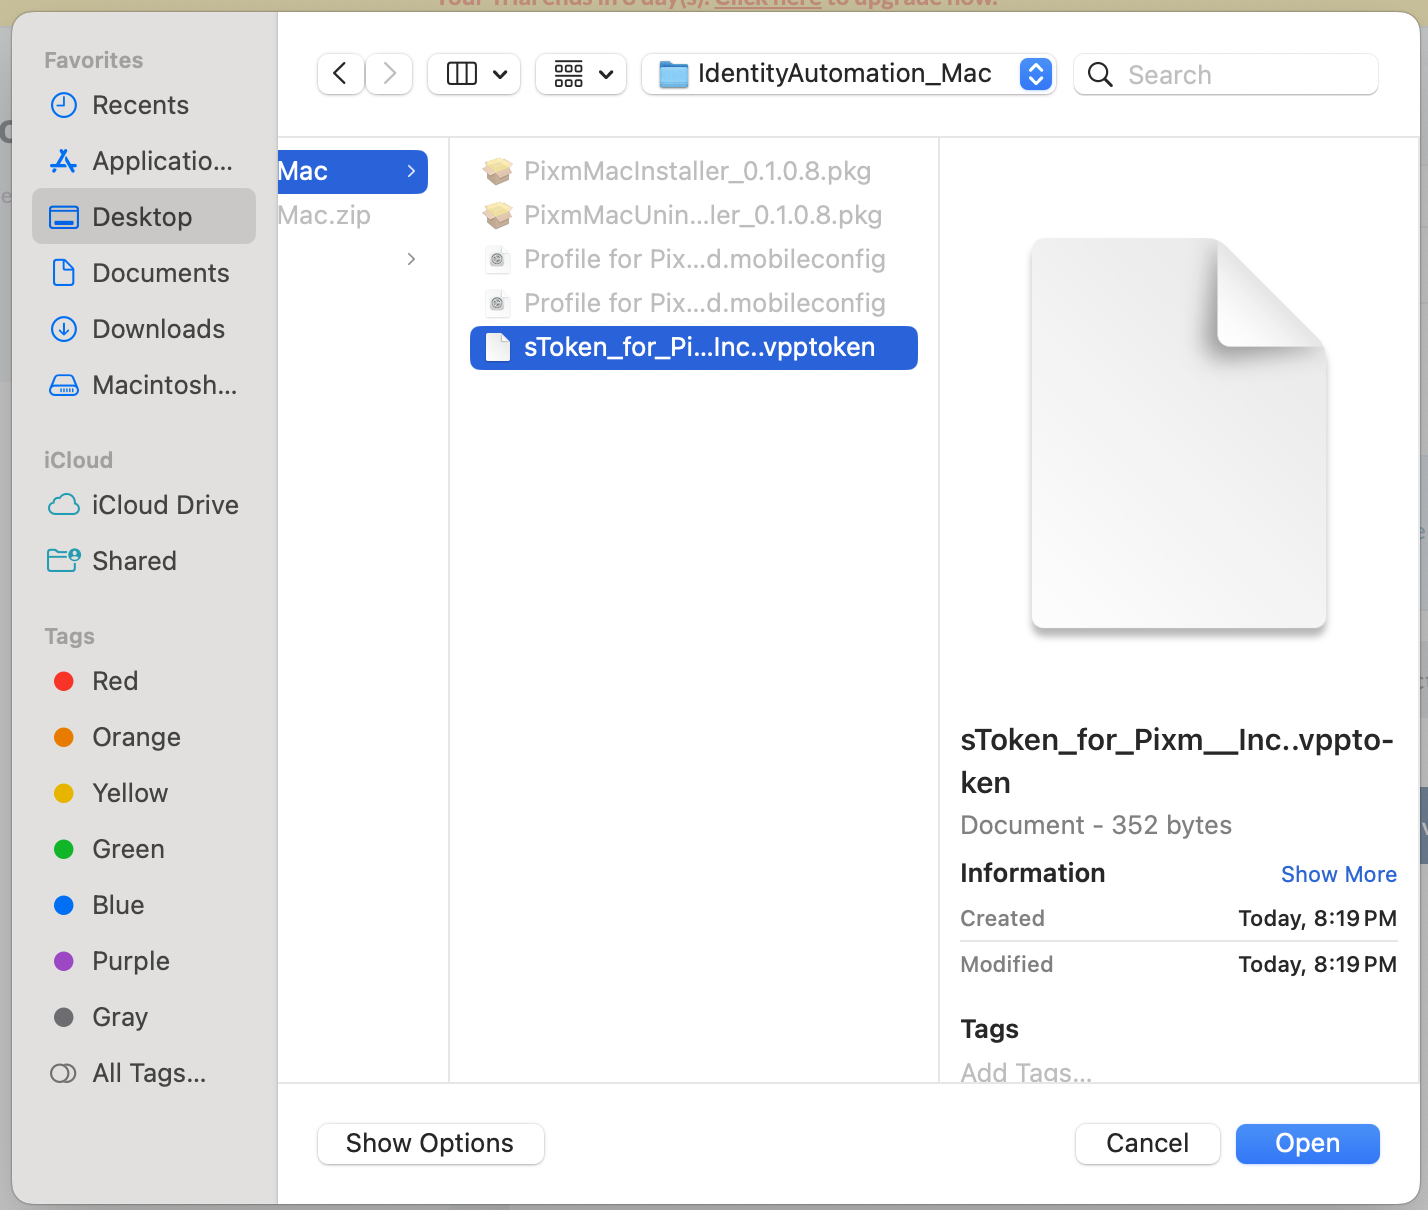
Select the .vpptoken file you downloaded earlier, as mentioned above and Click Open.
Click Save.
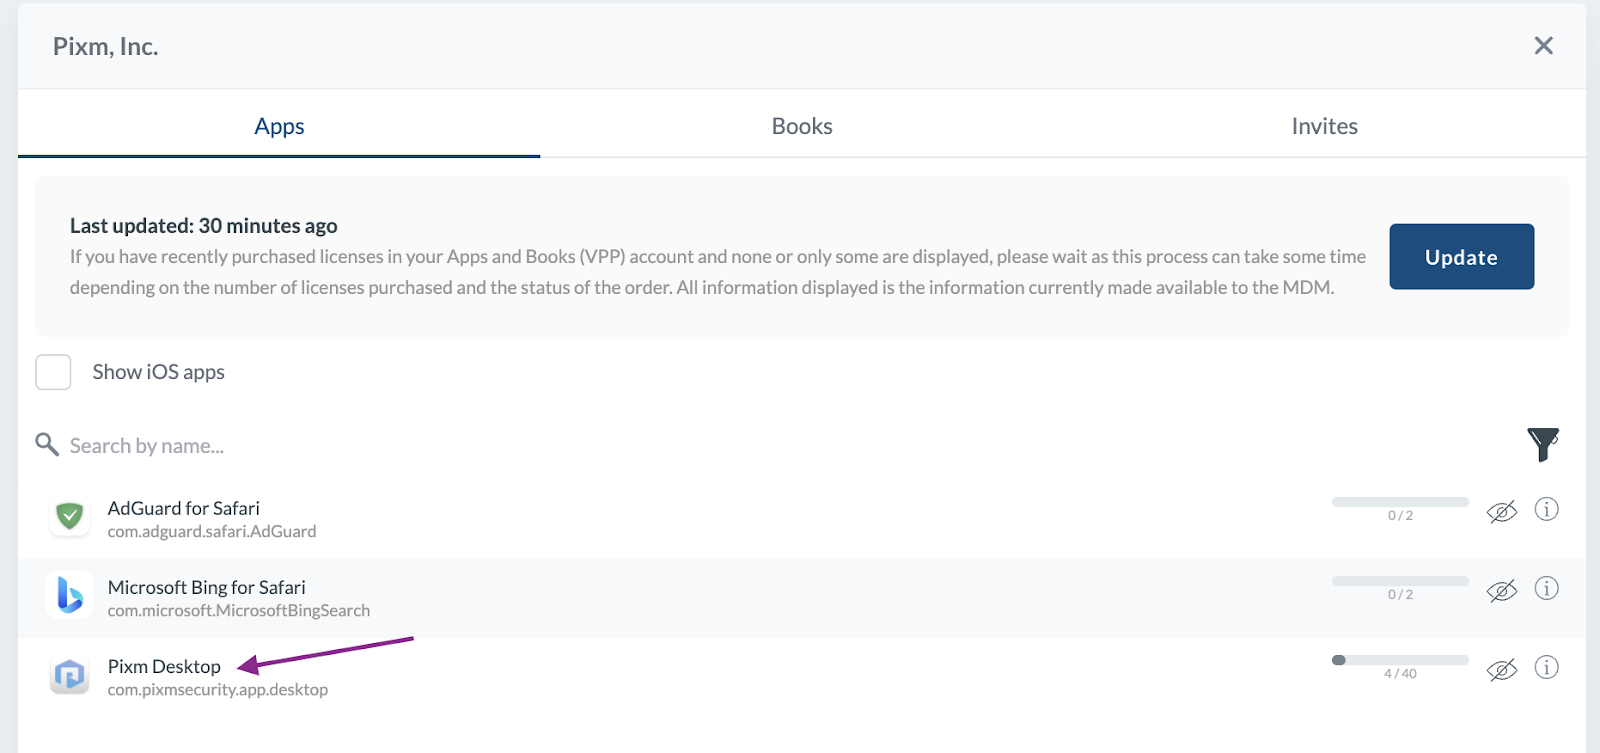
Click your organization entry, and a list of apps purchased in your Apple Business Manager account will be displayed.

Next, create a profile to deploy the Pixm Desktop app to enrolled Macs. Please note that this app should only be deployed to Macs that already have the Pixm Mac Installer pkg installed.
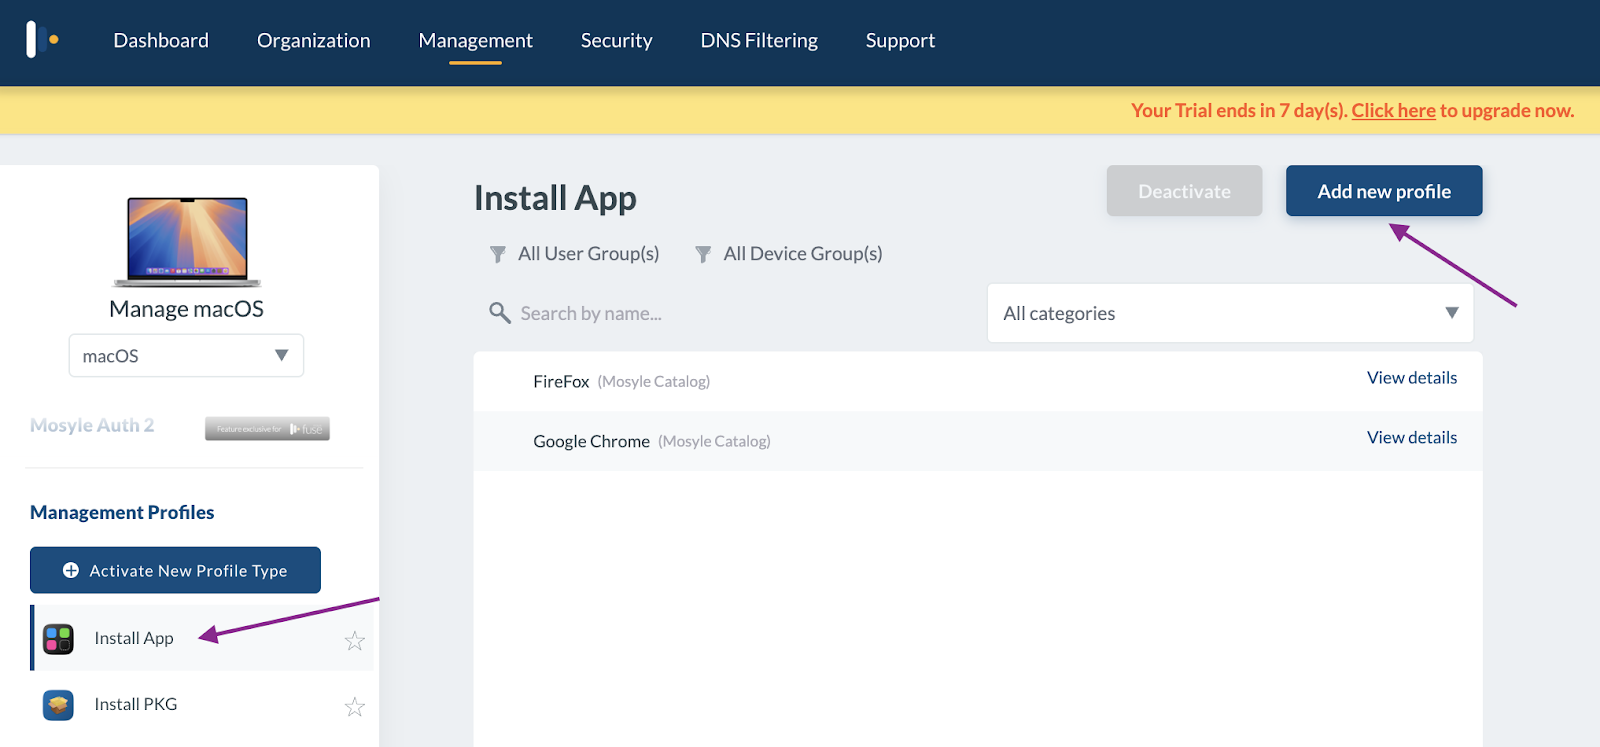
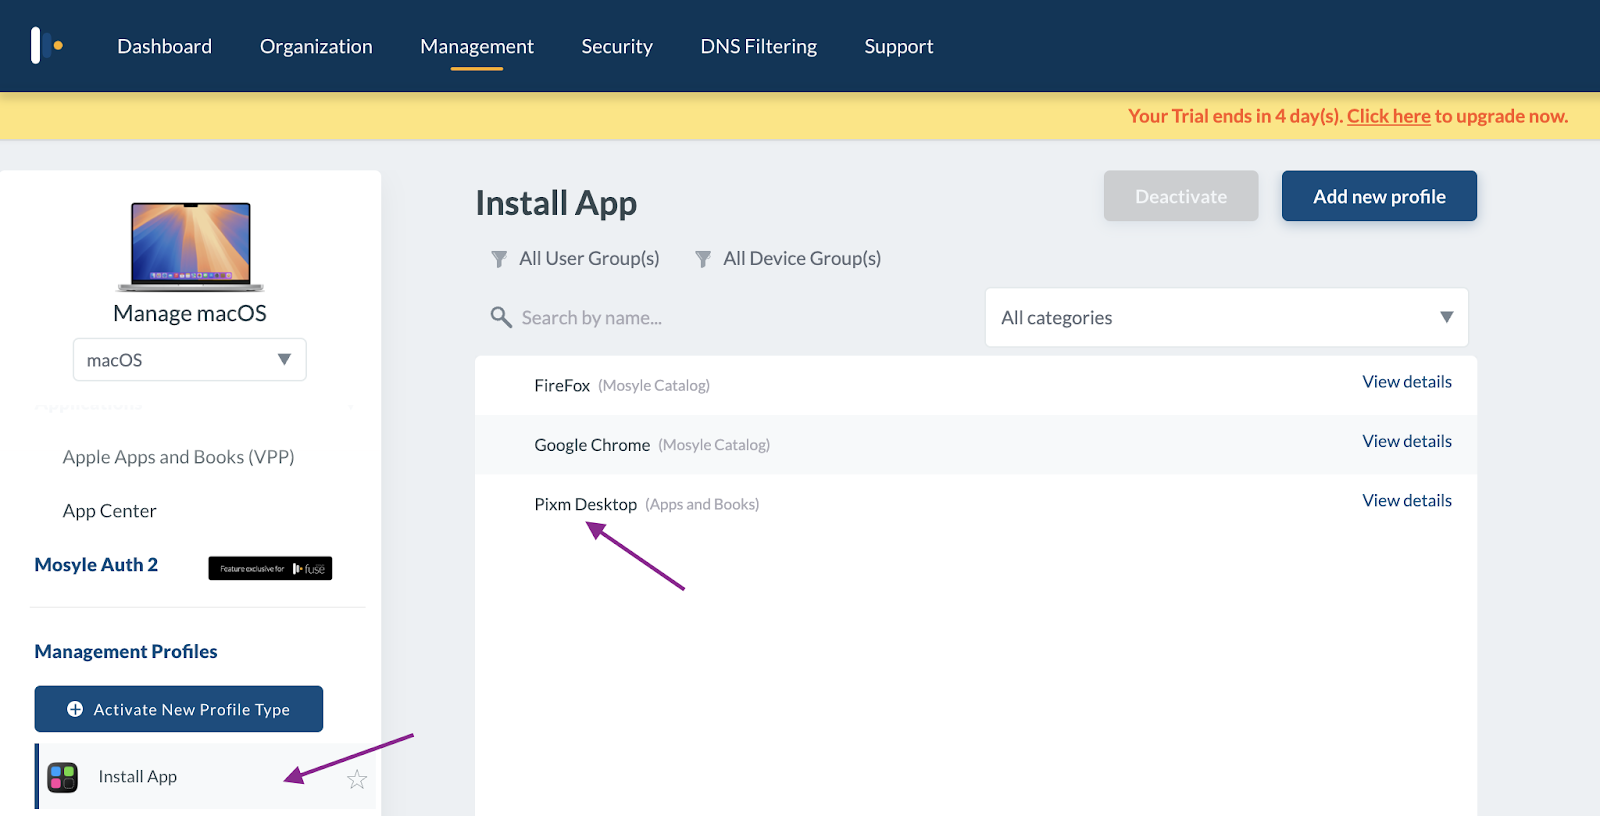
On the Management tab, click the Install App link under the Management Profiles section. Click Add new profile.
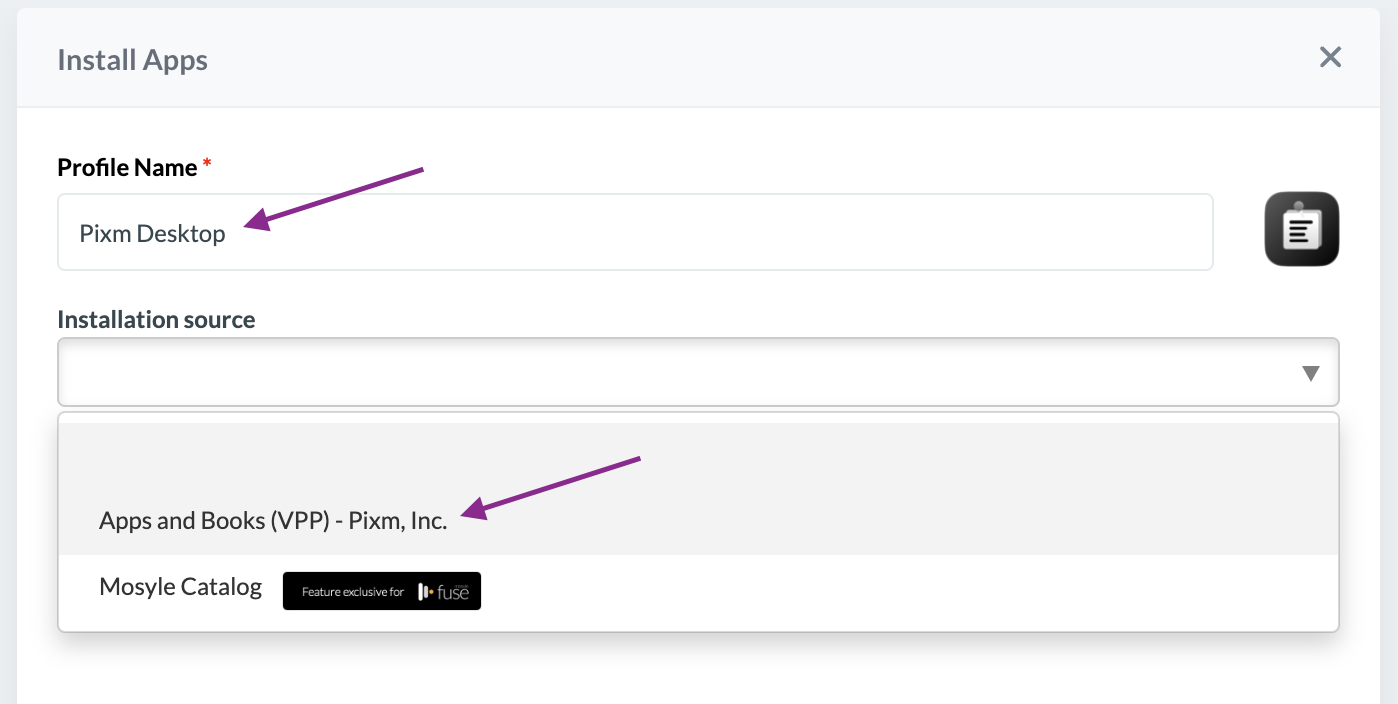
The Install Apps panel will open on the right side. Enter “Pixm Desktop” as the Profile Name. Select “Apps and Books (VPP)” associated with your organization. Here, we used the VPP token of Pixm, Inc., which is listed as "Apps and Books (VPP) - Pixm, Inc."
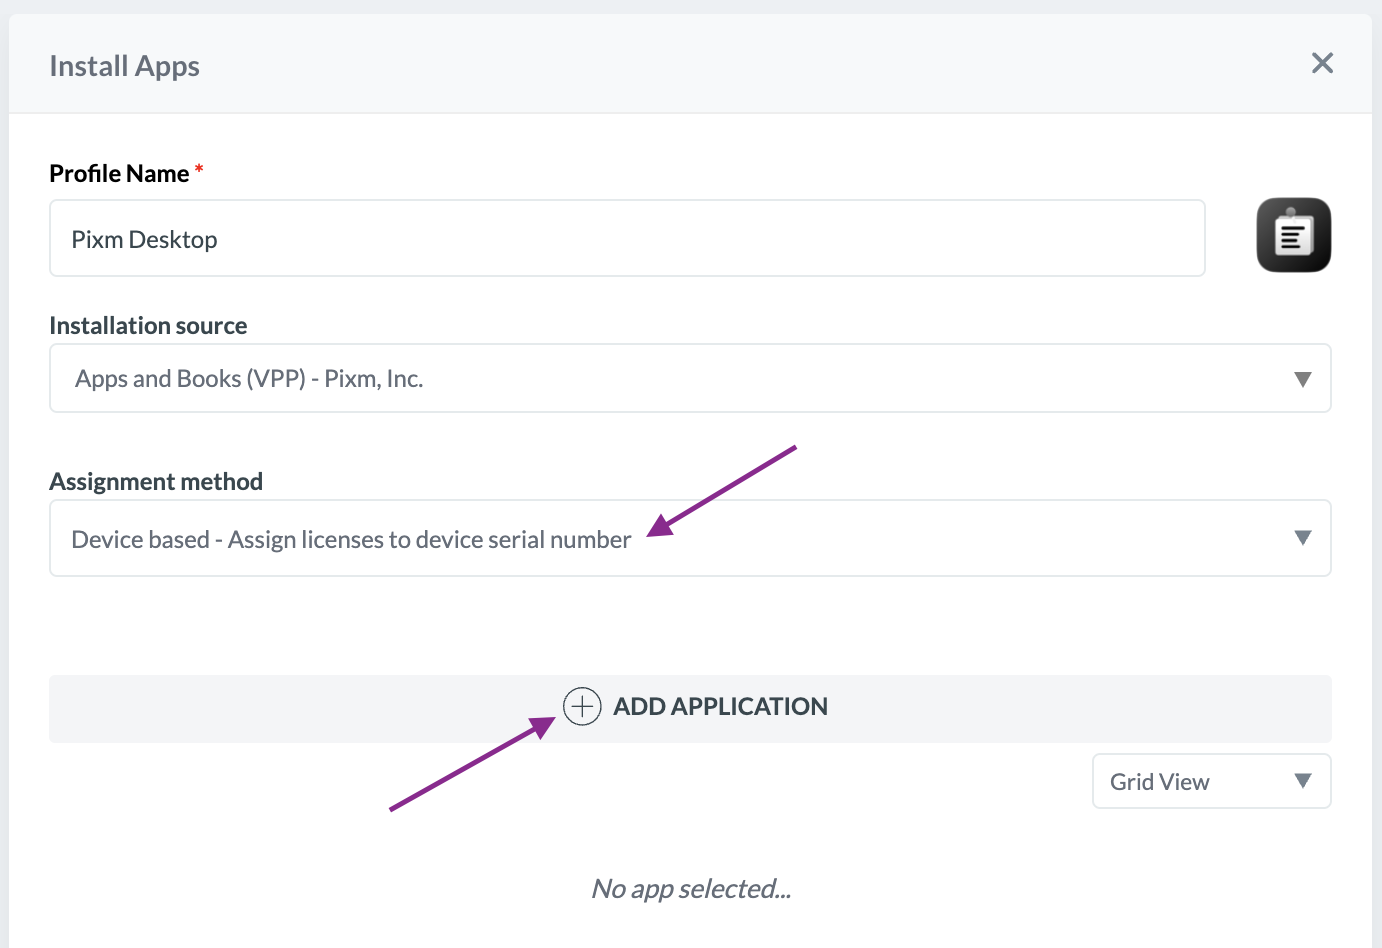
Select Device based - Assign licenses to device serial number as the Assignment method. Then, click Add Application.
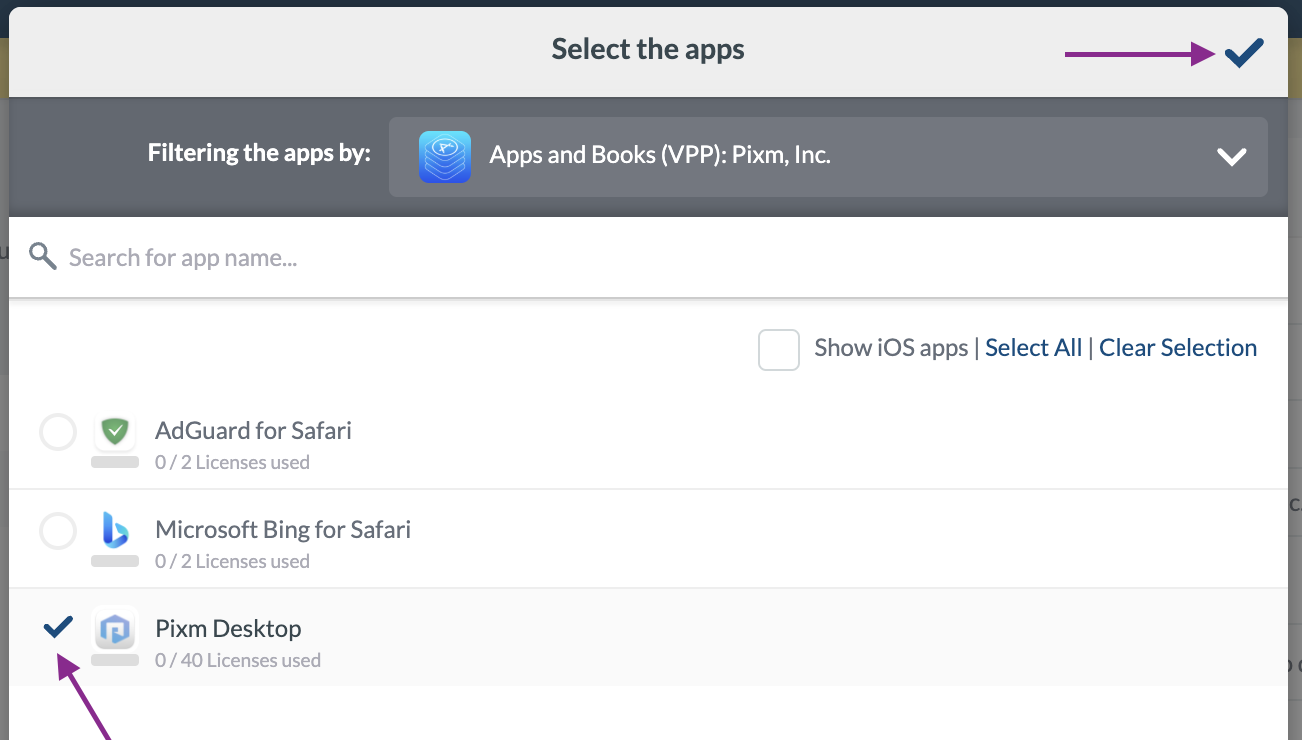
In the “Select the apps” dialog, select Pixm Desktop and click the ✔️ to dismiss this dialog.
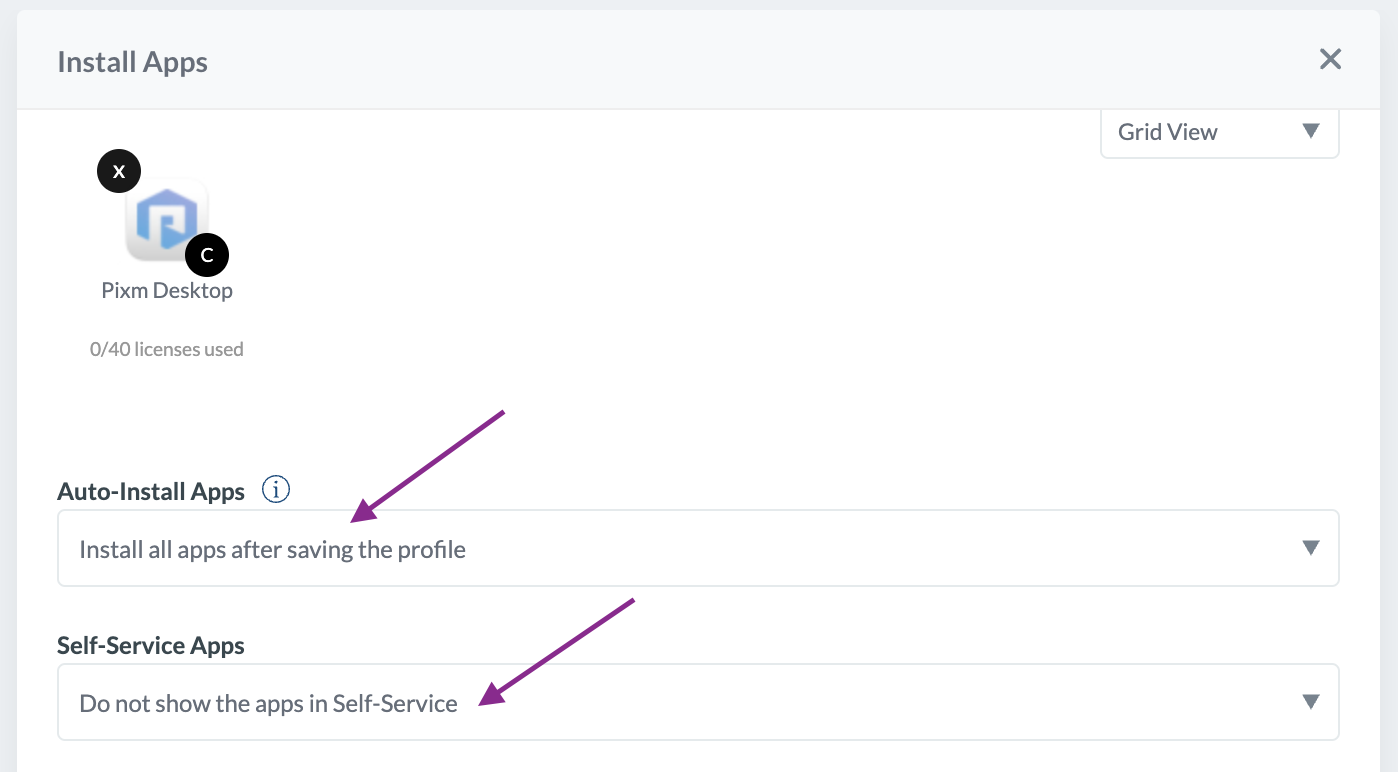
Select “Install all apps after saving the profile” for the “Auto-Install Apps” setting. Select “Do not show the apps in Self-Service” for the “Self-Service Apps” setting.
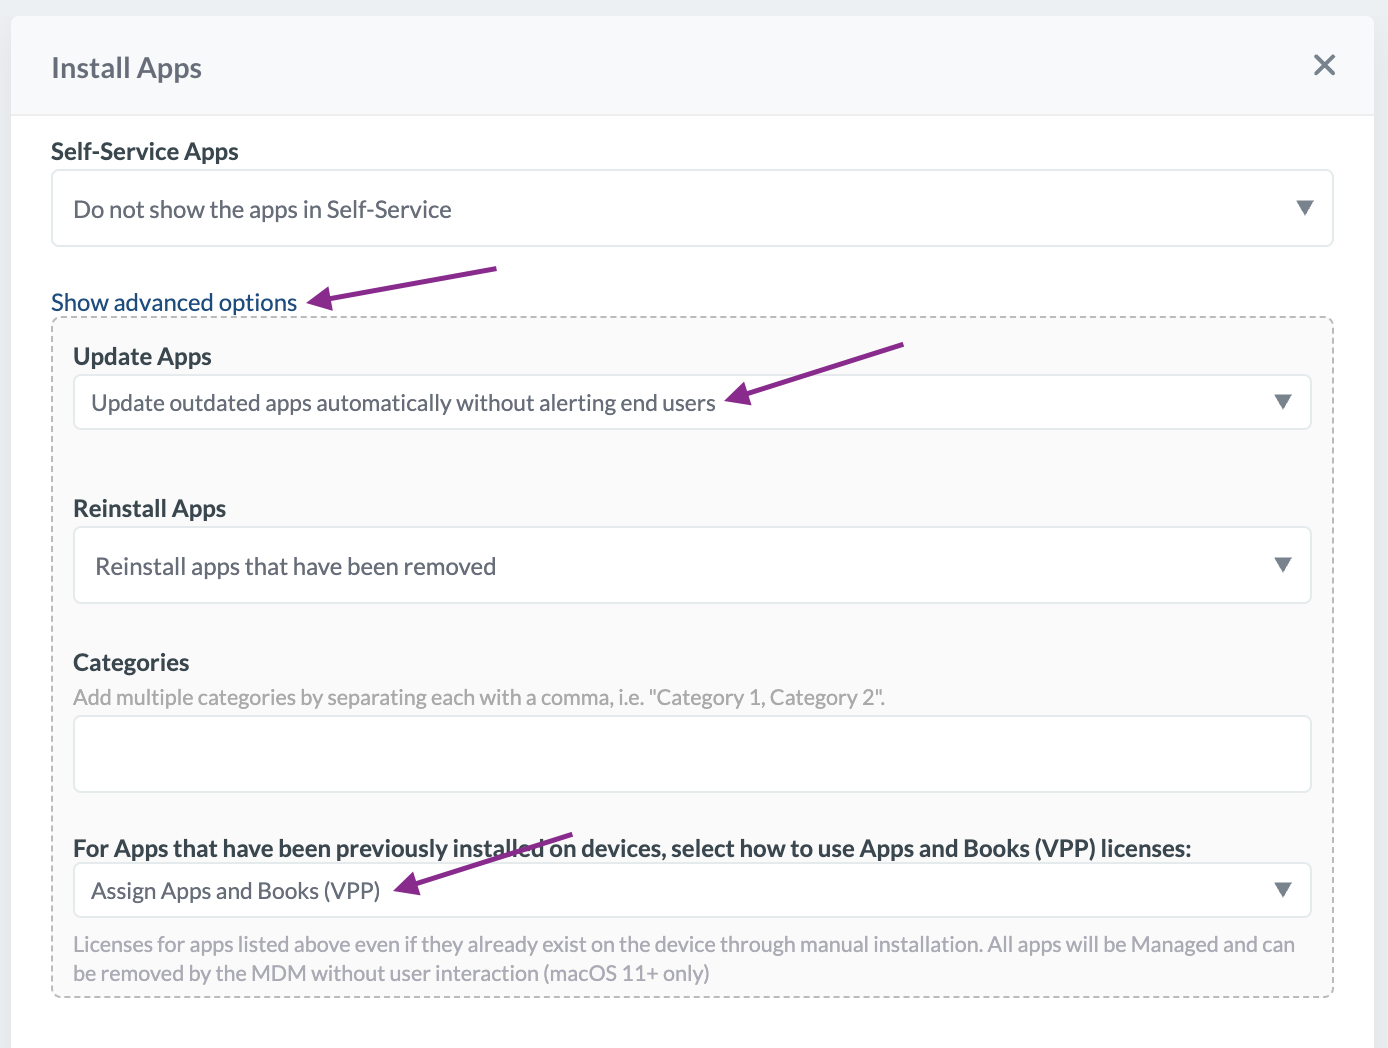
Click Show advanced options. Select “Update outdated apps automatically without alerting end users” for the “Update Apps” setting. Select “Reinstall apps that have been removed” for the “Reinstall Apps” setting. Select “Assign Apps and Books (VPP)” for the setting - “For Apps that have been previously installed on devices, select how to use Apps and Books (VPP) licenses”.
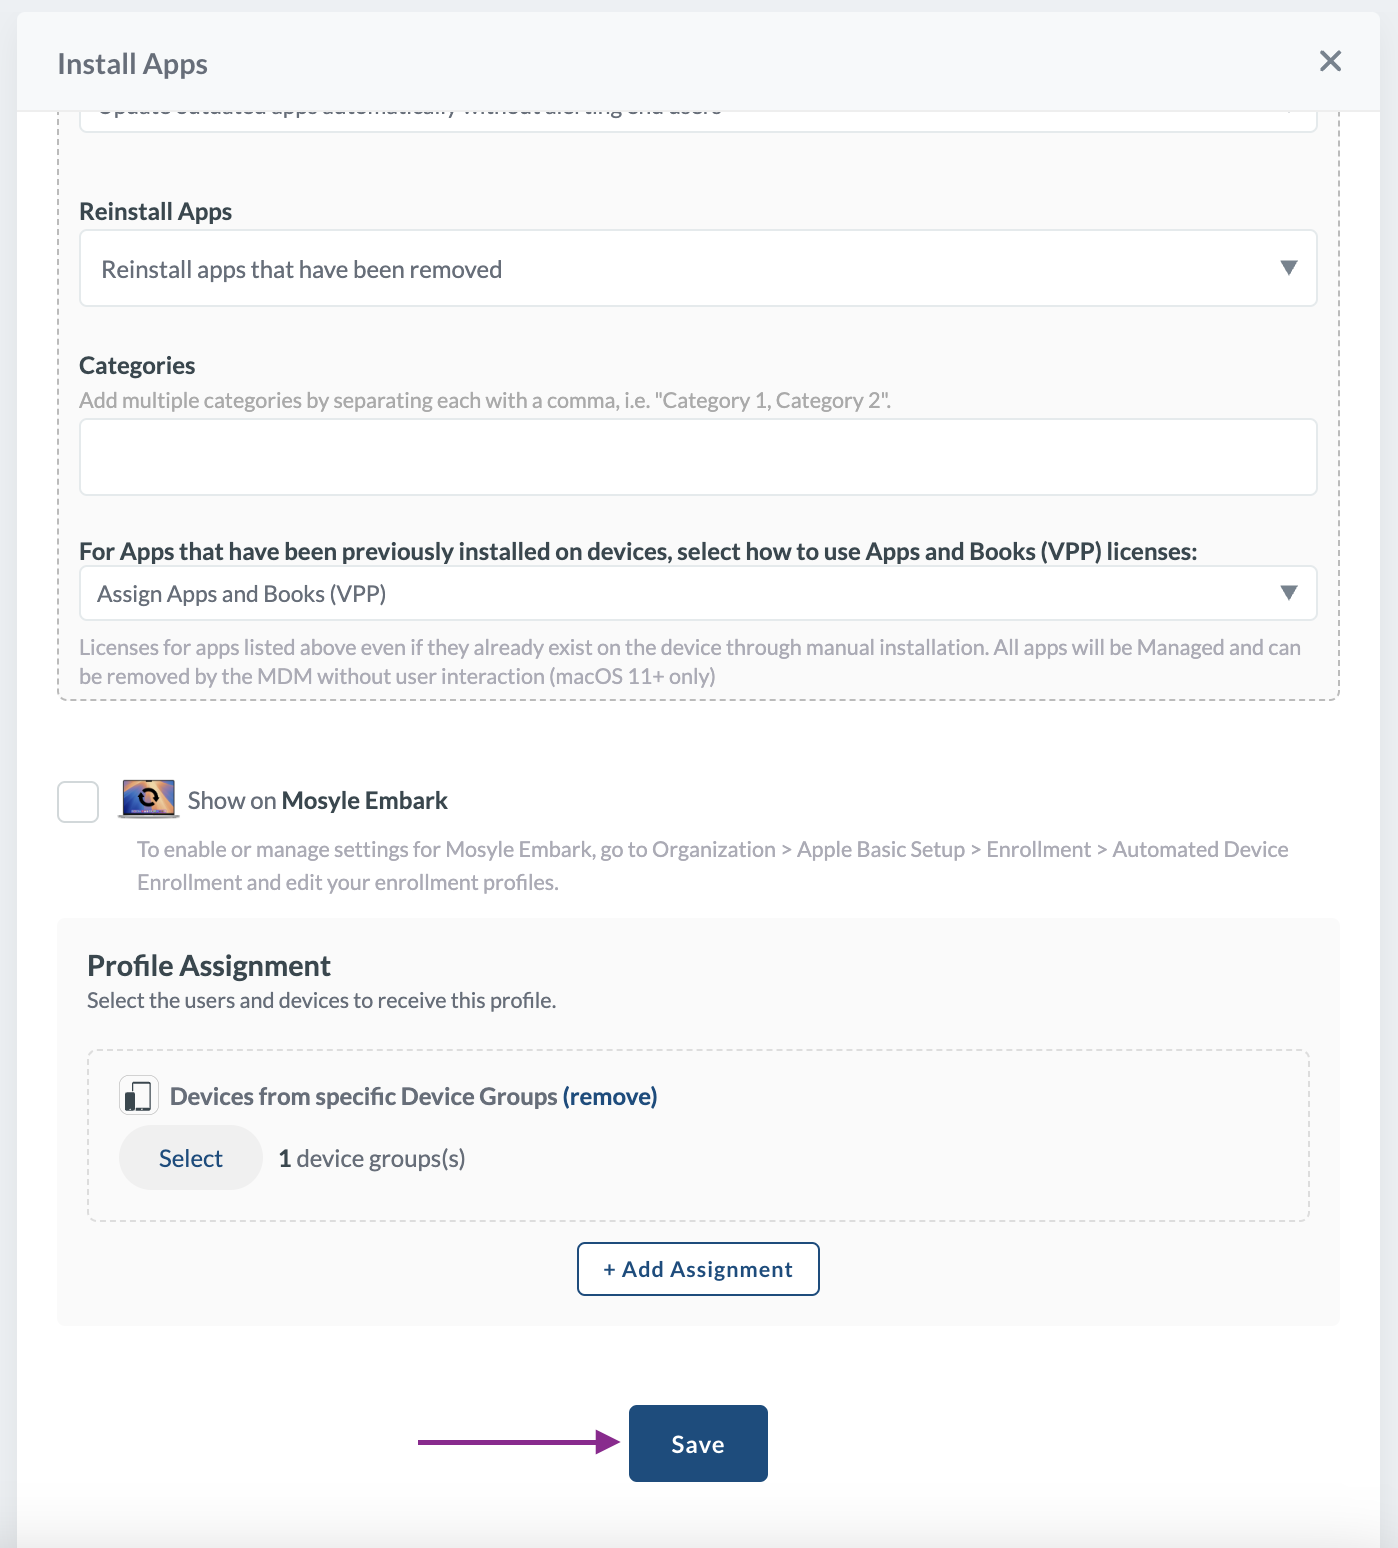
Click Add Assignment to open the device assignment dialog.

Select “Devices from specific Device Groups”.
In the Device Groups Selector dialog, locate the custom device group “Computers with Pixm Pkg Installed”, select it, and click the ✔ icon to close the dialog. Please do not select any other groups.
Click Save. This will deploy the Pixm Desktop app to all the Macs after the Pixm Mac Installer is deployed.
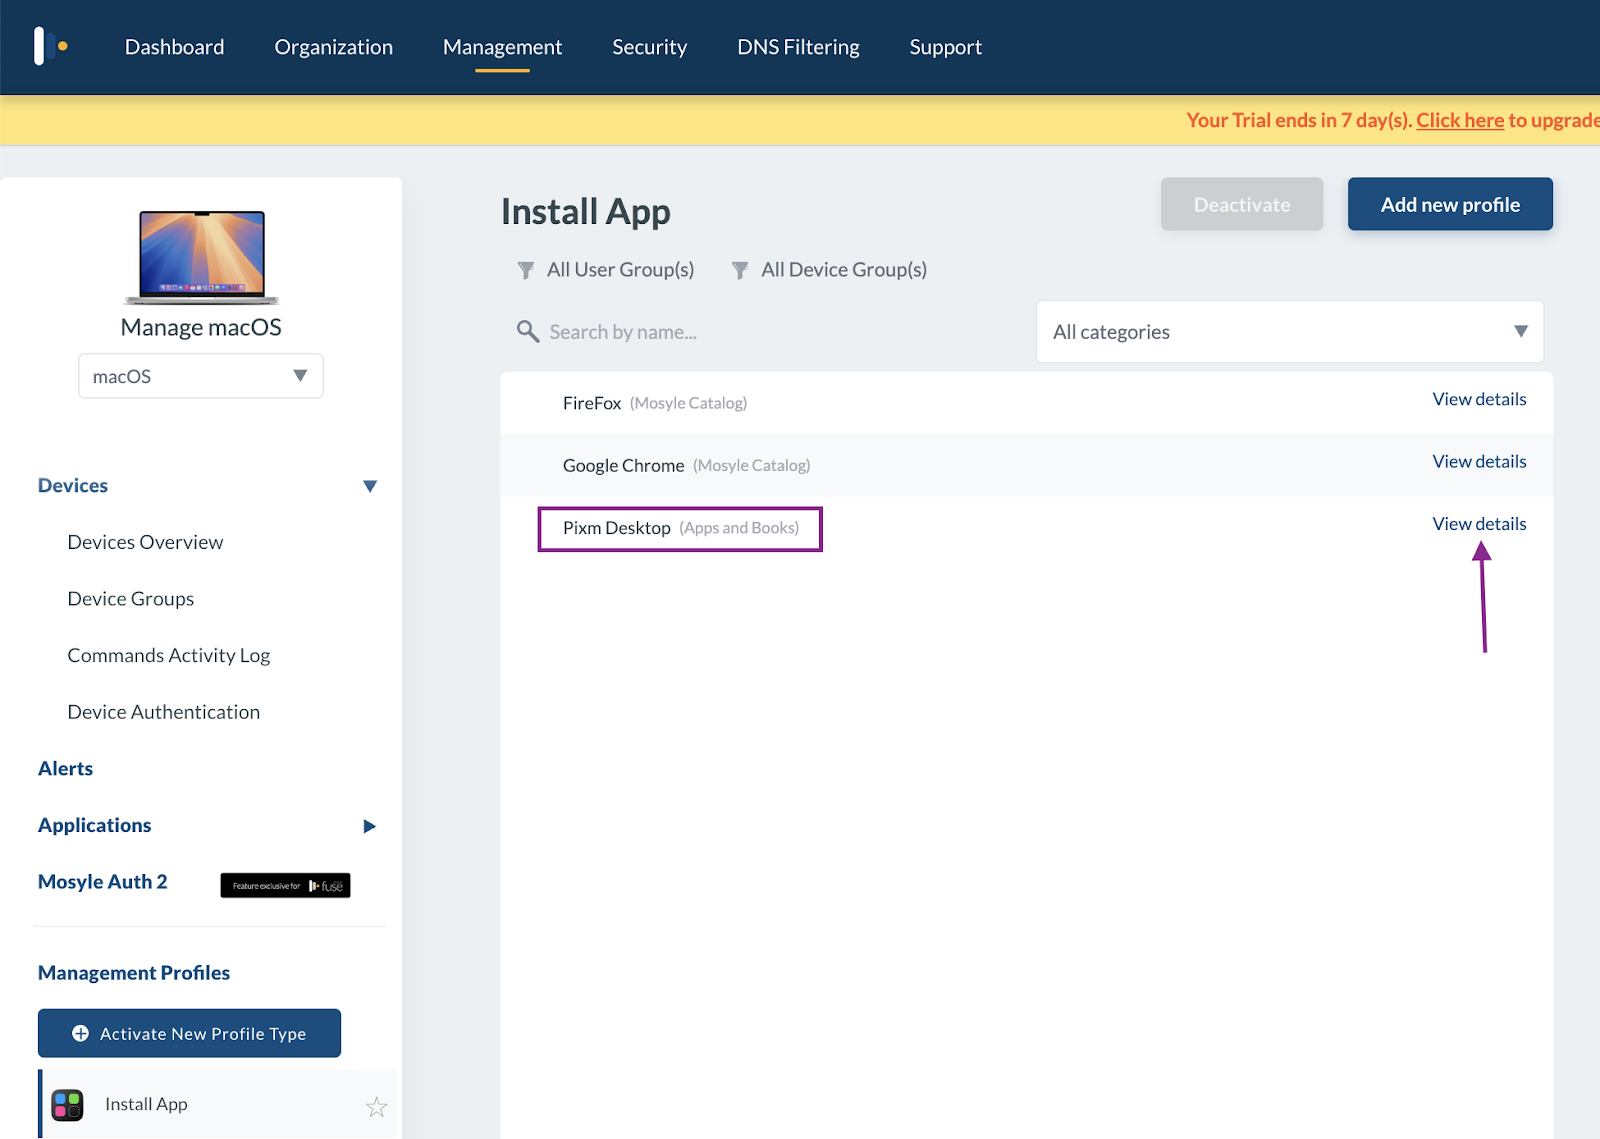
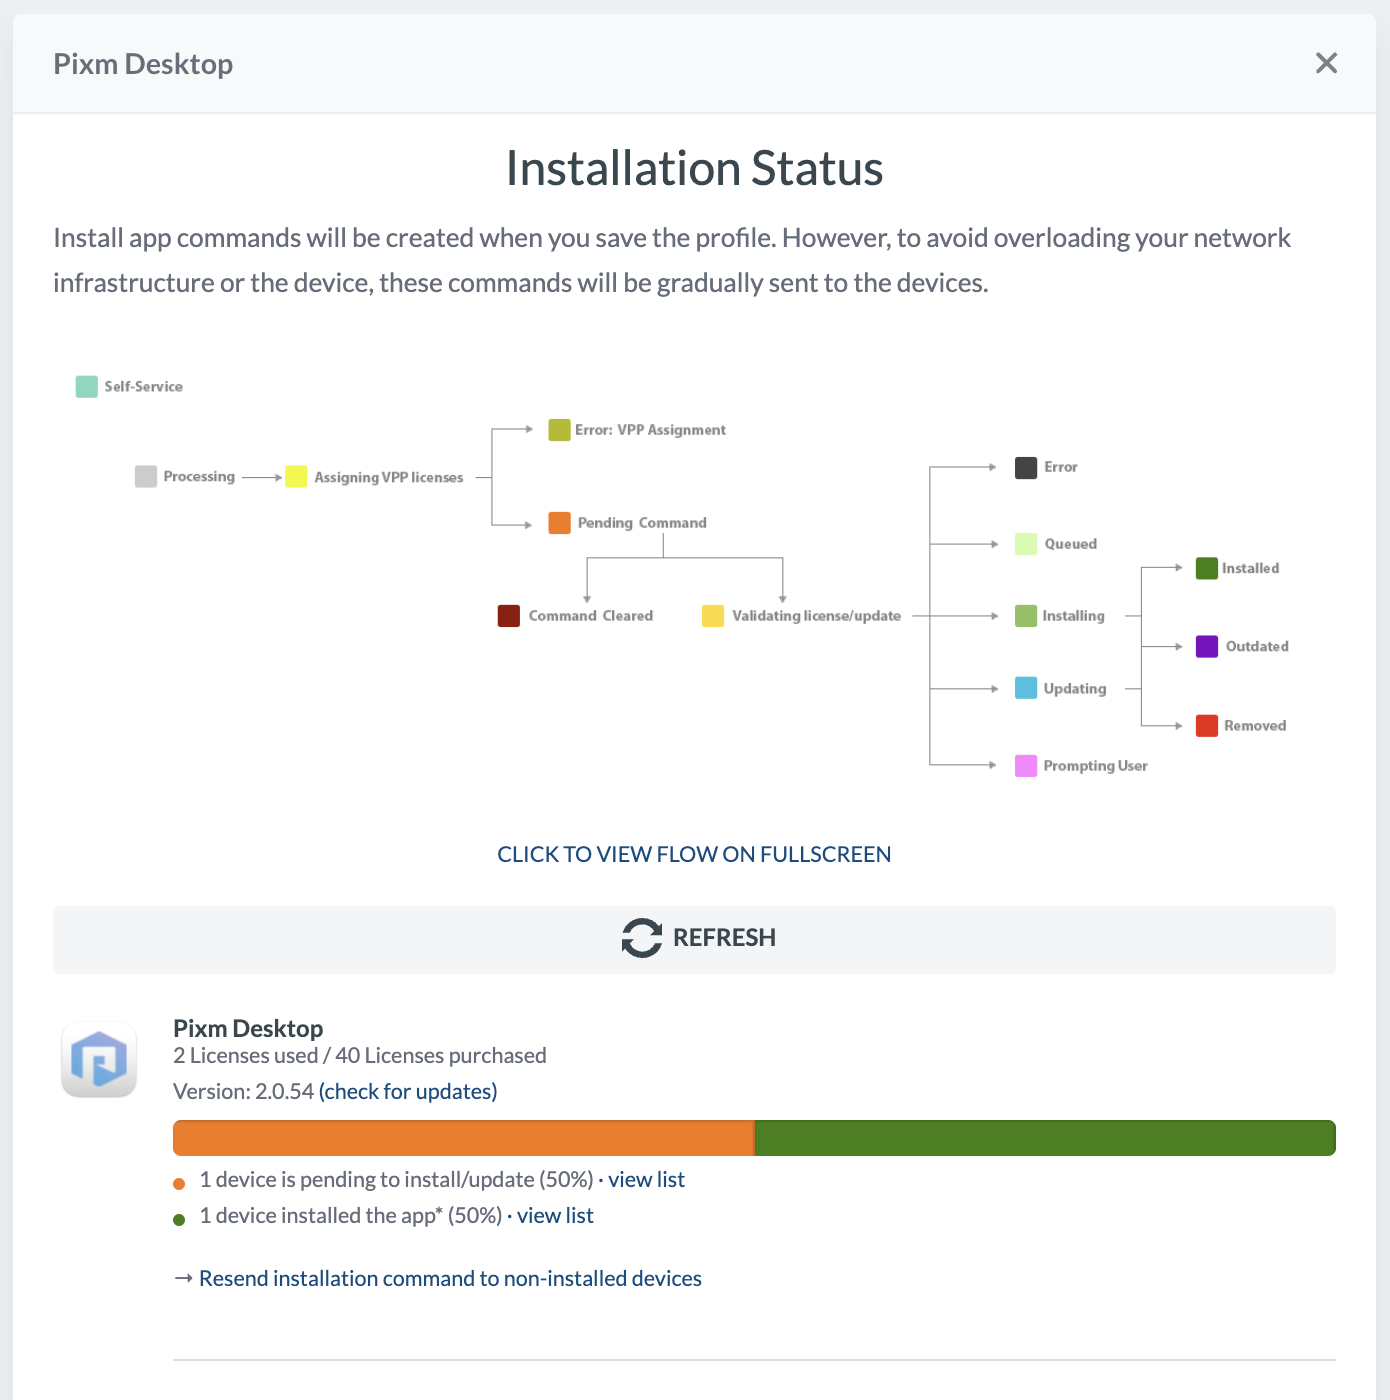
Pixm Desktop will be listed as one of the profiles in the Install App section. Click View details to know about the installation status.
End User Consent Steps
Once the Pixm Desktop app is installed on a user’s device, the user must manually enable the extension and grant it the necessary permissions to receive protection in Safari. The steps below outline the process from the end user’s perspective:
Navigate to the Applications folder. You should see an application called Pixm Desktop.app.

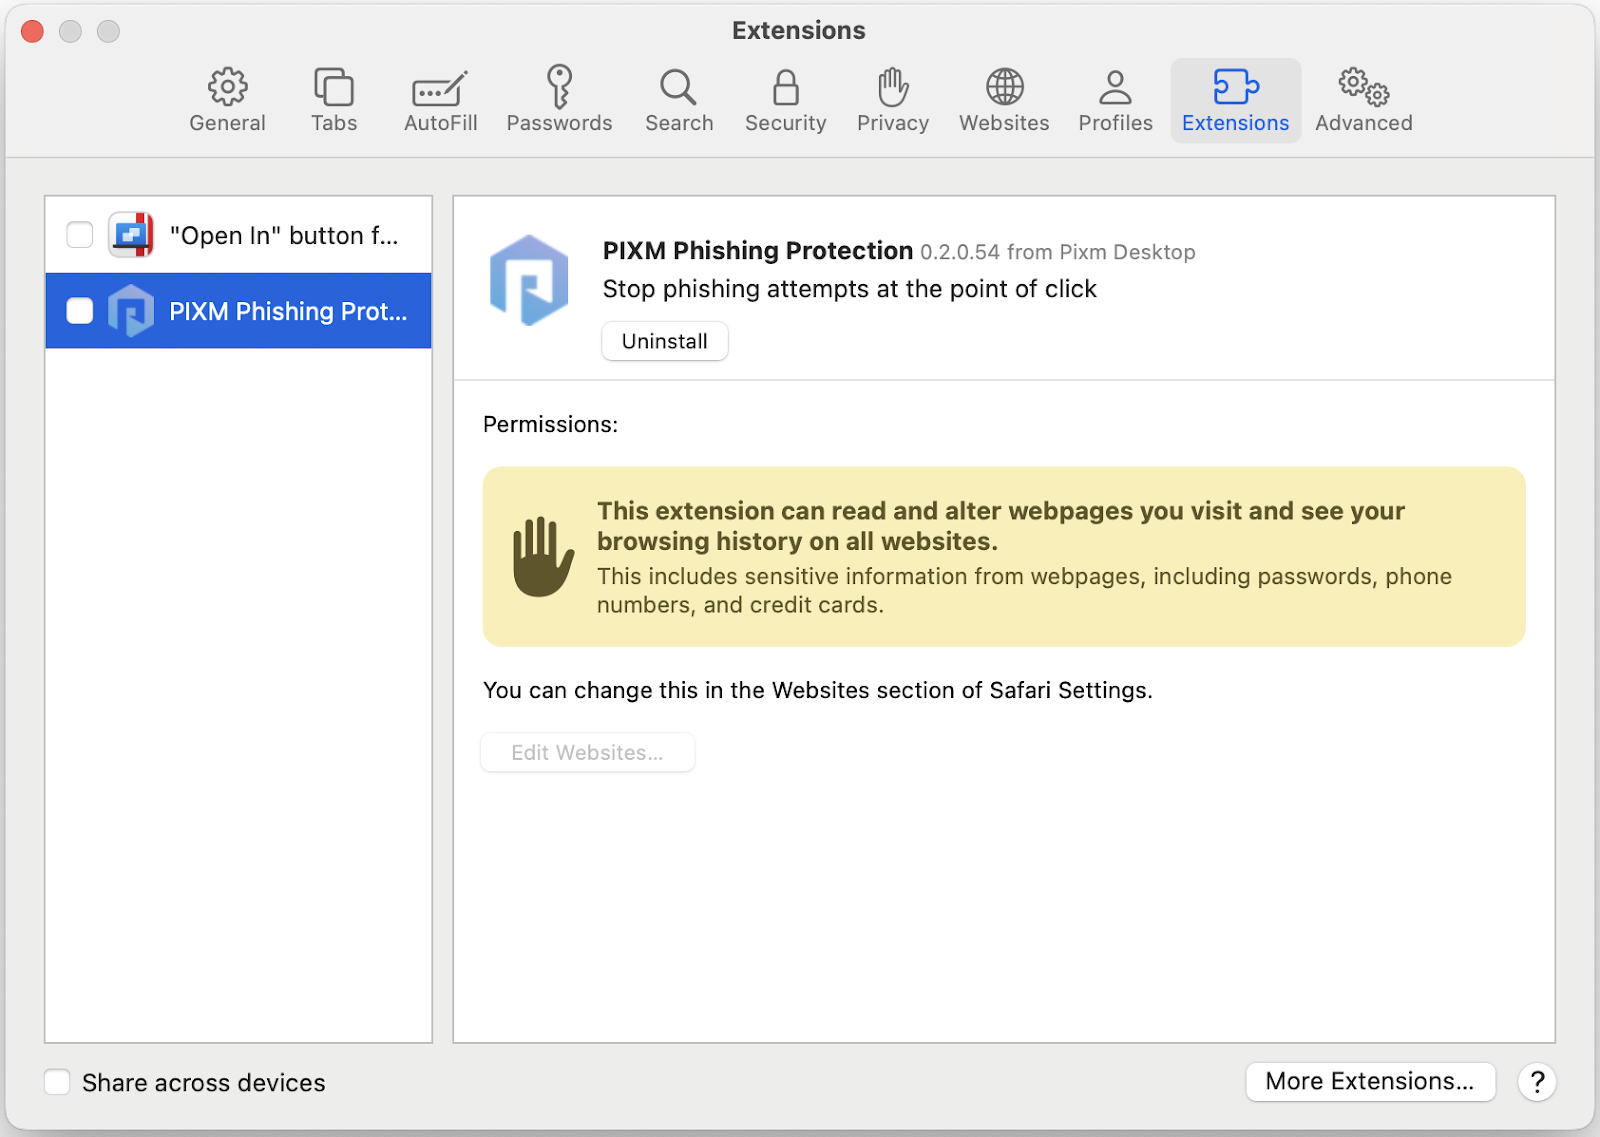
Open the application. In the Pixm popup window, select ‘Enable for Safari’.

This will open the Extensions settings for Pixm in Safari Preferences. Enable the Pixm Desktop Extension by checking the checkbox for PIXM Phishing Protection.
Enable the "Allow in Private Browsing" setting. You will be prompted for authentication; approve it. Then click “Edit Websites…”
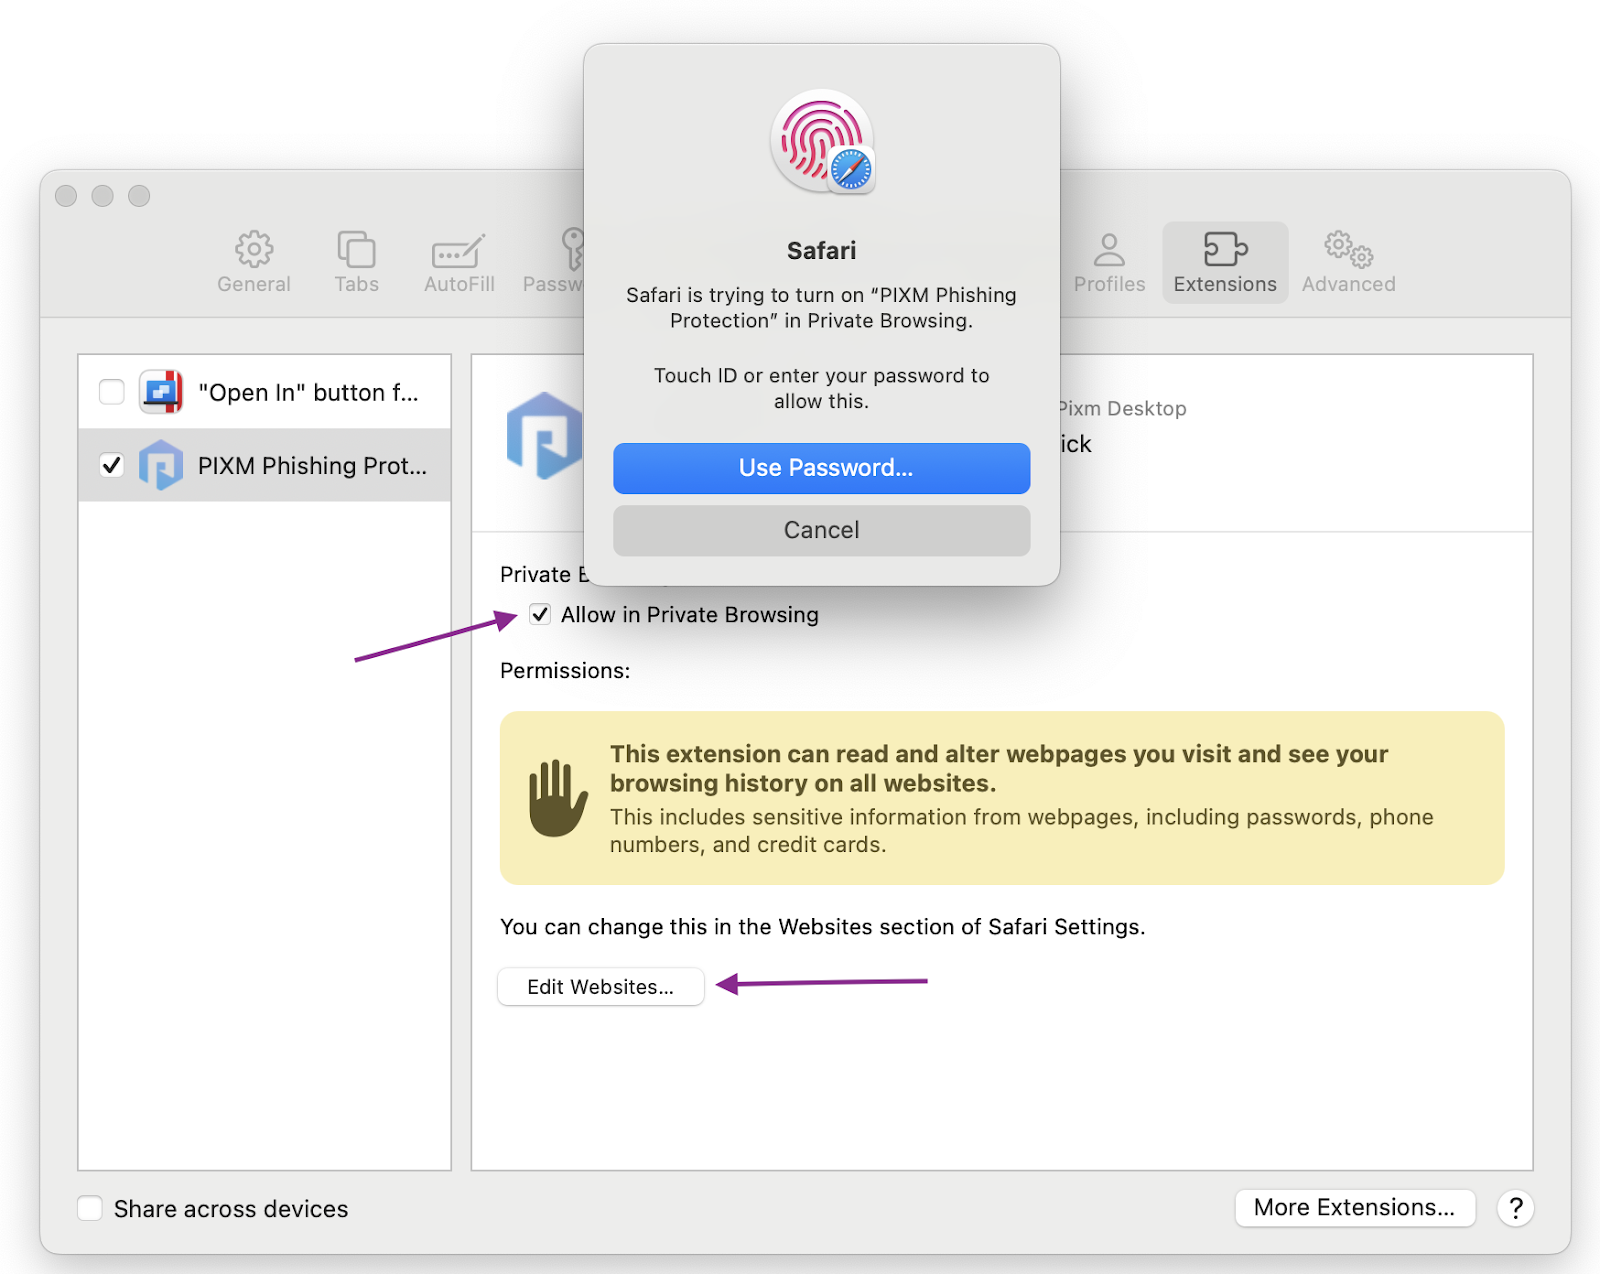
Make sure to select "Allow" for pixmsecurity.com under Configured Websites and in the “For Other Websites” setting.

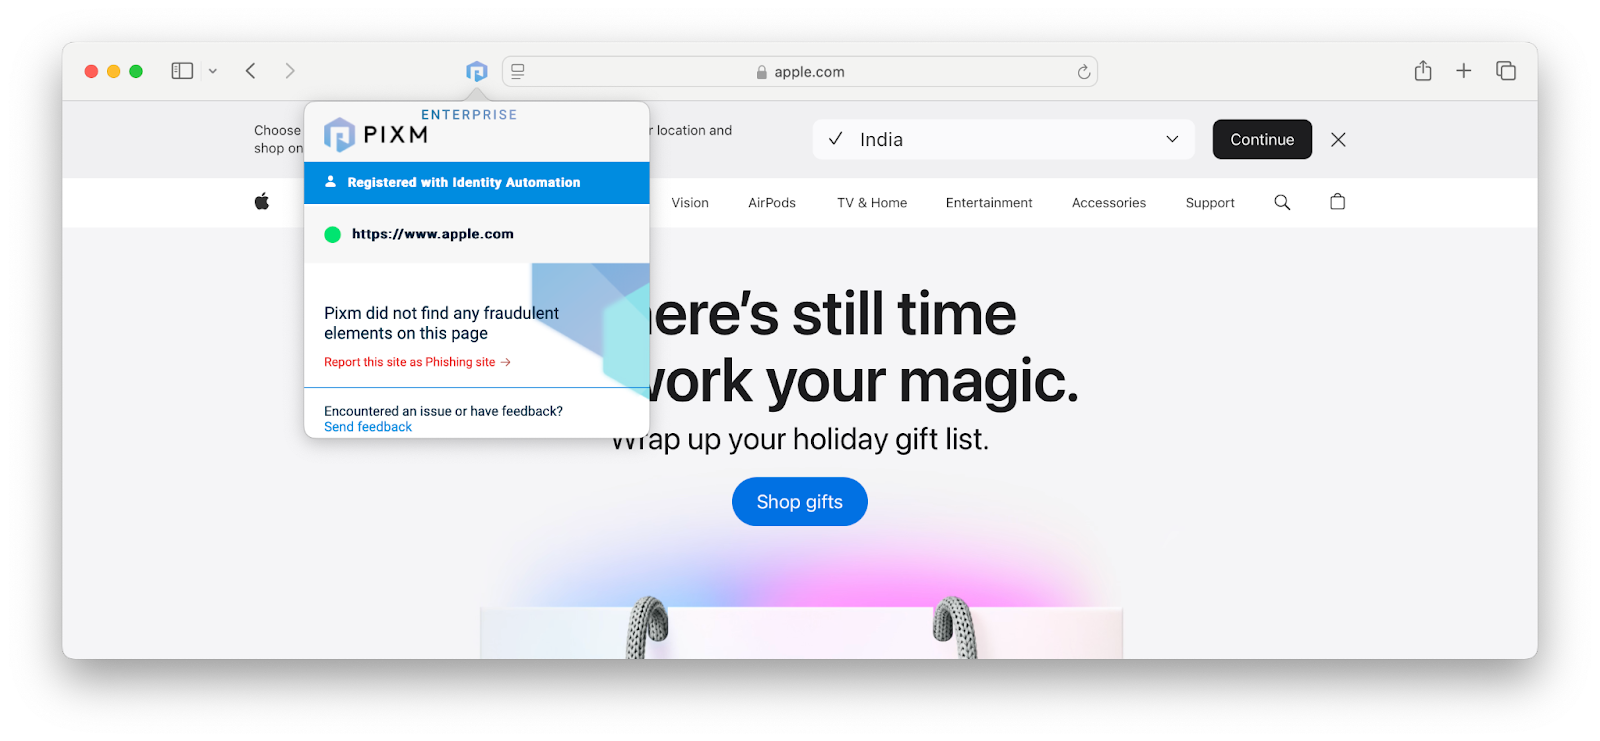
The Pixm Safari Extension is now fully installed. To confirm, click on the Pixm extension icon at the top left of the Safari browser. You should see that it is registered with your organization.
Uninstalling Pixm Chrome browser extension
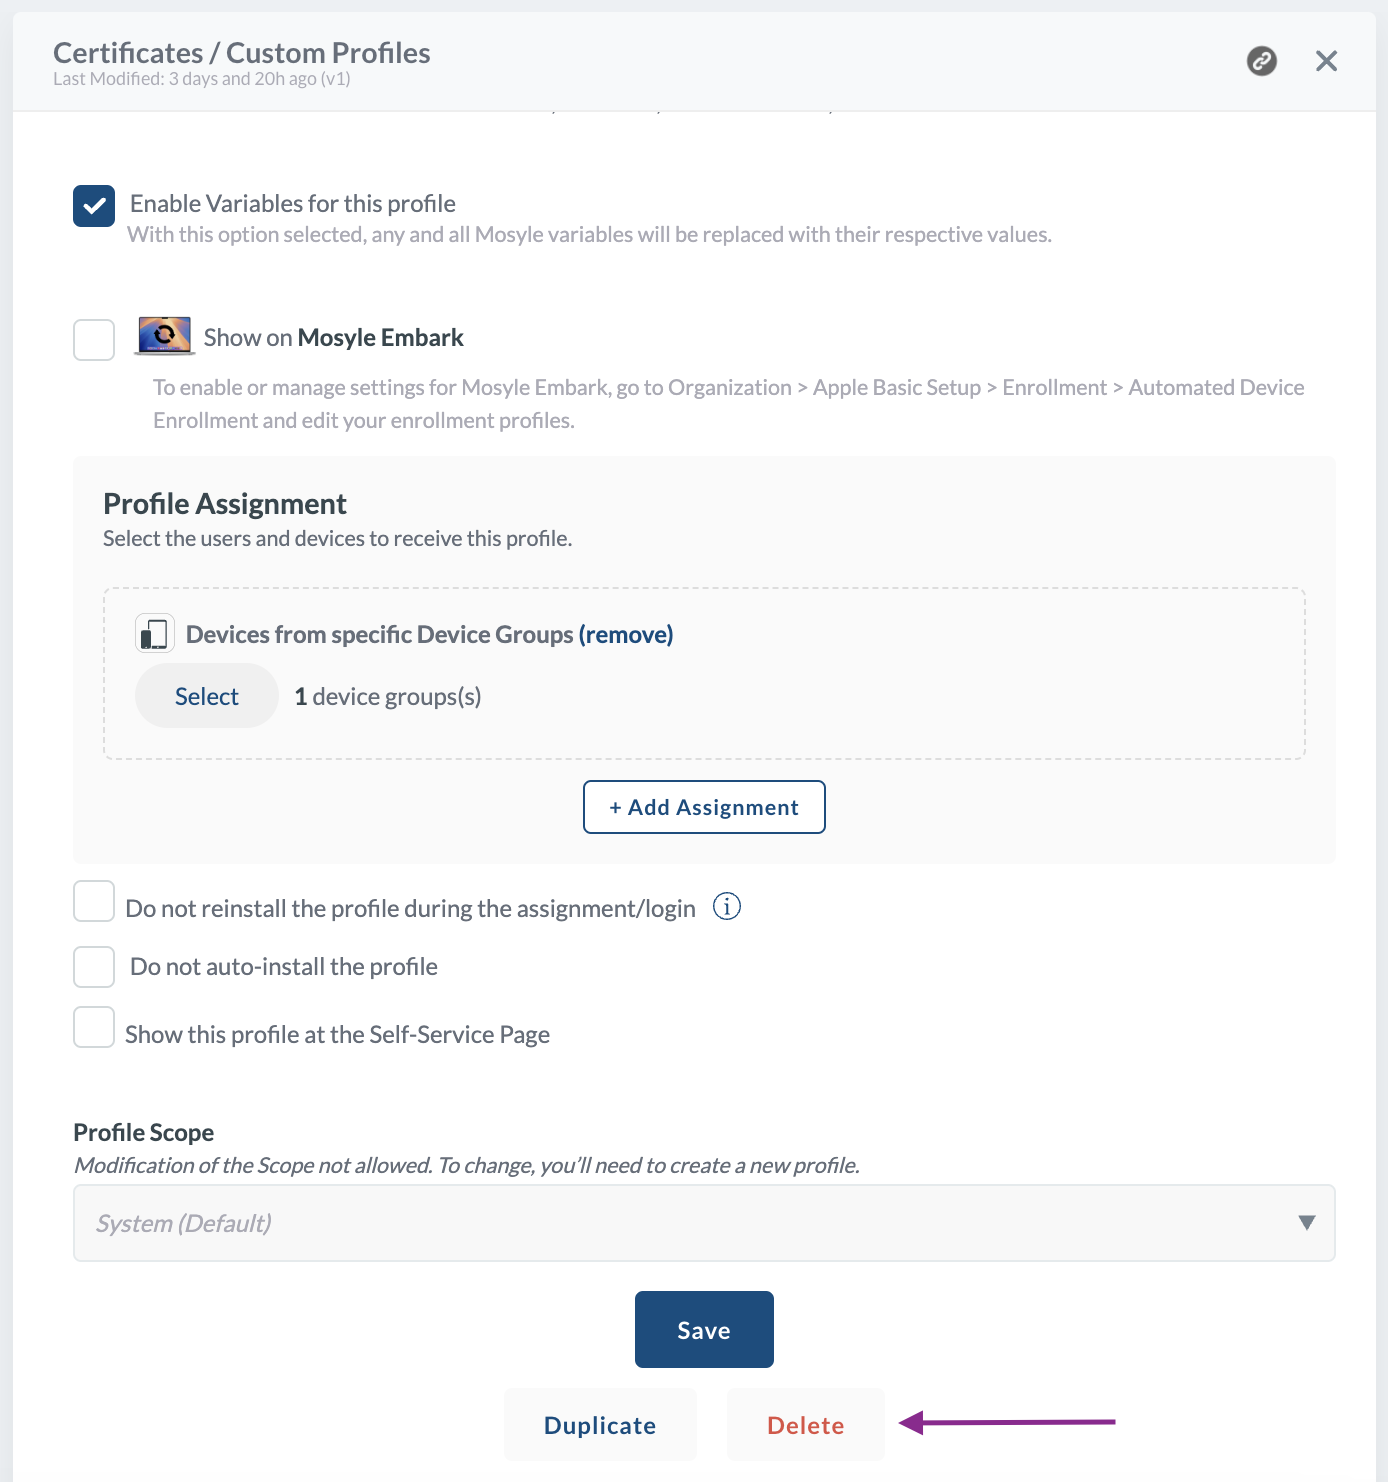
Click on Certificates / Custom Profiles under Management Profiles on the Management tab. Then, click on Pixm Chrome Extension. The Custom Profiles panel will open on the right.
Scroll down in the Custom Profiles panel, and then click Delete.
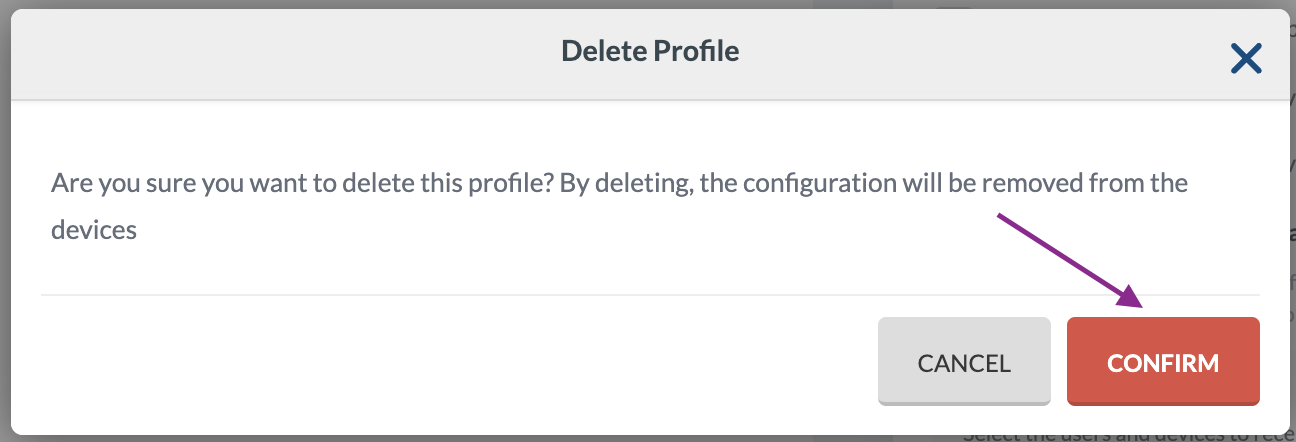
Click CONFIRM on the confirmation dialog.

In the next few minutes, the Pixm Chrome Extension will be removed from the Macs.
Uninstalling Pixm Firefox Browser Extension
Follow the same steps as outlined in the previous section for the Firefox profile. The complete removal of Firefox extension from user devices will occur only after finishing the remaining uninstallation steps.
Uninstalling Pixm Safari Browser Extension
Click on Install App under Management Profiles on the Management tab. Then, click on Pixm Desktop.
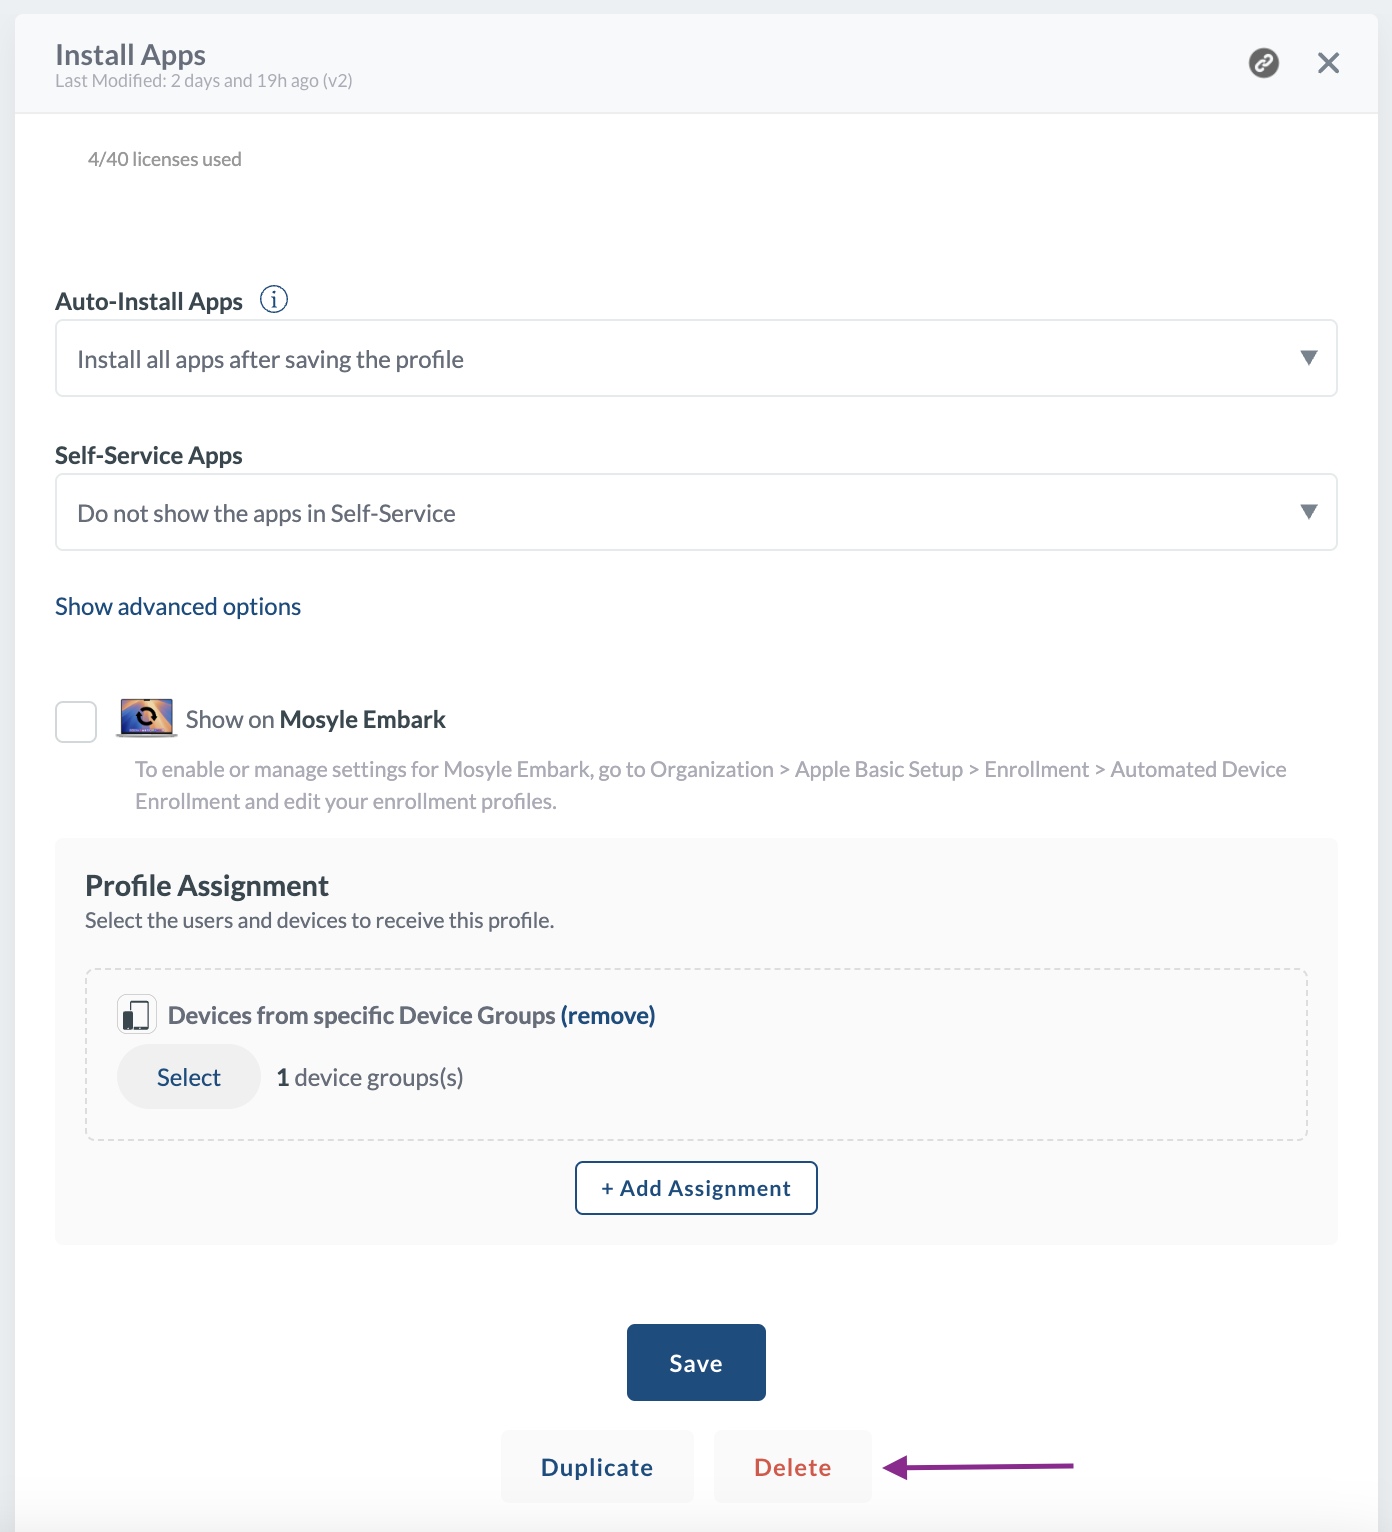
The Install Apps panel will open on the right. Scroll down within this panel. Click Delete.
Click CONFIRM on the confirmation dialog.

Revoke the licenses for the Pixm Desktop app assigned to the Macs. To do this, click Apple Apps and Books (VPP) under Applications on the Management tab.
Click your organization's name. (In this example, Pixm, Inc. is selected.)
In the right-side panel, locate the Pixm Desktop app and click it.
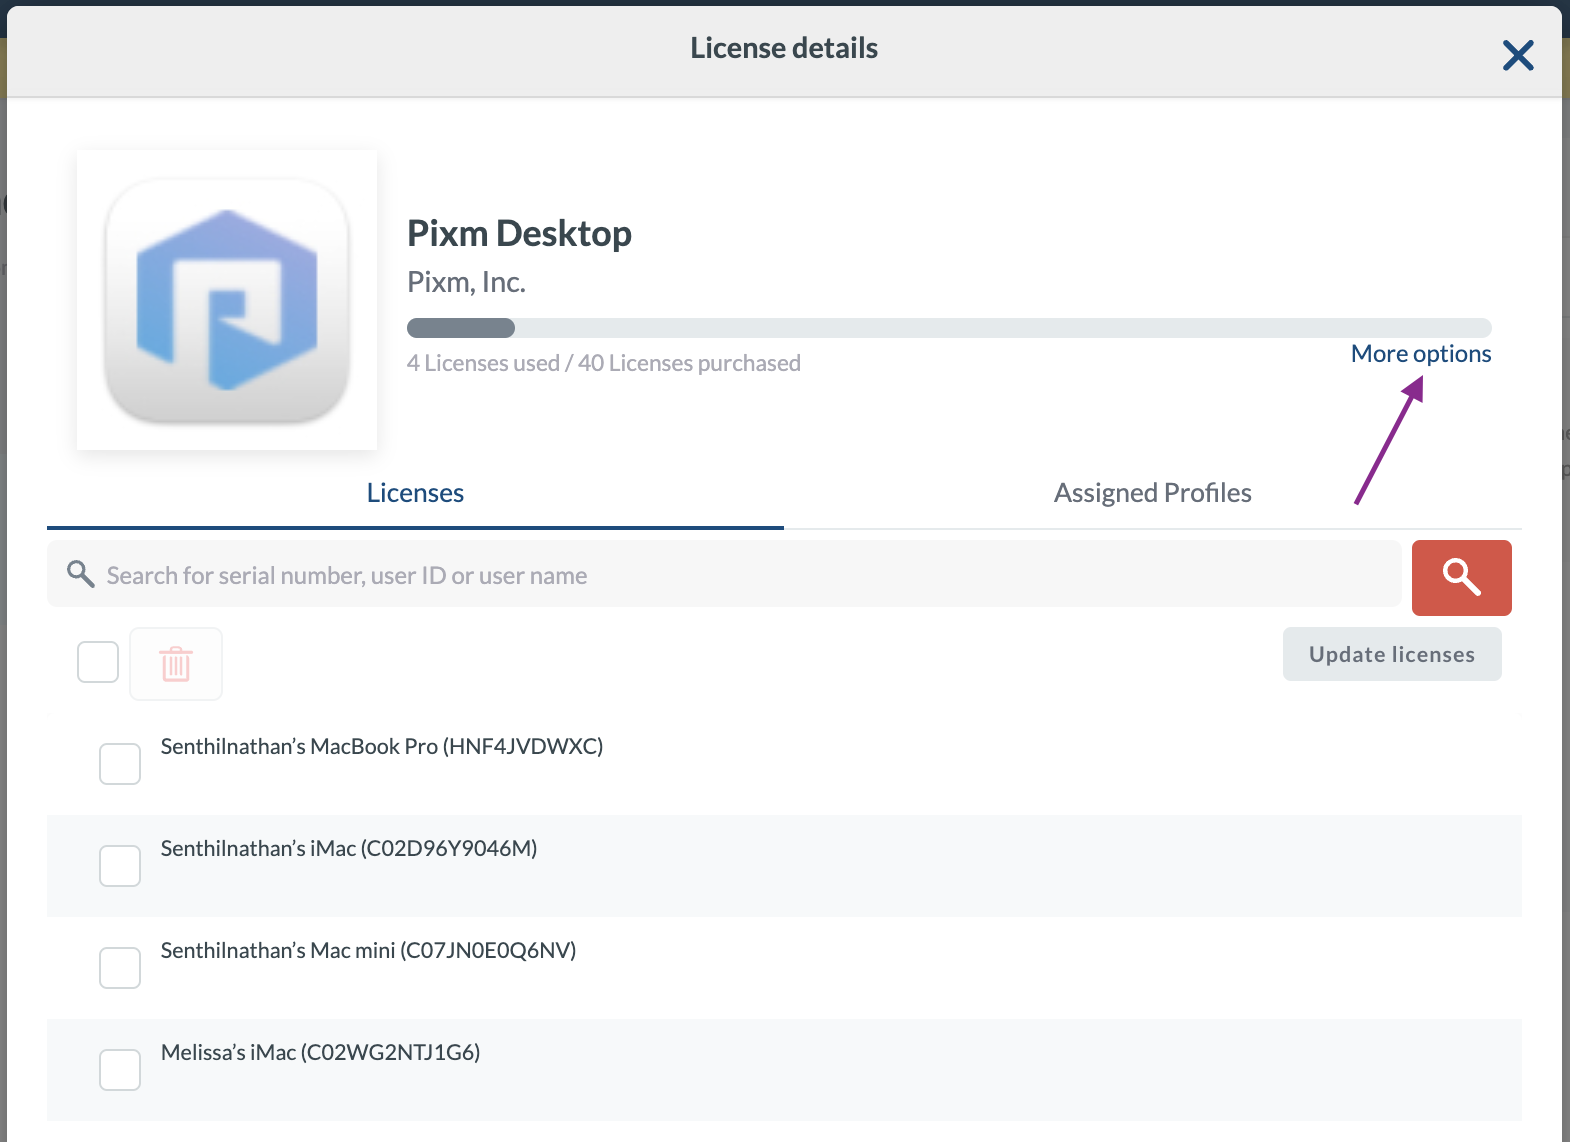
The license details dialog for the Pixm Desktop app will open. Click More Options.
In the options dialog, click Revoke all VPP app assignments.
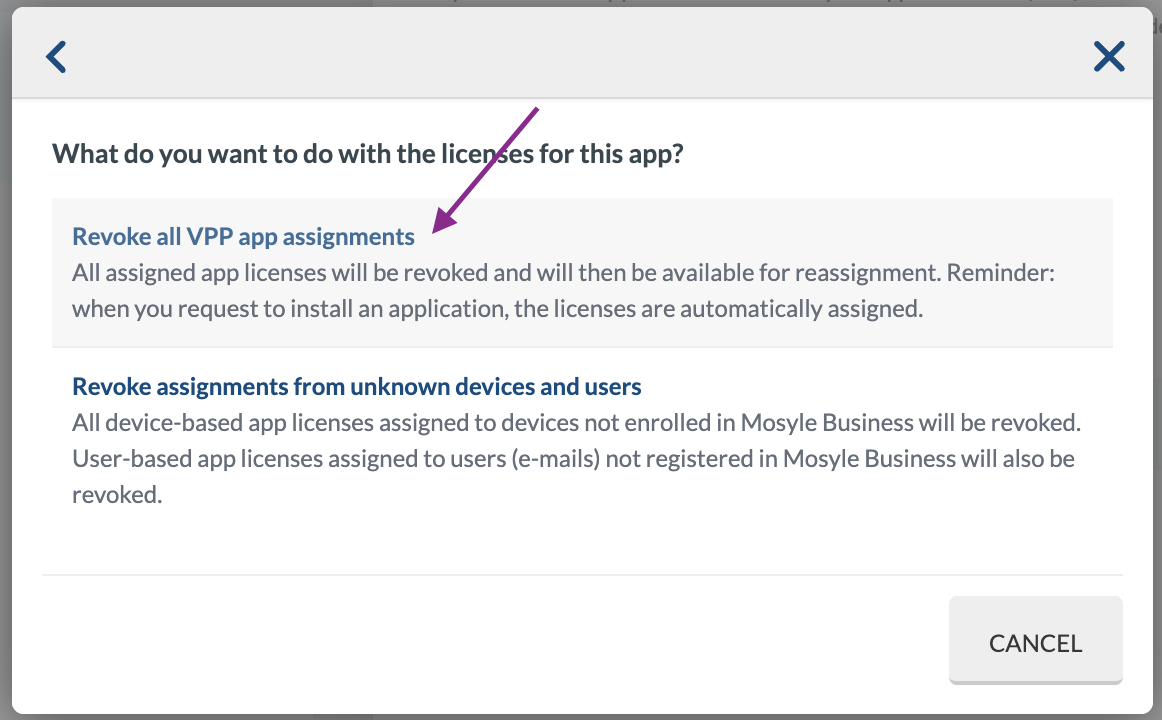
Click CONFIRM to revoke the licenses assigned to the Pixm Desktop app.

The complete removal of Safari extension from user devices will occur only after finishing the remaining uninstallation steps.
11. Removing Custom Device Group for Pixm Mac Deployment
Click on Device Groups under Devices on the Management tab. Then, click the group titled “Computers with Pixm Pkg Installed.”

The Device Group Information panel will open on the right. Click Delete device group.
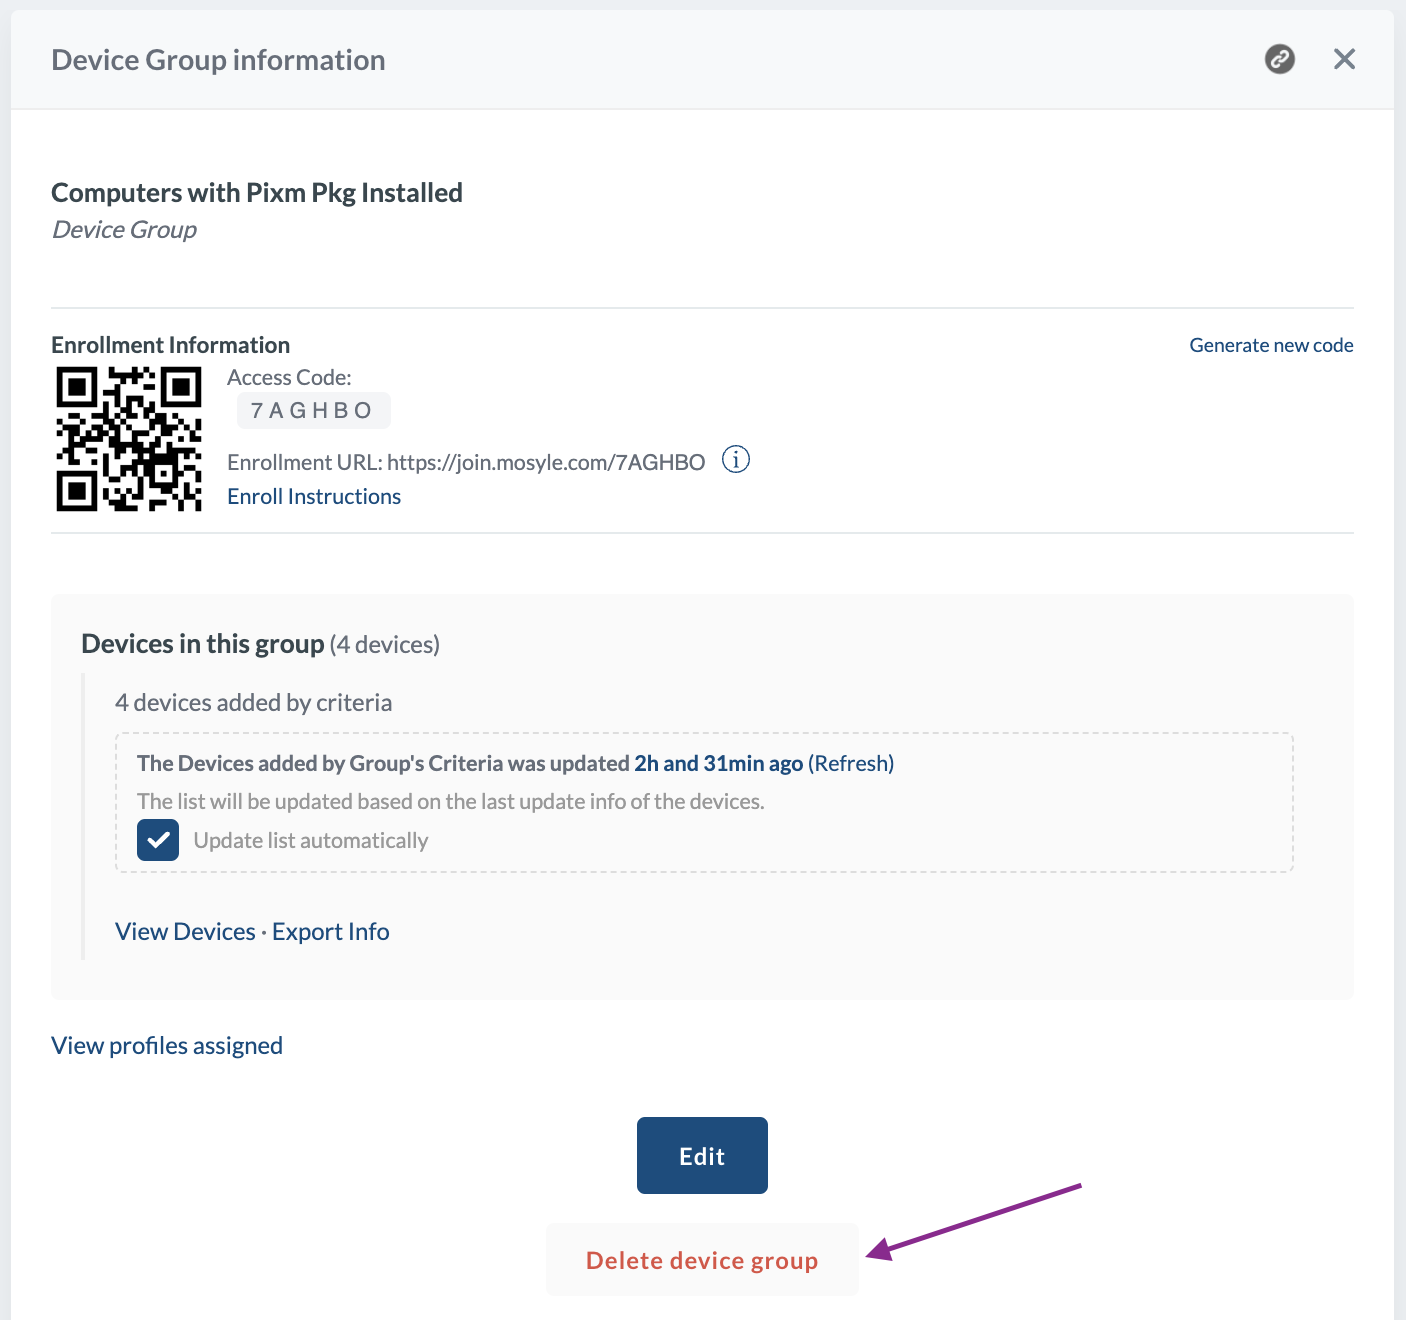
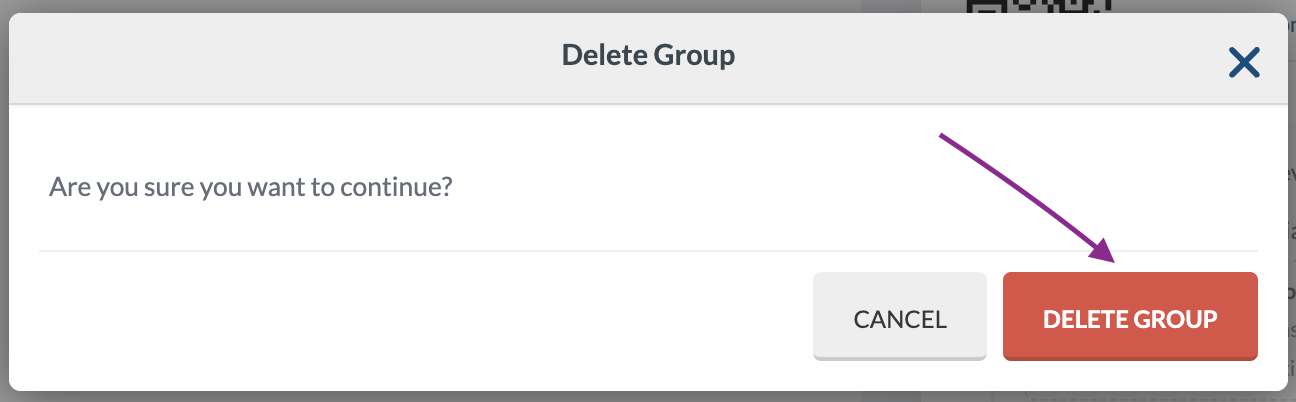
Click DELETE GROUP on the confirmation dialog to remove this custom group.
Uninstalling Pixm
Deploying the Pixm Mac Uninstaller will ensure the complete removal of the Pixm extensions and any other traces of Pixm from the devices.
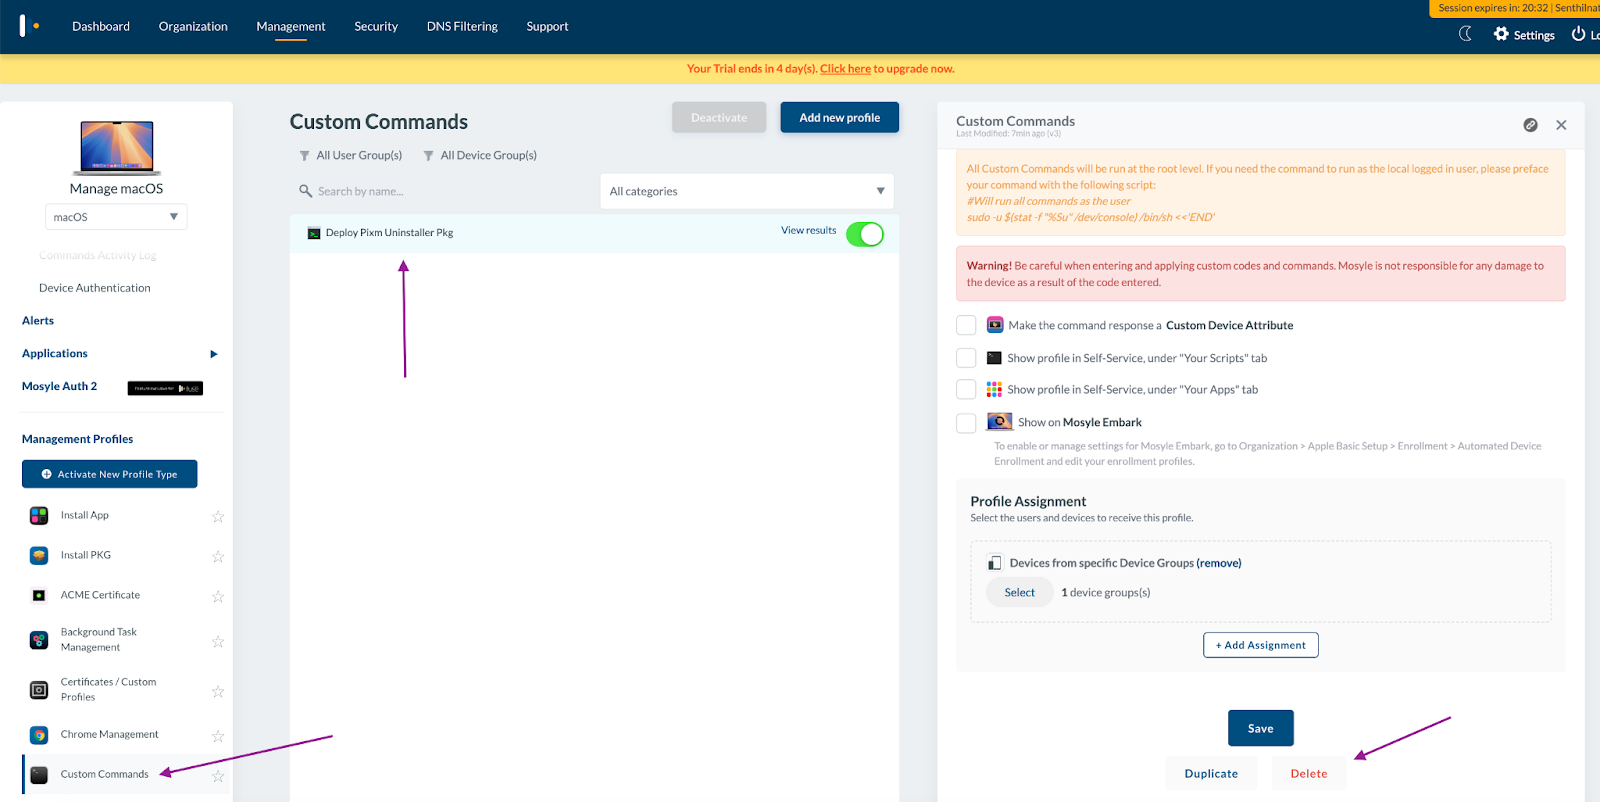
Click Custom Commands under Management Profiles on the Management tab. Click on “Deploy Pixm Mac Installer Pkg”.
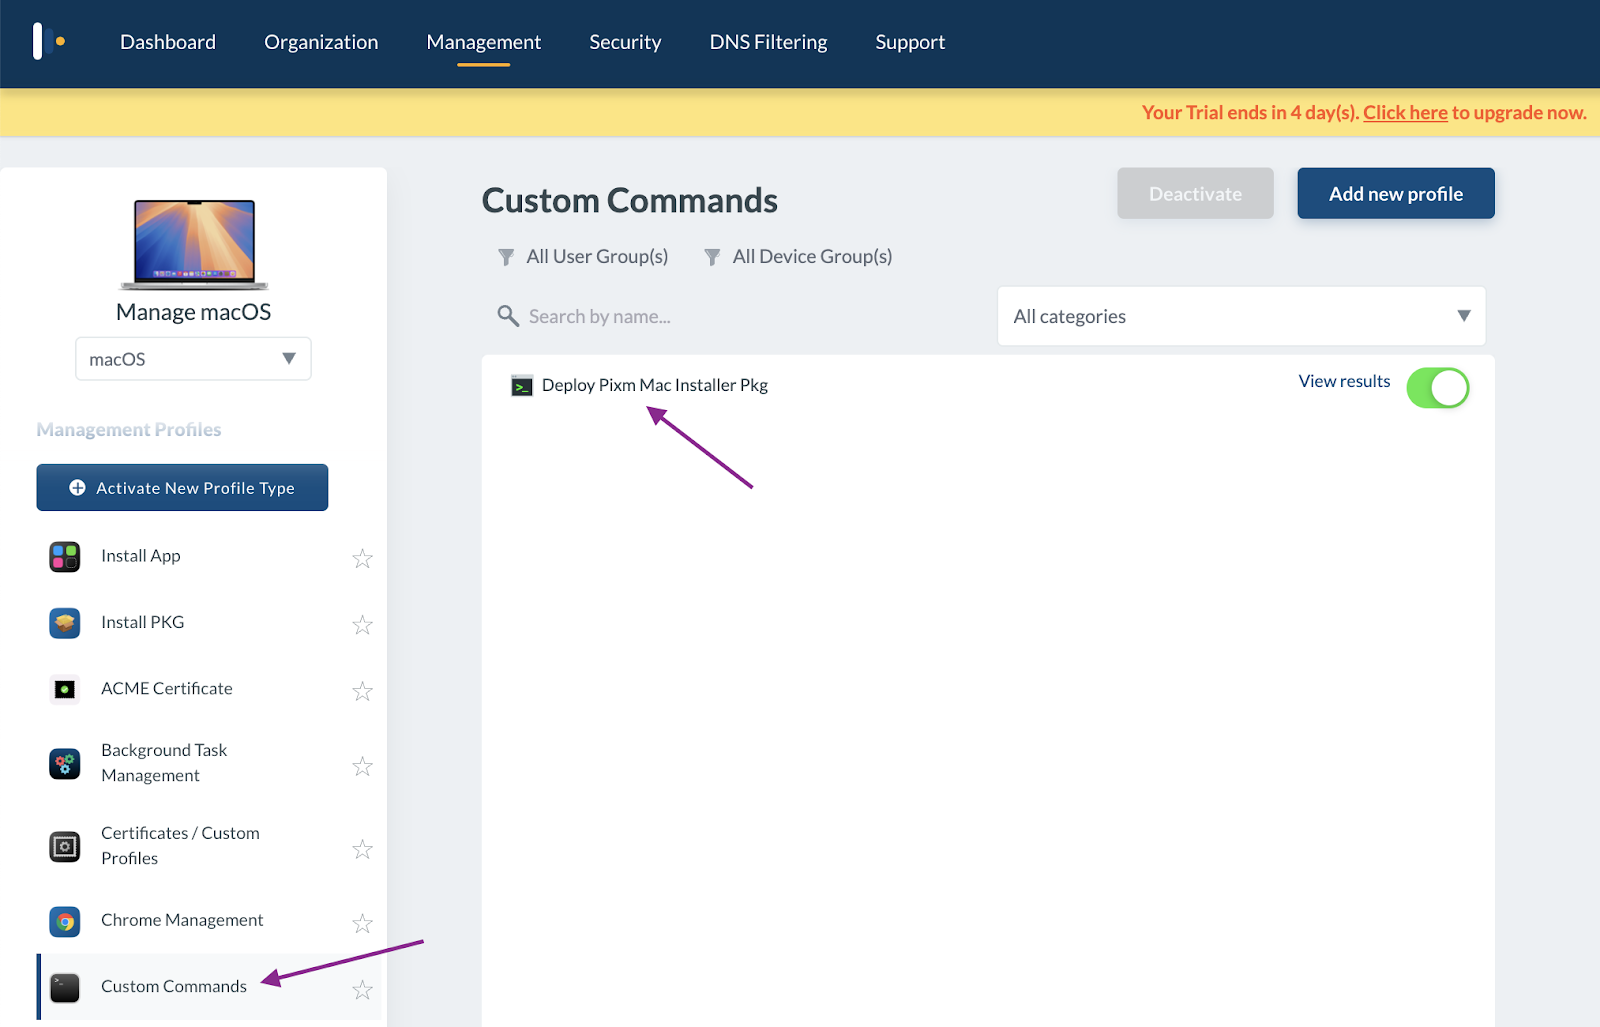
Click Delete in the Custom Commands panel that opens on the right.
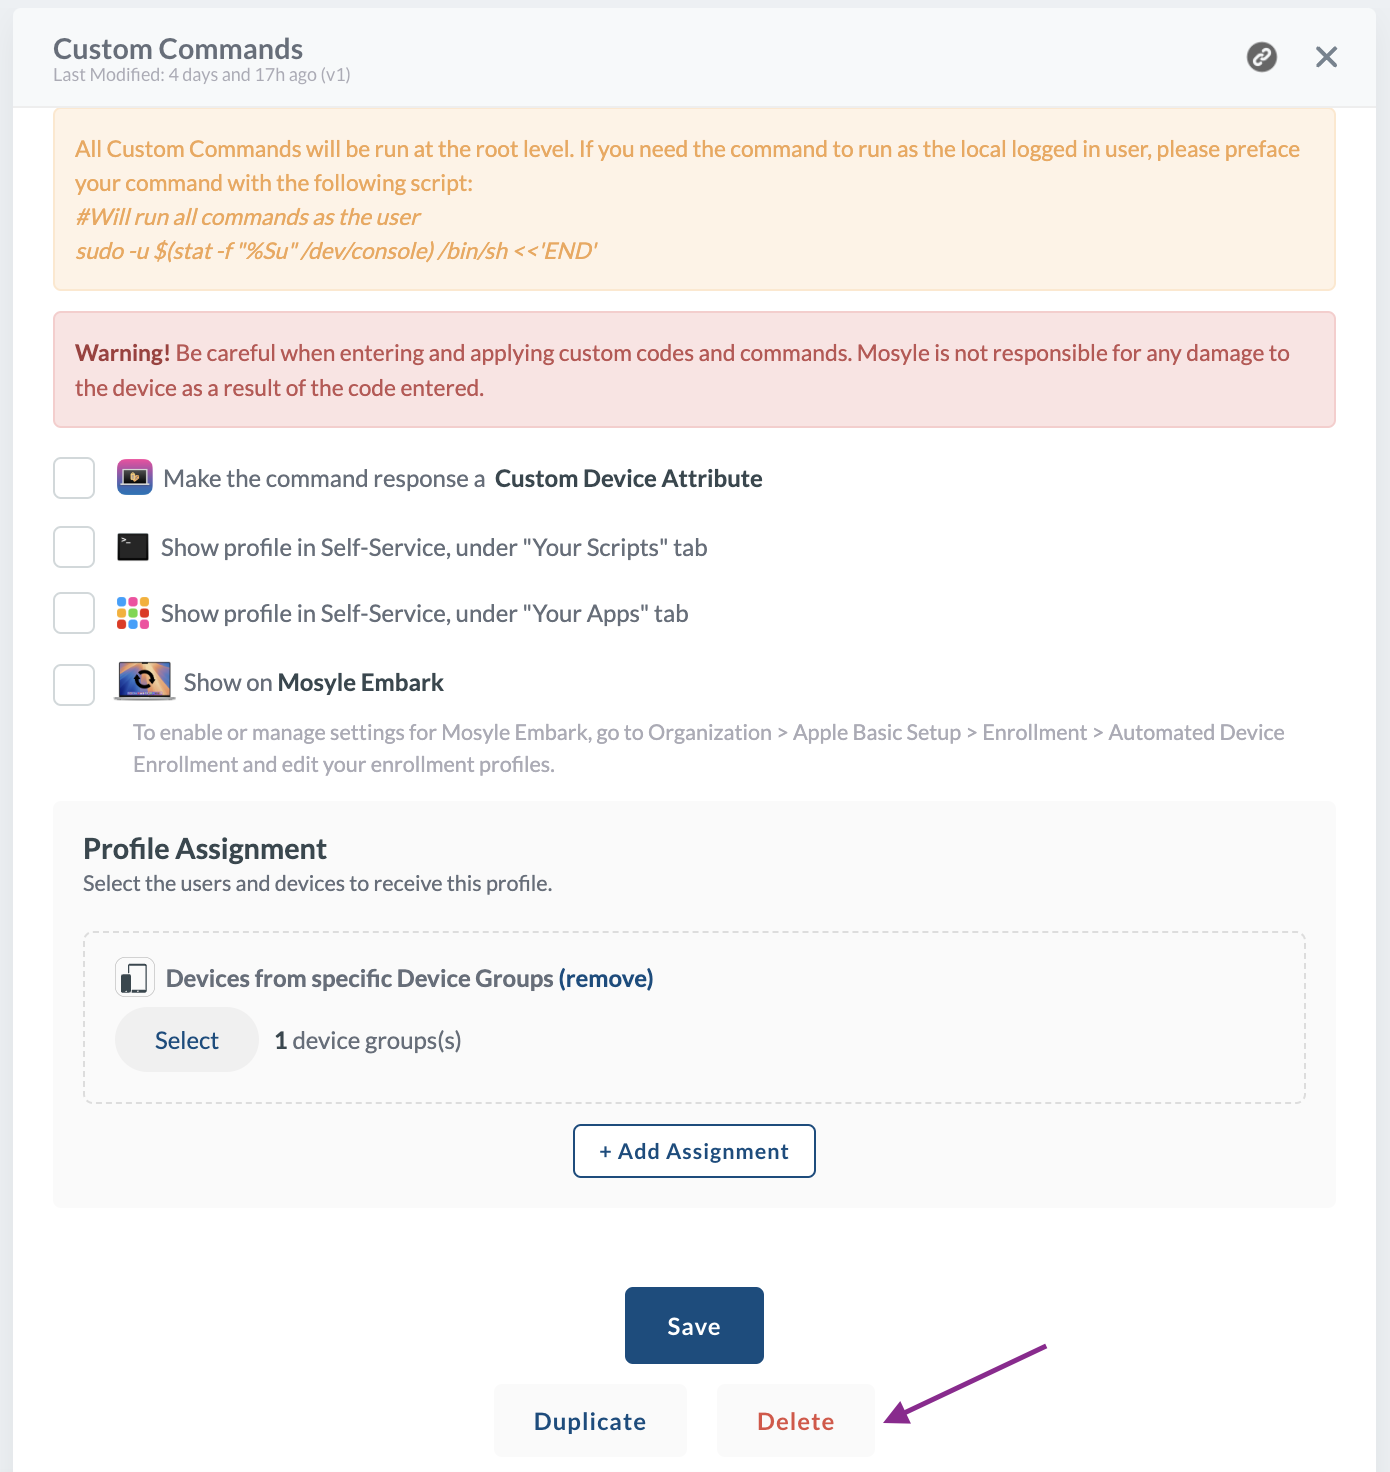
Click CONFIRM on the confirmation dialog to remove this custom command.
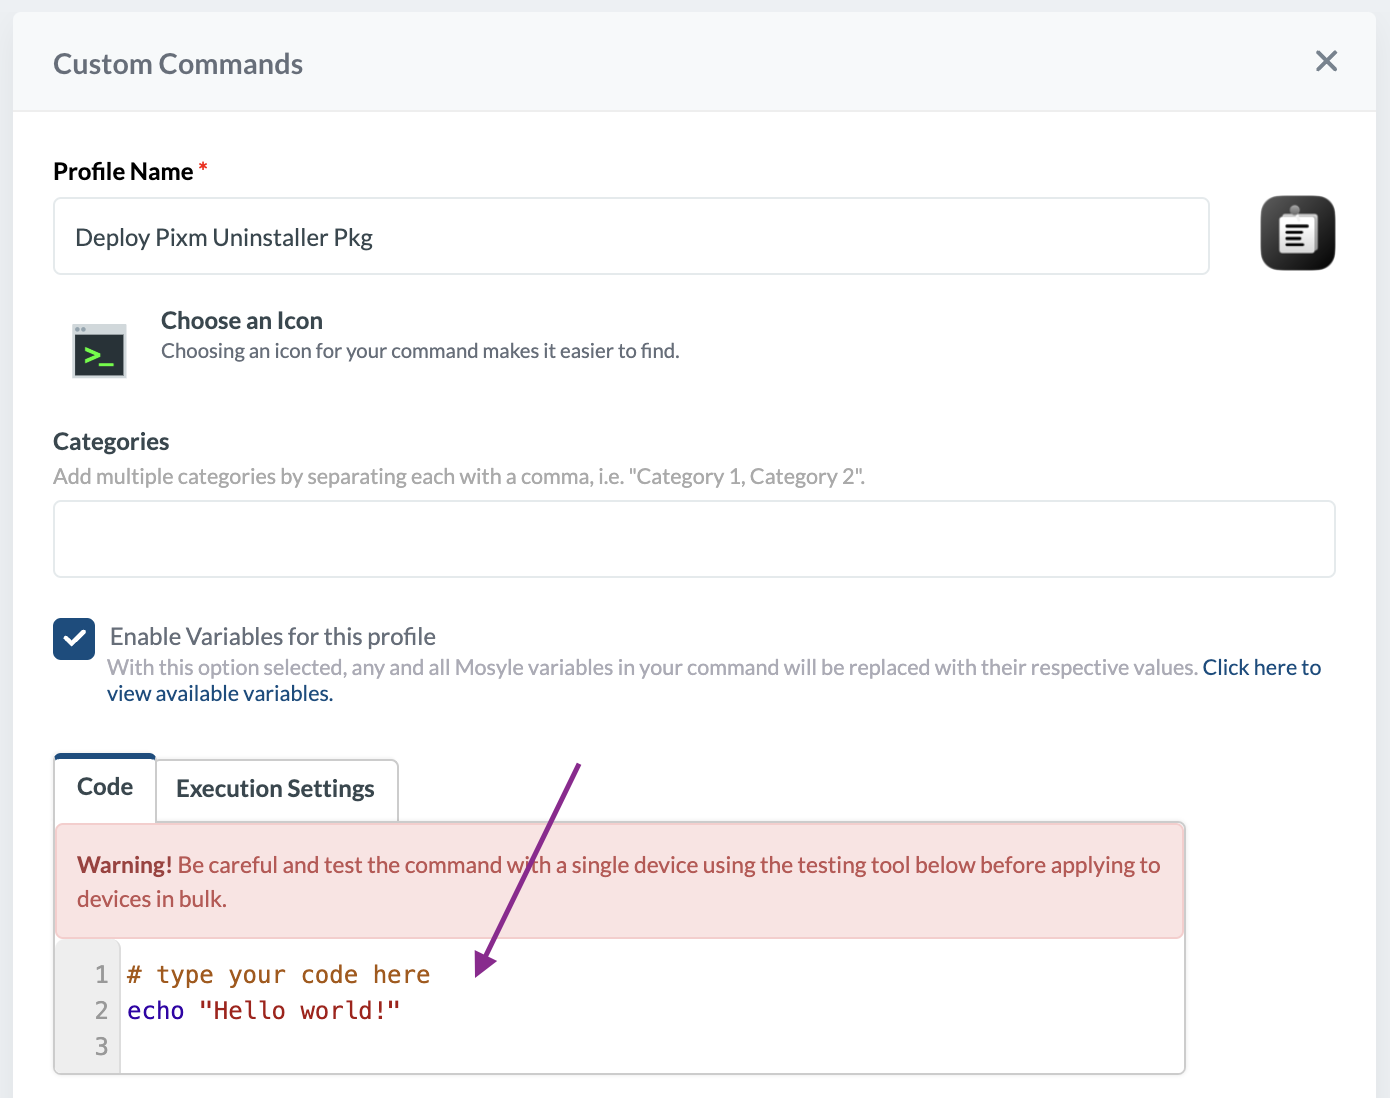
To uninstall Pixm Mac, you must deploy the PixmMacUninstaller package to the Macs. This can be accomplished using a new custom command.
Click Custom Commands under Management Profiles on the Management tab. Click on “Add new profile”.
The Custom Commands panel will open on the right. Enable the checkbox labeled "Enable Variables for this profile." Then, click the text link "Click here to view available variables." You must use the Mosyle variable that denotes the PixmMacUninstaller package, as explained in the previous section (4). This is being revisited here for reference.
On the next dialog - Variables available for Custom Command, click “View Mosyle CDN Variables”.
This will open a dialog displaying the Mosyle CDN variables. Here, copy the variable value corresponding to PixmMacUninstaller package.
Here the value is: %MosyleCDNFile:56db0120-7375-40ed-8ee6-62545cbf81fb%
Dismiss this dialog and go back to the Custom Commands panel.
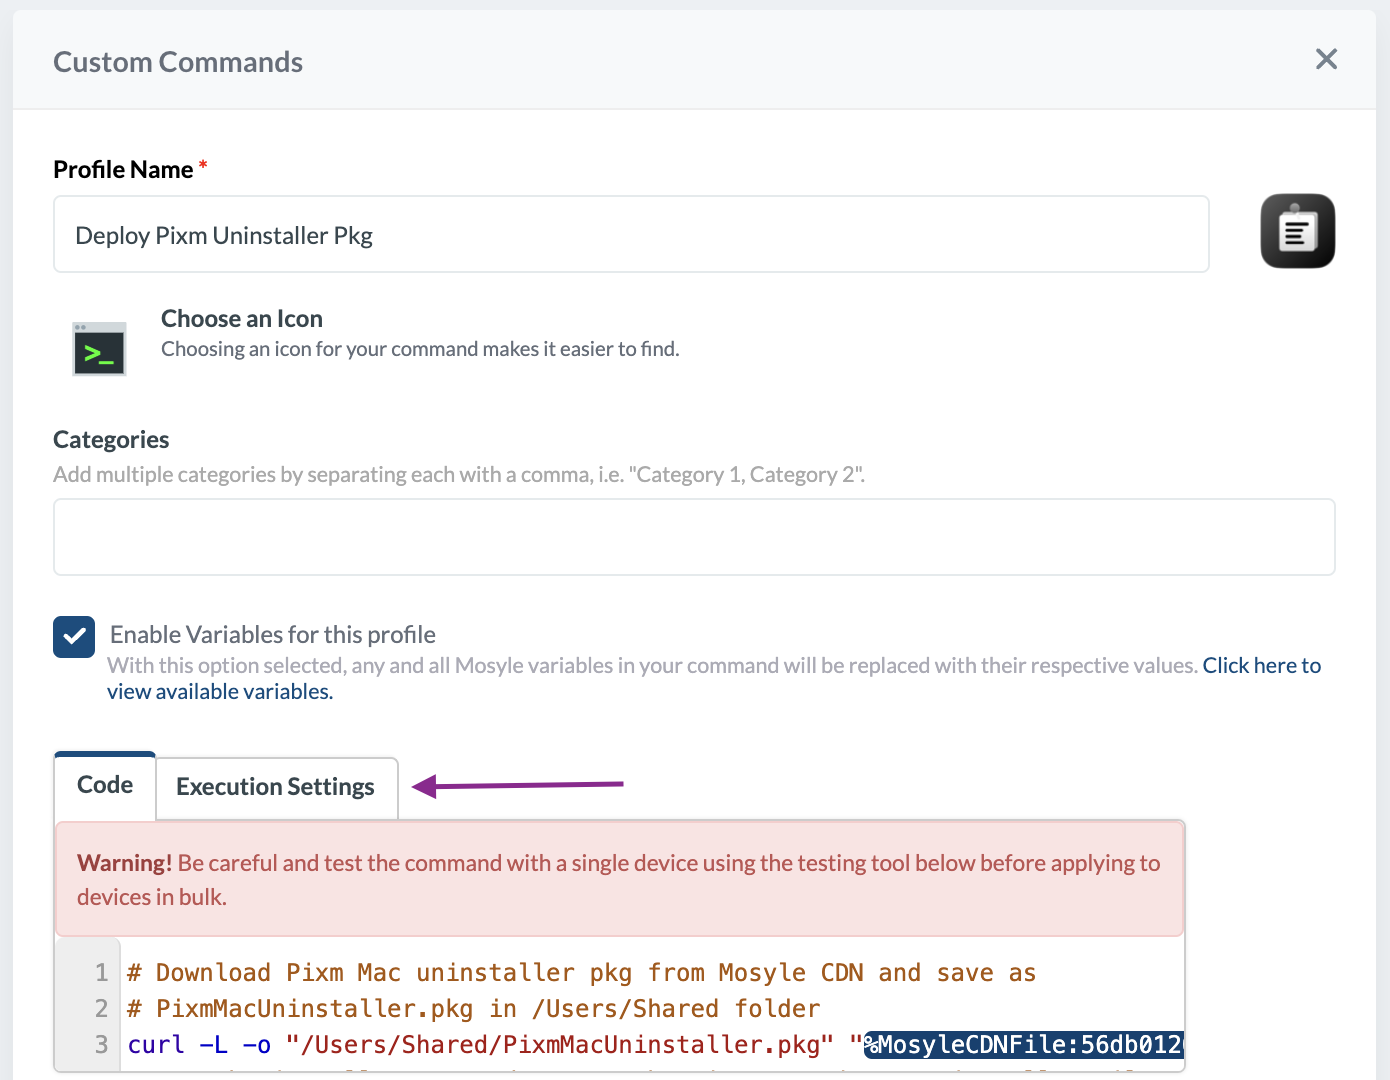
Click on the Code section to open the Code Edit dialog.
In the Code Edit dialog, select Free Scripting, remove any sample script if present, and then copy and paste the following script.
# Download Pixm Mac uninstaller pkg from Mosyle CDN and save as
# PixmMacUninstaller.pkg in /Users/Shared folder
curl -L -o "/Users/Shared/PixmMacUninstaller.pkg" "%MosyleCDNFile:56db0120-7375-40ed-8ee6-62545cbf81fb%"
# Run the installer command to run the Pixm Mac PixmMacUninstaller silently on the Mac
installer -pkg "/Users/Shared/PixmMacUninstaller.pkg" -target /
# Remove the Pixm Mac Uninstaller pkg after installation
rm -rf "/Users/Shared/PixmMacUninstaller.pkg"
Use the Mosyle variable value corresponding to the PixmMacUninstaller package in the Mosyle CDN Variables dialog.
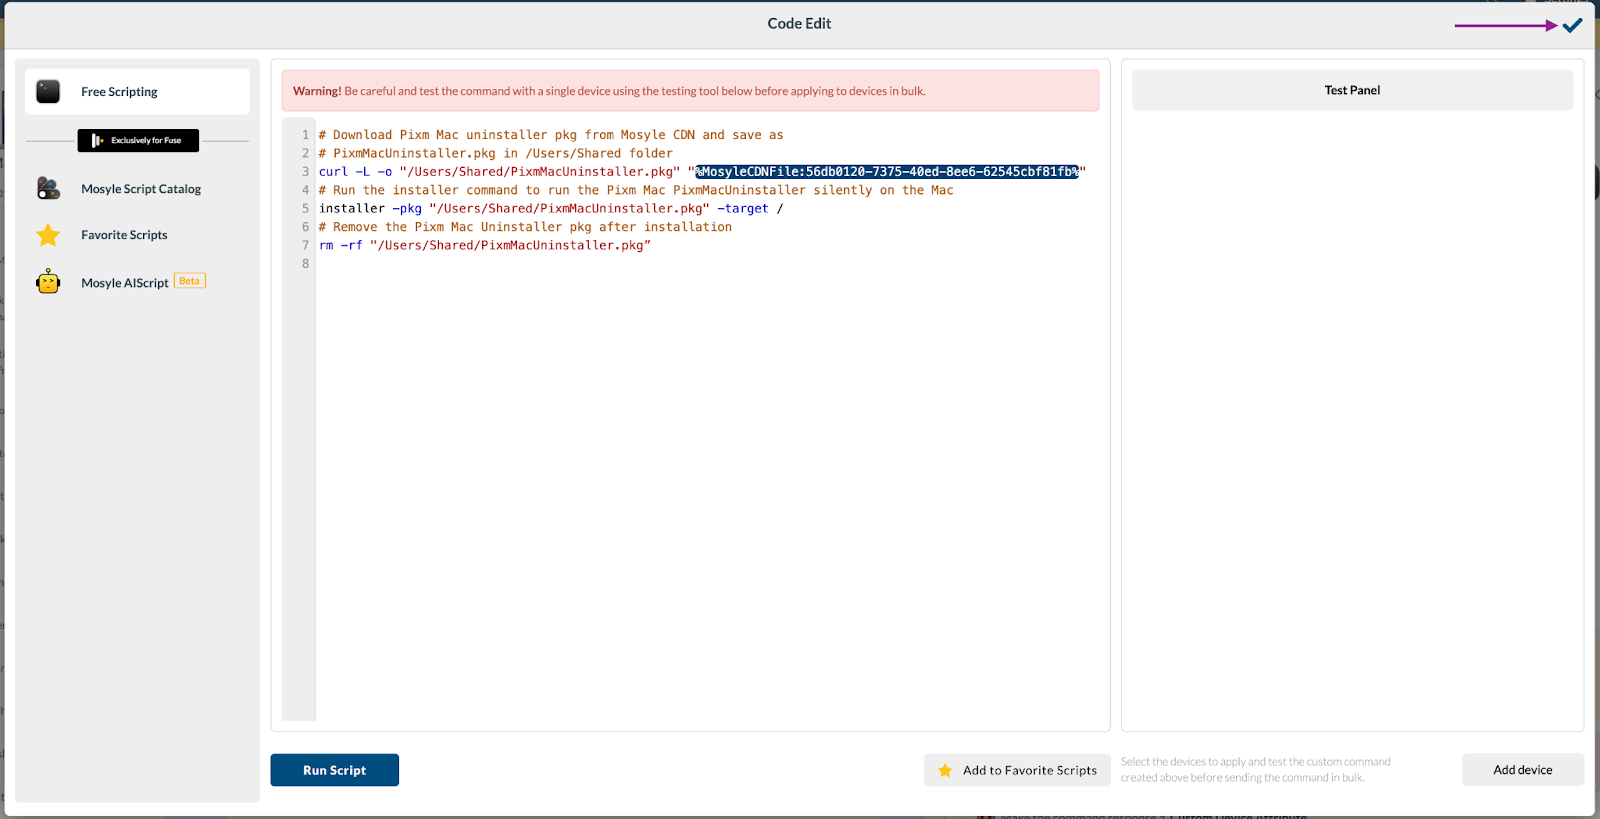
Now, click the ✔ in the top right corner to save the command.
Click Execution Settings
Click the Execute command drop-down box and select the value “Immediately when saving the profile, upon assignment, or based on schedule or events”. Select the “Every Device Info” update under Event. Select “Only once (Event Required)” under Schedule.
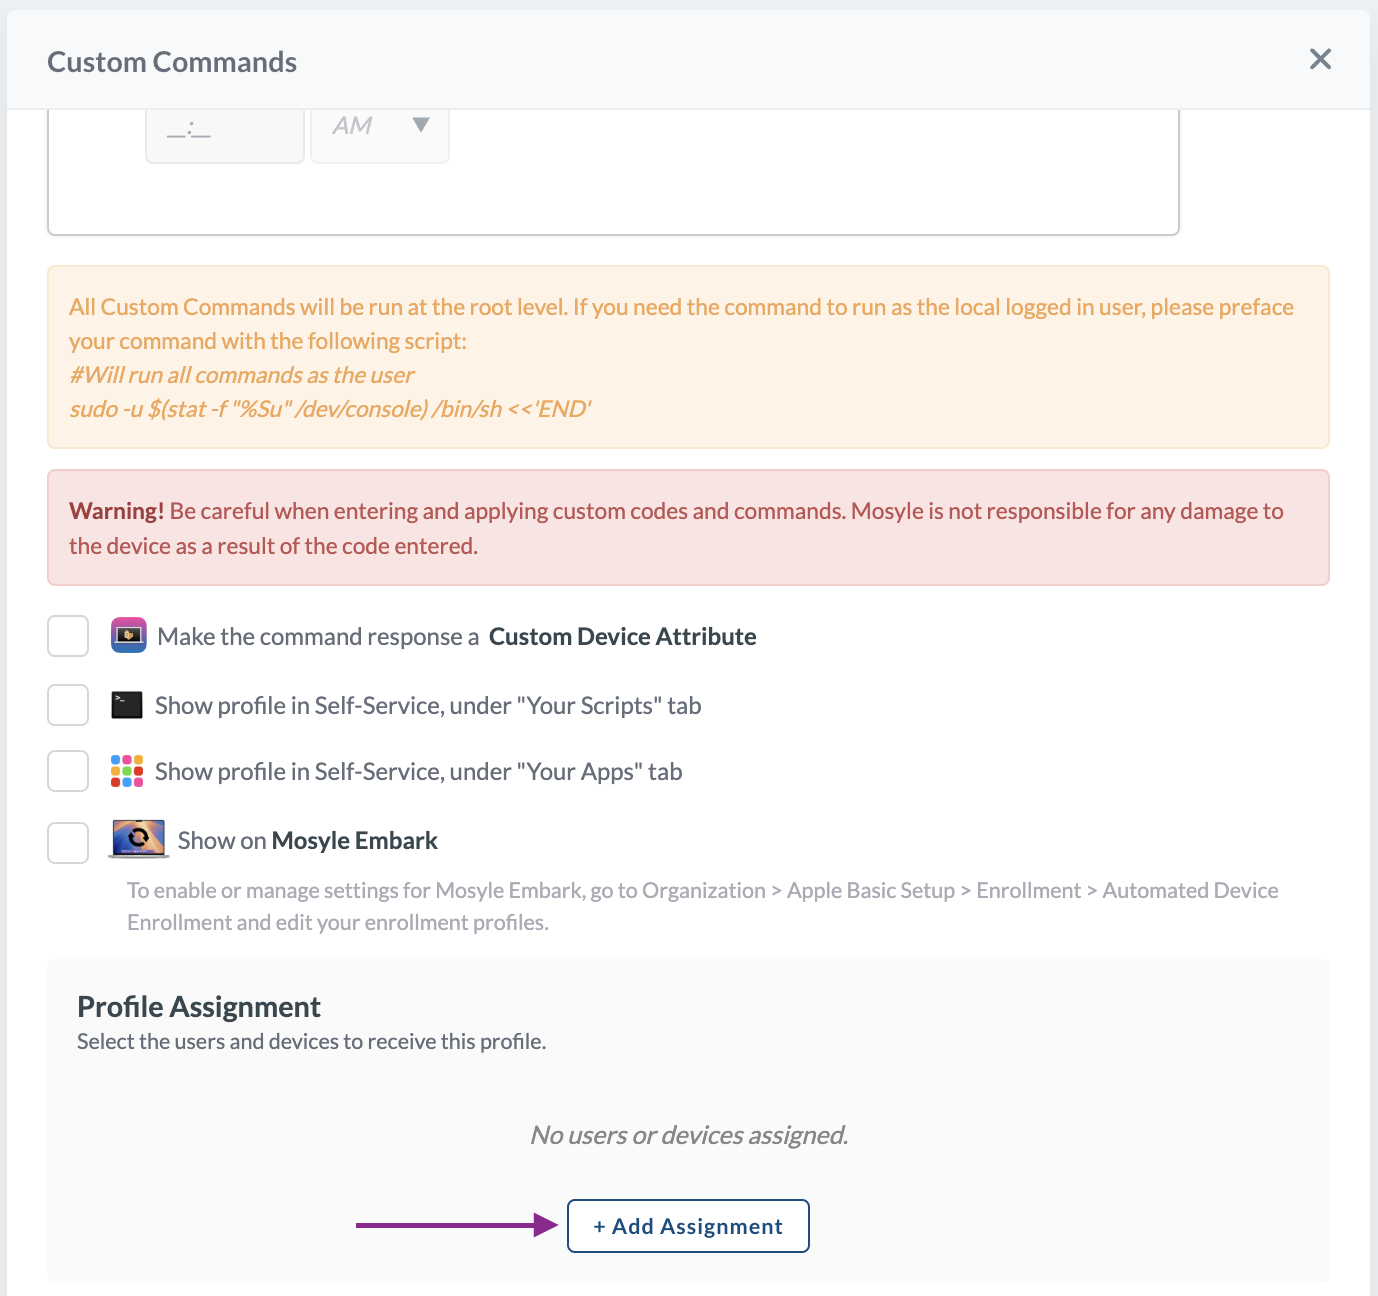
Now, scroll down the Custom Commands panel to assign the profile to the enrolled Macs. You can assign the profile to either a group of Macs or specific individual Macs.
Click Add Assignment to open the device assignment dialog. We selected “Devices from specific Device Groups” in this example deployment.
This will open the Device Groups Selector dialog. Here, select one or more groups where the PixmMacInstaller package may have already been deployed. In this example, we selected the group named "General."
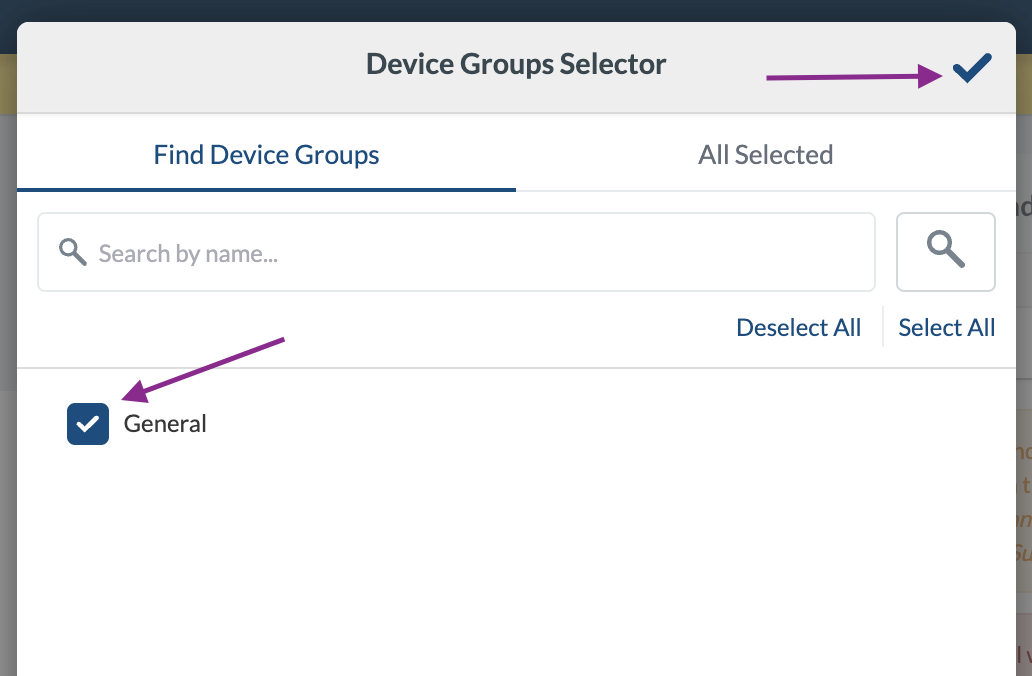
Select the ✔️icon on the top right corner to dismiss this dialog.
Click Save on the Custom Commands panel.
The command “Deploy Pixm Mac Uninstaller Pkg” will now be listed under Custom Commands as shown below. Click the View Results link to check the deployment status of the package.
Here is the Results panel, which will open on the right side. The results will be logged for all Macs where the PixmMacUninstaller package has been deployed. The message “The install was successful” indicates that the PixmMacUninstaller package has been successfully deployed and executed on the Macs.
You can remove this custom command once you confirm from the Results Log that the PixmMacUninstaller package has been successfully deployed to all the Macs.
Before removing this command, please ensure that the Results log confirms the command has been successfully deployed to all the Macs you selected as targets. If you remove the command before it has been deployed to all Macs, any Macs that did not receive the command may still retain traces of the Pixm extensions.
To remove this command, click Custom Commands under Management Profiles on the Management tab. Click on “Deploy Pixm Mac Uninstaller Pkg”. Click Delete on the Custom Commands panel opened on the right.