End Users/Administrative Guide to Fast User Switching
There are 3 scenarios for Managing Fast User Switching settings for Windows Auth Client:
When the machine is “personal” (BYOD) and is NOT managed by the organization - the user who owns the device determines the setting - it is managed by the Student (or the Parent)
When the machine is owned by the organization and is not joined to a domain
When the machine is owned by the organization and is domain joined
This would also apply to Intune managed devices
Note
Windows HOME edition doesn’t provide the tools for managing fast user switching - we can provide some guidance to change settings, but given the device is a home device, the parent/student is likely to use the out of the box Windows home experience, which probably should not be changed. Also note that Windows Home edition does not support being joined to a domain. Upgrade the edition of the operating system to pro or above for that feature.
Scenario 1: The machine is ‘personal’, and not managed by the organization.
Follow the same steps as scenario 2 if desired - the student or parent will be responsible for managing their own device and configuring it accordingly
Scenario 2: The machine is not joined to a domain.
In this scenario, presumably, an administrator prepared the machine by installing Windows, or purchased a device that is preinstalled. Depending on the OS level/Edition, the admin has 2 choices on how to configure this settings.
Windows Home: does not come preloaded with GPEDIT.MSC - so the only choice for setting the value is by Regedit. There is a way that can be used to get GPEdit to run on a home edition: Fix Gpedit.msc Not Found In Windows 10/Windows 11 As the article describes, there are many reasons why this isn’t functional, however, given the Home edition problem, the feature must be enabled under the heading “Install gpedit.msc in Windows Home Edition” - which provides command line instructions for installing the tool from Microsoft via an elevated command line prompt.
i. FOR %F IN ("%SystemRoot%\servicing\Packages\Microsoft-Windows-GroupPolicy-ClientTools-Package~*.mum") DO (DISM /Online /NoRestart /Add-Package:"%F")
ii. FOR %F IN ("%SystemRoot%\servicing\Packages\Microsoft-Windows-GroupPolicy-ClientExtensions-Package~*.mum") DO (DISM /Online /NoRestart /Add-Package:"%F")
The alternative choice is to directly set the value via
regedit.exe
Windows Pro or above: - GPEDIT.MSC can be directly executed
in the search bar, type “edit group policy” and start the application (Windows 10/11) - select the best match as as shown here to start the application:
alternatively, press
<windows key +> rkey combination which will bring up the run command boxtype
gpedit.mscand hit enter to start the group policy editorAlternatively, or use the search bar and select the best match as as shown here to start the application:

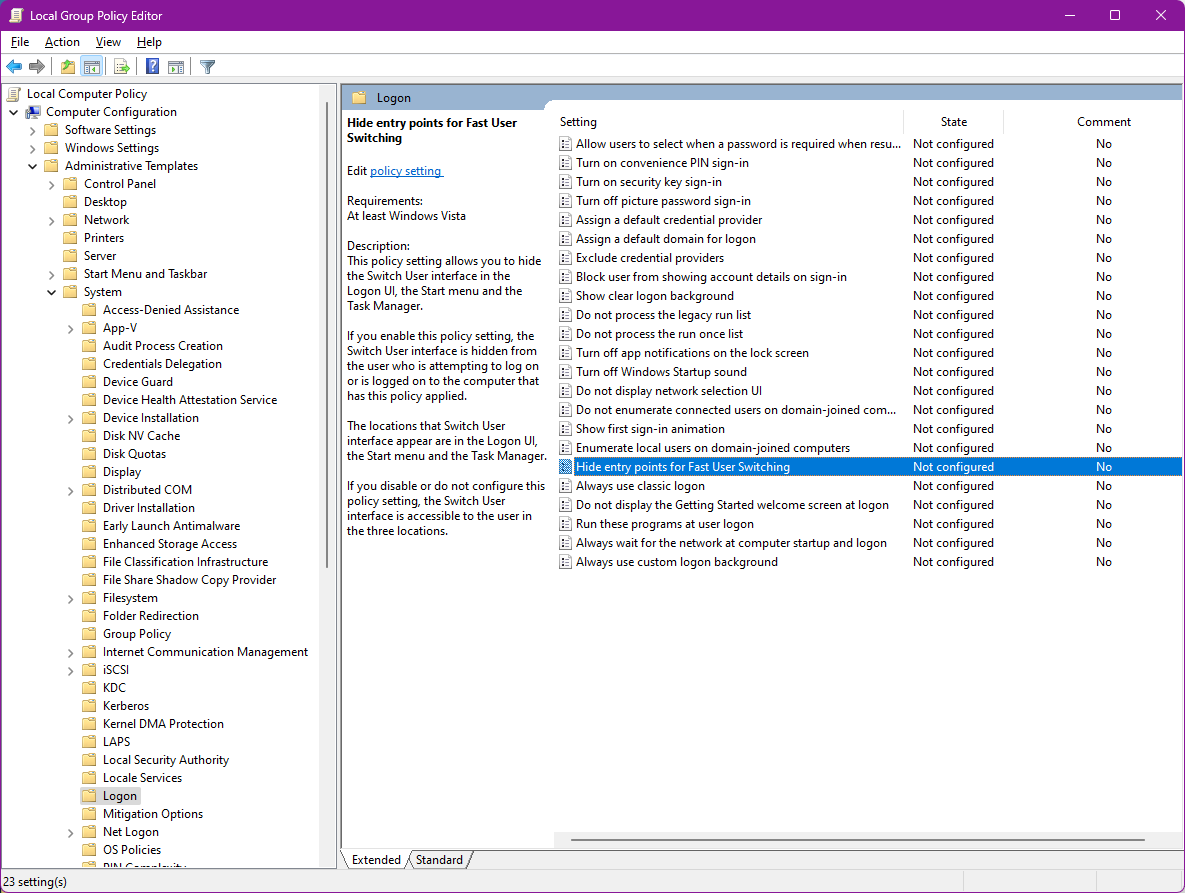
Once you have the Local Group Policy Editor running Navigate to Local Computer Policy → Computer Configuration → Administrative Templates → System → Logon in the left navigation bar, then in the right side window, Select Hide entry points for Fast User Switching - adjust this value as desired. When ready, restart the PC for the policy to apply.

Scenario 3: If the machine is domain joined, then the domain controller is responsible for managing this setting.
Microsoft provides documentation on how to configure policies. This link provides examples for setting Branch Cache and Windows Firewall settings. While we desire to set Fast User Switching settings: Use Group Policy to Configure Domain Member Client Computers we will use similar instructions here to describe the steps necessary to perform to
Hide entry points for Fast User SwitchingOn a computer upon which the Active Directory Domain Services server role is installed, in Server Manager, click Tools, and then click Group Policy Management. The Group Policy Management console opens.
In the Group Policy Management console, expand the following path: Forest:
http://example.com, Domains,http://example.com, Group Policy Objects, wherehttp://example.comis the name of the domain where theFast User Switchingclient computer accounts that you want to configure are located.Right-click Group Policy Objects, and then click New. The New GPO dialog box opens. In Name, type a name for the new Group Policy Object (GPO). For example, if you want to name the object
FastUserSwitchingClient Computers, type FastUserSwitching Client Computers. Click OK.In the Group Policy Management console, ensure that Group Policy Objects is selected, and in the details pane right-click the GPO that you just created. For example, if you named your GPO
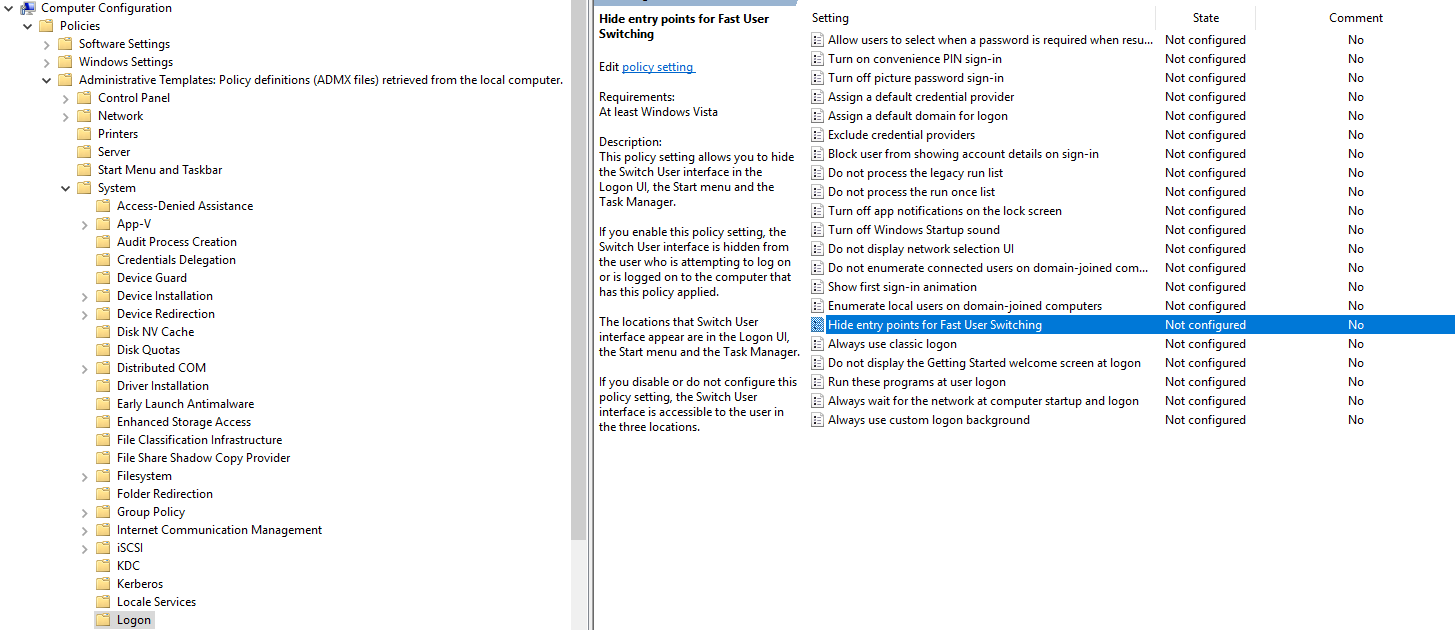
FastUserSwitching Client Computers, right-click FastUserSwitching Client Computers. Click Edit. The Group Policy Management Editor console opens.This will launch the Group Policy Management Editor - which looks almost identical to the Local Group Policy Editor tool presented above.
As shown above with LGPE - navigate to
FastUserSwitching Client Computers→Computer Configuration→Policies→Administrative Policy definitions (ADMX files) retrieved from the local computer.→System→Logon
Select and Configure the
Hide entry points for Fast User Switching settingas desiredThe above has created a policy, but has not defined where the policy is applied. After saving the policy, close the editor and return to the group policy management tool.
There are 2 ways to apply this to a computer:
Under Security Filtering, choose the computers the policy applies to.
Remove “Authenticated Users” from the list
click the Add… button
in the Select User, Computer, or Group dialog, click the Object Types…
Uncheck Built-in security principals, Groups and Users
Check Computers
Click OK
Choose the computer names the policy is to apply to.
Alternatively, you can apply this to an Organizational Unit that already has computers associated with it
Note: In this scenario, the computers should be assigned/moved to the OU so that they only get the policies intended for that target
(either using
Active Directory Users and Computers(ADUC), or the add button button detailed above)
Right click an existing OU
Select “Link an Existing GPO…” menu option
Select the policy that was created above
Click OK
Alternative: Create a new OU
Assign computers to the OU (either using
Active Directory Users and Computers(ADUC), or the add button button detailed above)Apply the GPO to the OU as indicated above
Application of the policy is governed by the Windows services related to policy (
gpsvc- Group Policy Client).To force policy to apply on a particular PC, from an elevated command prompt, type:
gpupdate /force
Scenario 3a: The machine is Hybrid Intune Device managed.
For assistance with this configuration, please review the following article:Quickly Disable Fast User Switching Using Intune HTMD Blog
.png)


