SAML 2.0 Overview
The overall goal of the SAML SSO Configuration Process is to federate the Customer and Service Provider to provide Customer-environment users a Single Sign-On (SSO) experience to access the Service Provider's web-based service. Users access the web-based service through an Applications icon in the RapidIdentity Portal. This document focuses on configuring a third-party application to be authenticated via SAML to the RapidIdentity Portal as an Identity Provider.
SAML 2.0 SSO Settings and Attribute Mapping
The SAML authentication process typically begins when the Identity Provider (IdP) receives an Authentication Request
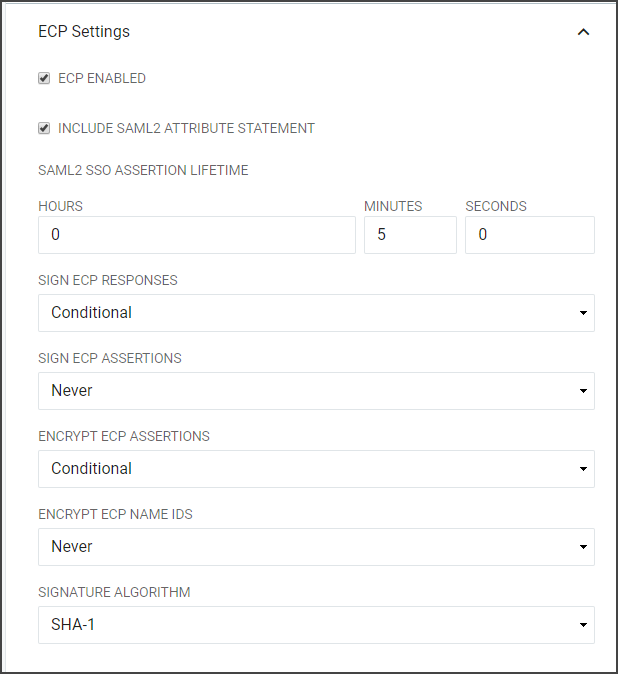
RapidIdentity Federation supports the Oasis SAML V2.0 Enhanced Client or Proxy (ECP) profile. RapidIdentity supports ECP and can be enabled if required by a particular Federation Partner which may require SAML ECP to authenticate and their ECP Advanced Settings, such as Microsoft Office 365™.
The SAML SSO and ECP Advanced Settings are both configured utilizing similar Federation Partners SSO Settings Menu options, therefore, the configuration options are combined below in the SAML SSO / ECP Advanced Settings Table.
Creating a Federation Partner for SAML SSO
-
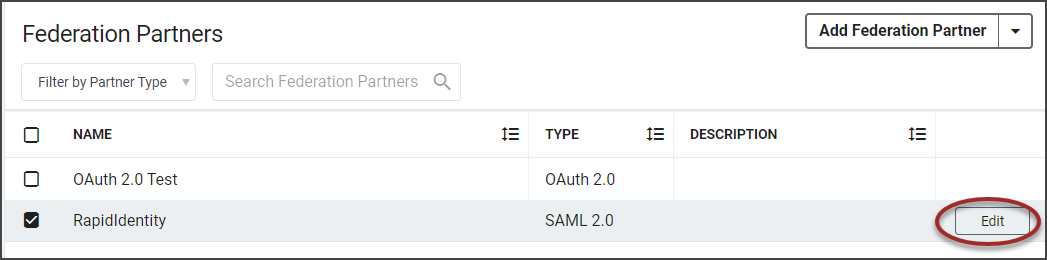
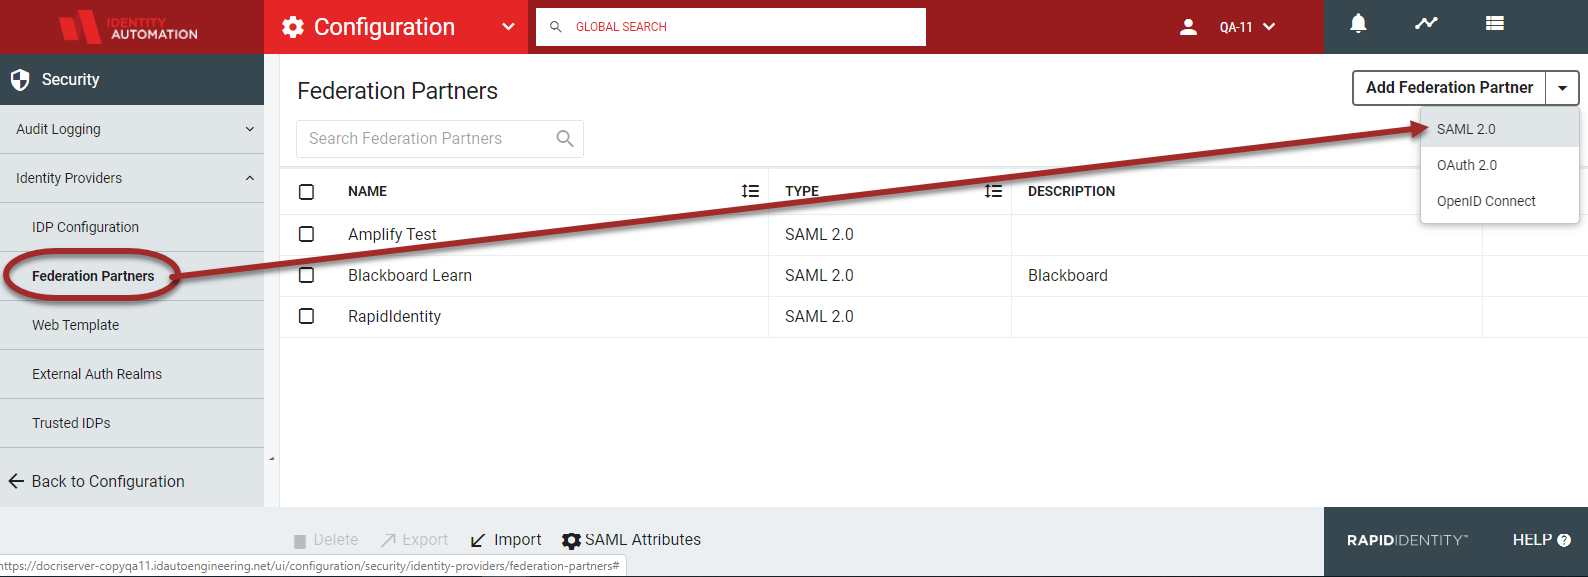
Access the SAML SSO Advanced Settings from the Configuration menu and select Federation Partners from the left-hand menu items.

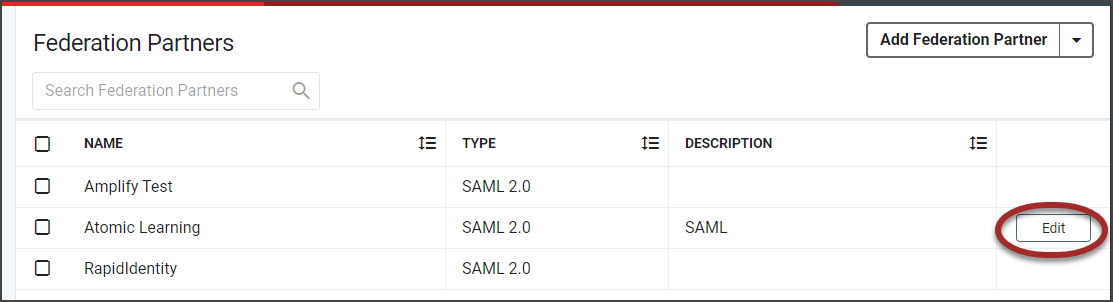
- If there are Federation Partners that have been configured, they will display in the workspace. Hover in the far right of the row and click the Edit button.
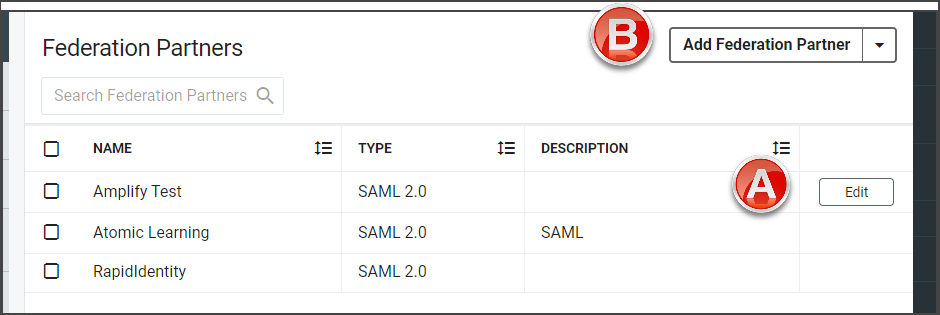
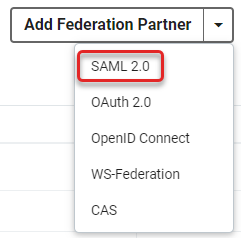
- If there are no Federation Partners already configured, click Add Federation Partner and select SAML 2.0 from the drop-down to open the configuration settings.
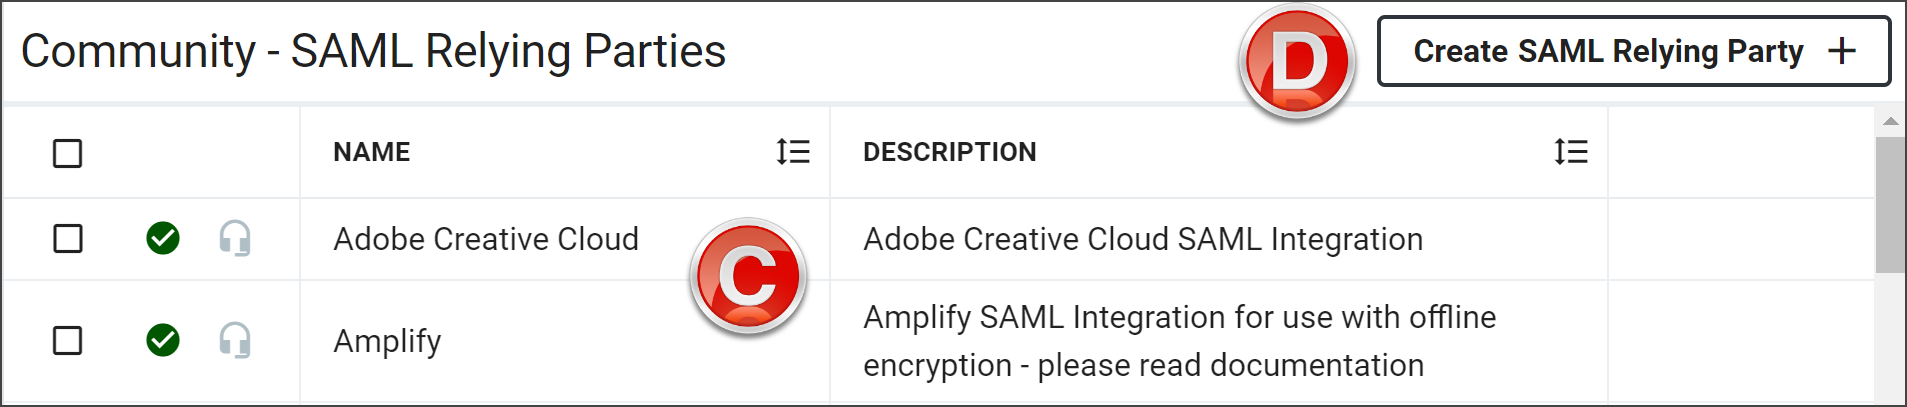
- Click Create SAML Relying Party to open the configuration options.
- If there are Federation Partners that have been configured, they will display in the workspace. Hover in the far right of the row and click the Edit button.
-
Enter all relevant settings in the General section.
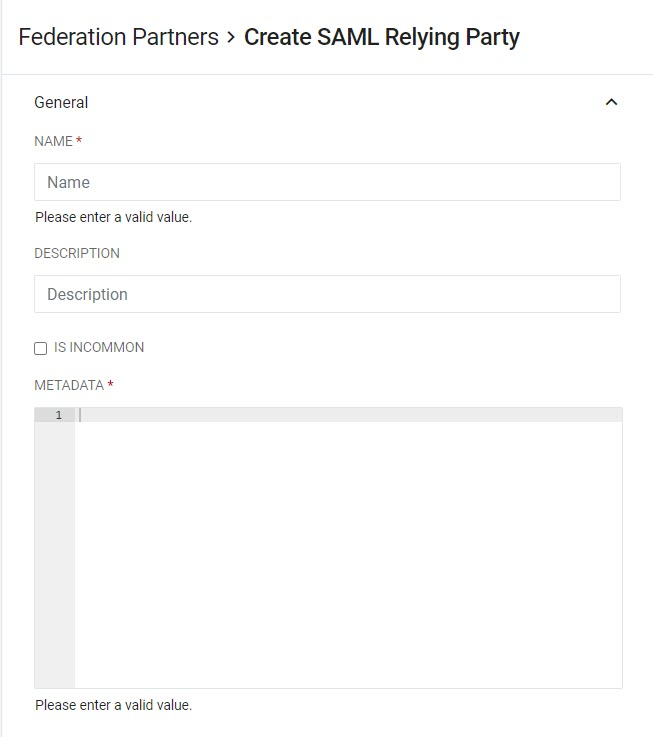
Field Description Name (Required) Give the Relying Party a unique name. Description (Optional) Provide a short but accurate description if desired. Is InCommon Check this box if the Relying Party is a registered entity in the InCommon Federation. 
*Metadata Refresh Interval (Hours) -- InCommon Only Set the interval in hours between RapidIdentity refreshing the Relying Party's metadata by retreiving it from the InCommon Metadata Service. Valid refresh intervals are from 1-24 hours. Metadata (Required) Enter the metadata for the Relying Party. -
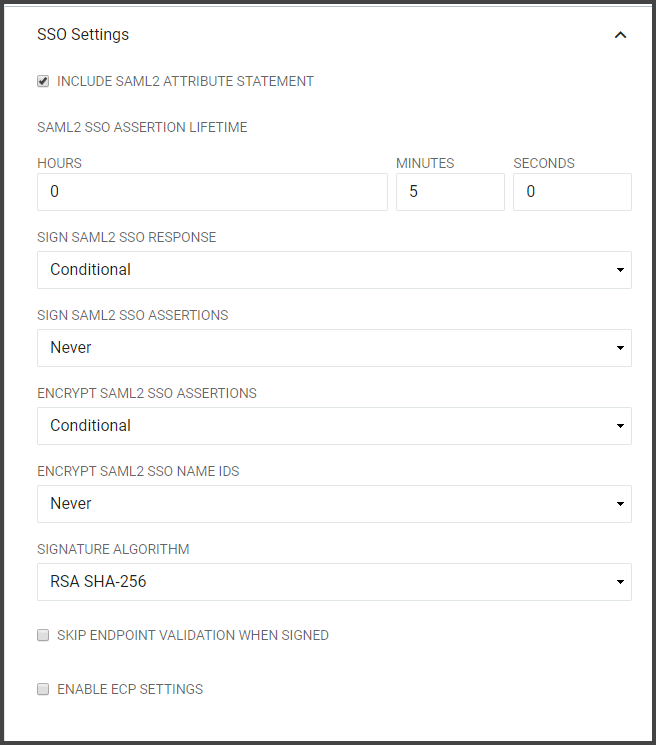
From the Federation Partners configuration screen, click on SSO Settings.
 Note:
Note:By default, the ECP Settings are not active. Click Enable ECP Settings to enable ECP Settings. When selecting the Enable ECP Settings checkbox, the ECP Settings section will become available beneath the SSO Settings along with the configuration options.
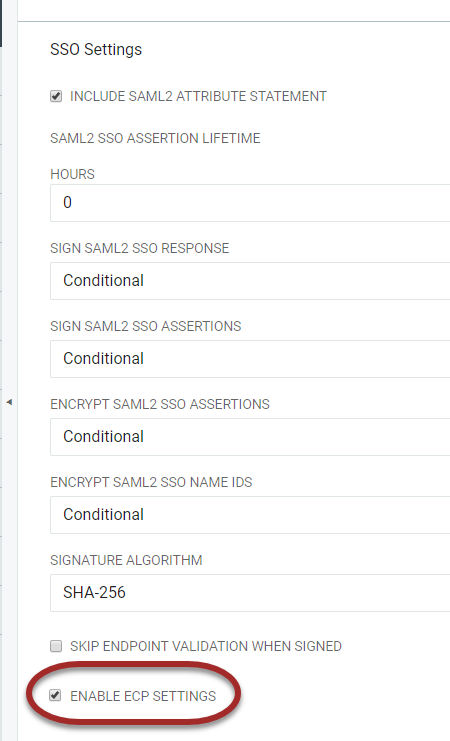
When selecting the Enable ECP Settings checkbox, the ECP Settings section will become available beneath the SSO Settings along with the configuration options.
SAML SSO and ECP Advanced Settings
Field Description Include SAML2 Attribute Statement If selected the SAML2 SSO or ECP Assertion generated for this Relying Party will contain an element. SAML2 SSO Assertion Lifetime Defines the period of time that a SAML2 SSO Assertion generated for this Relying Party will be valid in hours, minutes, and seconds. This setting directly affects the "NotOnOrAfter" attribute in the SAML Assertion which indicates to the Relying Party who receives the Assertion that the Assertion should only be considered valid if it is received before this time instant. Sign SAML2 SSO or ECP Responses Determines if the SAML2 SSO or ECP Responses should be cryptographically signed. Choose "Always" to enable signatures on the Response and "Never" to disable signatures on the Response. Sign SAML2 SSO or ECP Assertions Determines if the SAML2 SSO or ECP Assertions should be cryptographically signed. Choose "Always" to enable signatures on the Response and "Never" to disable signatures on the Response. Encrypt SAML2 SSO or ECP Assertions Determines if the SAML2 SSO or ECP Assertions should be encrypted. Note: this is only possible if the IdP is provided with an "encryption" certificate in the SAML metadata for the Relying Party. Choose "Always" to enable encryption and "Never" to disable encryption. Encrypt SAML2 SSO or ECP Name IDs Determines if the Name IDs present in the SAML2 SSO Assertions should be encrypted. Note: this is only possible if the IdP is provided with an "encryption" certificate in the SAML metadata for the Relying Party. Choose "Always" to enable encryption and "Never" to disable encryption. Signature Algorithm The algorithm to use when cryptographically signing the SAML2 SSO or ECP Responses and/or SAML2 SSO or ECP Assertions. SHA-1: Use only when the Relying Party does not support SHA-256. SHA-256: In general, "SHA-256" should be chosen unless the Relying Party does not support it. Skip Endpoint Validation When Signed If the is cryptographically signed and if the IdP can successfully verify that signature by using a public signing key present in the Relying Party's metadata, then the IdP can be instructed to comply with an un-recognized Assertion Consumer Service URL by enabling this option.
After a user authenticates successfully, a SAML Assertion is generated by the IdP. The SAML Assertion contains attributes about the user (e.g. name, email address, etc) and other information describing how and when authentication occurred at the IdP. The SAML Assertion is then embedded inside of a more consolidated generic SAML Response and it is the SAML Response, containing the Assertion, which is ultimately conveyed to the Relying Party.
Attribute Mapping
The SAML Attributes available for assignments will have been set up already under the Federation Partners SAML Attributes section.
-
Select the Federation Partner from the Federation Partners workspace, and click Edit by hovering in the last column.
-
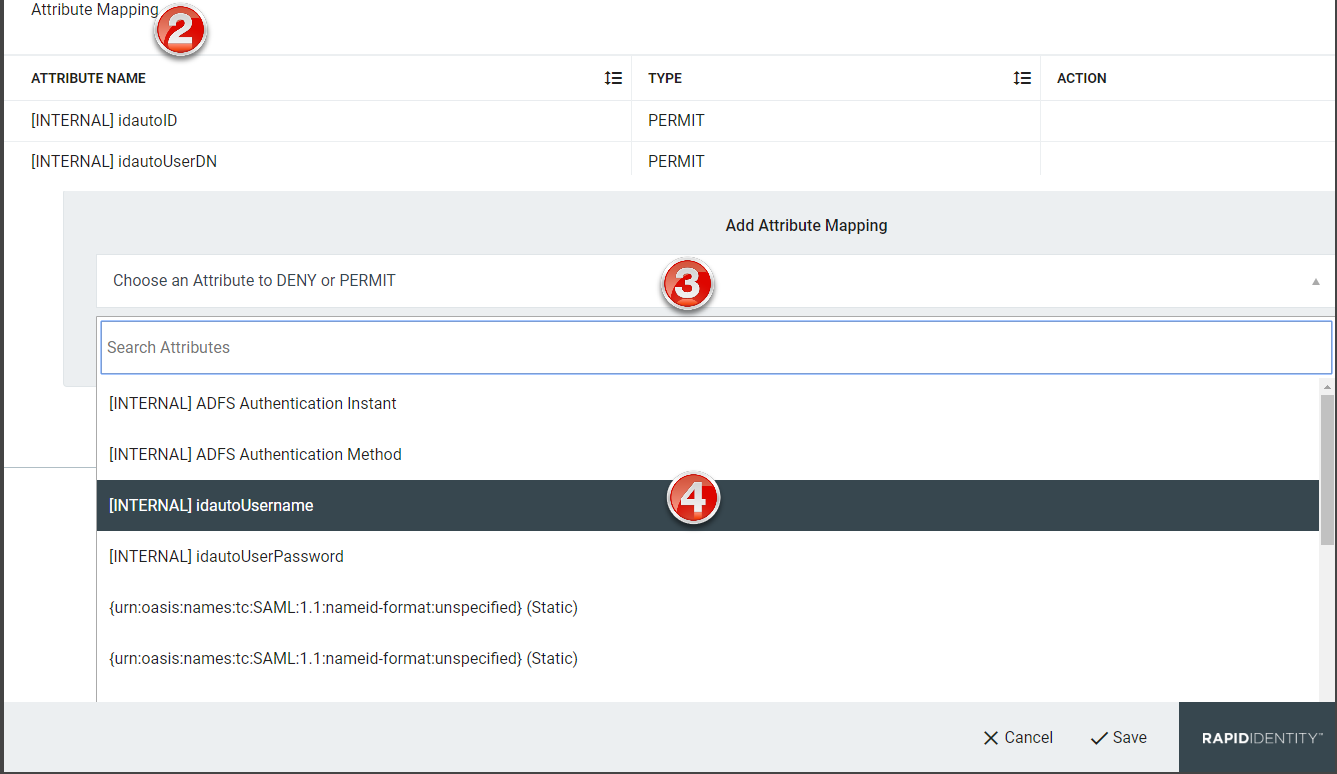
From the Federation Partners window, scroll down to Attribute Mapping.
-
Click Choose an Attribute to DENY or PERMIT.
-
Click to expand the drop-down of available attributes to deny or permit mapping.
-
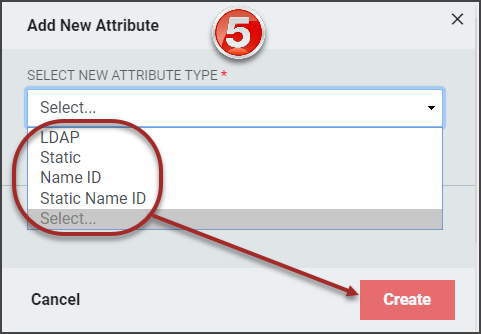
The Add New Attribute window will load. Select the attribute type from the drop-down.
- Based on the type of attribute being added, different menu options will display. Refer to the SAML Attributes section for details on completing the configuration for each attribute type.
- For InCommon configurations, the two following attributes must be set:
- eduPersonPrincipalName - this attribute must correspond to the name of the user
- eduPersonScopedAffiliation - this attribute must correspond to the user's relationship to the institution (e.g., Student, Teacher, etc.)
Note:An error message will display until these attributes are configured.
-
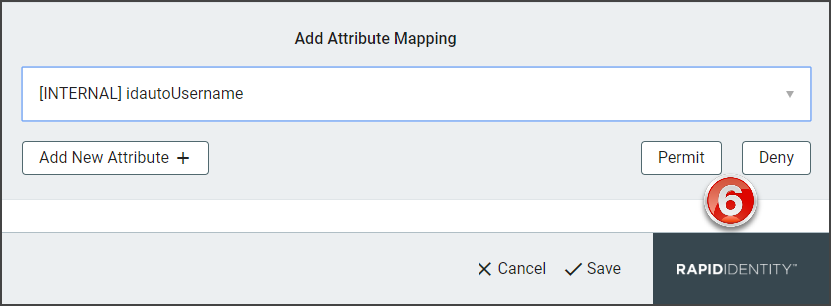
Select to Permit or Deny the attribute mapping.
-
Click Add New Attribute+ to add additional SAML attributes. Repeat steps 2-8.
-
Click Save to add the attribute to the selected Federation Partner.
The following Confirmation Notice indicates that Updates are SuccessfulAttribute Mapping updated successfully
Make sure to trigger a service reload on completion of updating attribute mappings for this relying party.
SAML Attribute Configuration
SAML Attributes are added during the setup or editing of a SAML Federation Partner and define attributes which may be released to SAML Relying Parties after a user successfully authenticates.
Technology professionals can view the SAML 2.0 technical overview.
The SAML protocol there are several important aspects, the Identity Provider, SAML transactions use Extensible Markup Language (XML) for standardized communications between the identity provider and service providers.
In the SAML protocol, the Identity Provider (IdP) is in charge of authenticating users and if successful, generating a SAML assertion which relays to the Relying Party that the user has successfully authenticated. Often times this information includes when and how they authenticated, and other information about the user required by the Relying Party. This information about the authenticating user is referred to as the attributes of the authenticating user. Common attributes are user's email address and name, but ultimately the Relying Party must communicate which attributes are required from the Identity Provider to release.
-
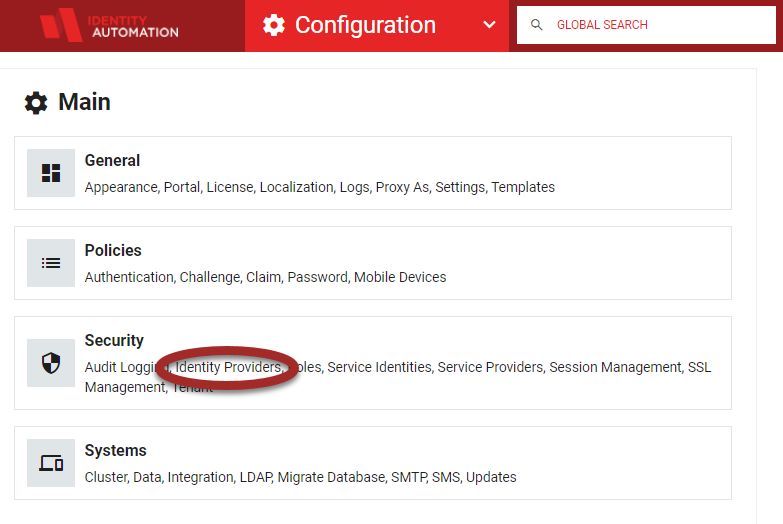
From the Configuration menu, select Identity Providers from the Security menu.
-
Expand Identity Providers in the left hand menu items and click Federation Partners.

-
Click Add Federation Partner and select SAML 2.0 from the drop-down selector.
- If configuring the SAML Attributes after the Federation Partner has been added, hover and click the edit icon on the far right column of the workspace to select existing attributes.
- If configuring the SAML Attributes after the Federation Partner has been added, hover and click the edit icon on the far right column of the workspace to select existing attributes.
-
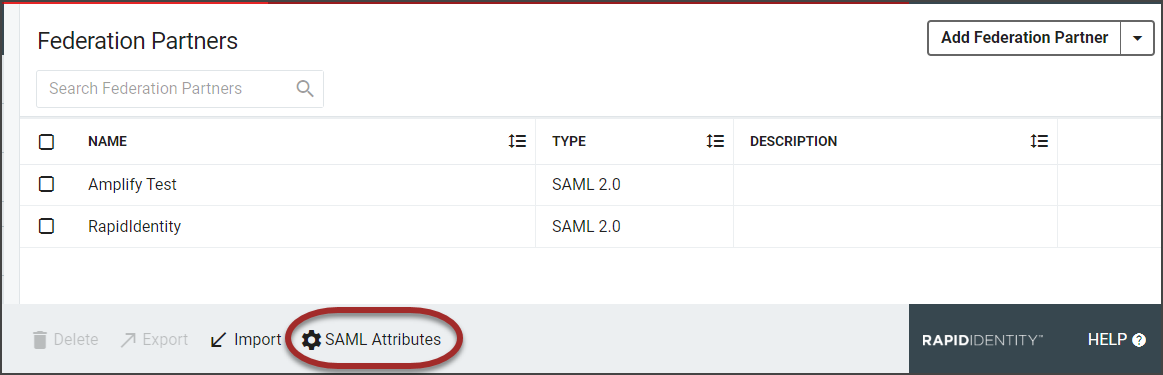
The current Federation Partners will be displayed in the workspace. Click the SAML Attributes icon in the action buttons at the bottom of the page.
 Note:
Note:The SAML Attributes icon will only display if there are SAML Federation Partners in the system.
-
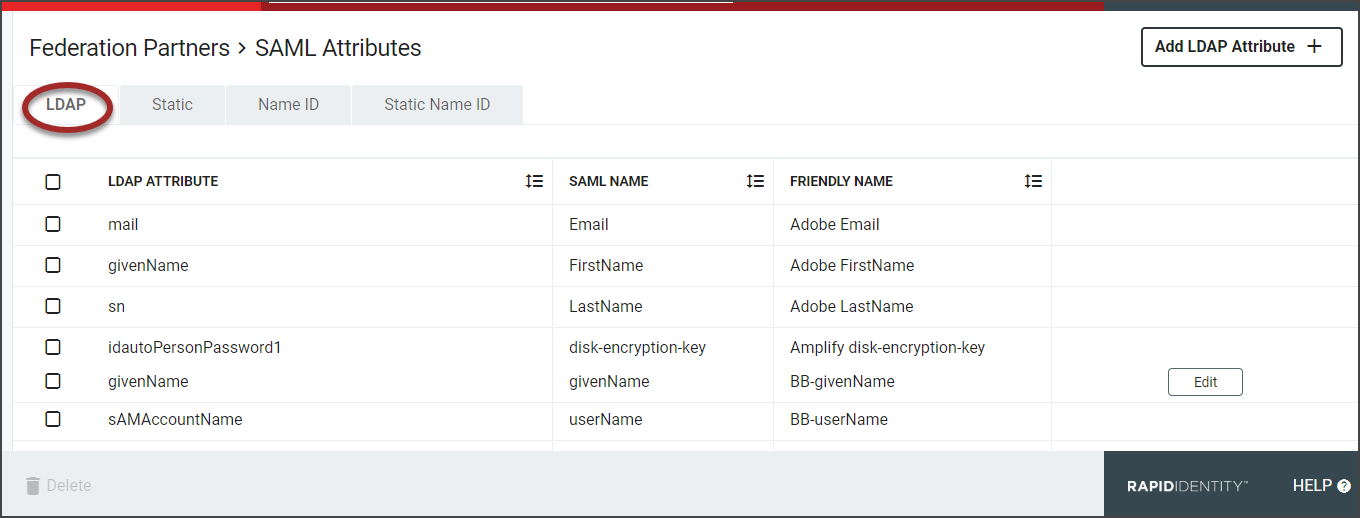
The SAML Attributes will load with four separate attribute tabs, LDAP, Static, Name ID, and Static Name ID. Required fields are marked with an asterisk when setting up each attribute.
-
The first tab is the LDAP Attributes tab. This is where administrators define attributes for values that come directly from LDAP.
ImportantAdministrators define the total pool of attributes which might be allowed to be released to any Relying Party. After the attributes are defined, administrators can choose from the pool which attributes will actually be released to each Relying Party, individually.
-
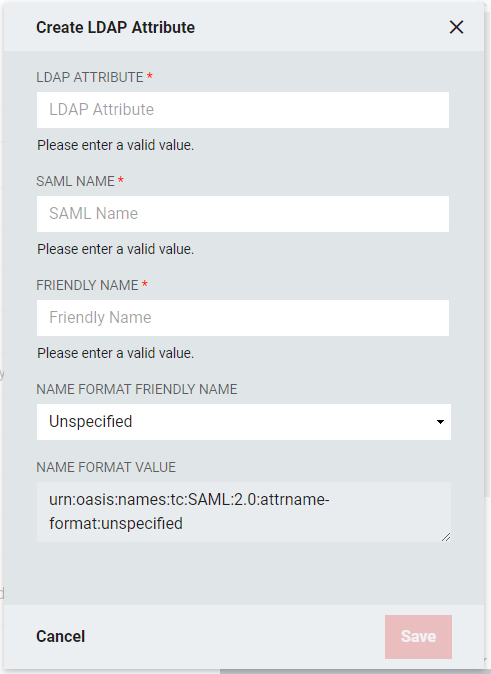
Click the Add LDAP Attribute + button to open the LDAP attribute window.
-
LDAP Attribute: The name of the LDAP attribute holding the values which are intended to be released. Each attribute can have one or more values.
-
SAML Name: The name of the attribute as it will appear in SAML assertions. Different Relying Parties might require the same attribute value, such as a user email address, to be released for them, but could require different names. For example, for a user email address, multiple names such as "EMAIL", "mail", or "http://schemas.xmlsoap.org/ws/2005/05/identity/claims/address."
-
Friendly Name: This is the name as the LDAP attribute will appear in the SAML Assertion.
-
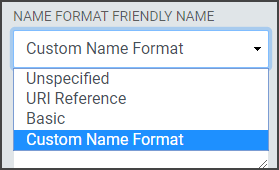
Name Format Friendly Name: Select the format value type to be used for the LDAP Attribute Value. SAML Name Formats are typically URIs which convey information to the Relying Party of what format the attribute takes. Depending upon the requirements of the Relying Party, a certain value may or may not be required. This drop-down allows you to choose from some common values or allows you to choose "Custom Name Format" in the event the required value is not one of the provided common values. If the Relying Party does not require a specific value, select "Unspecified."
-
-
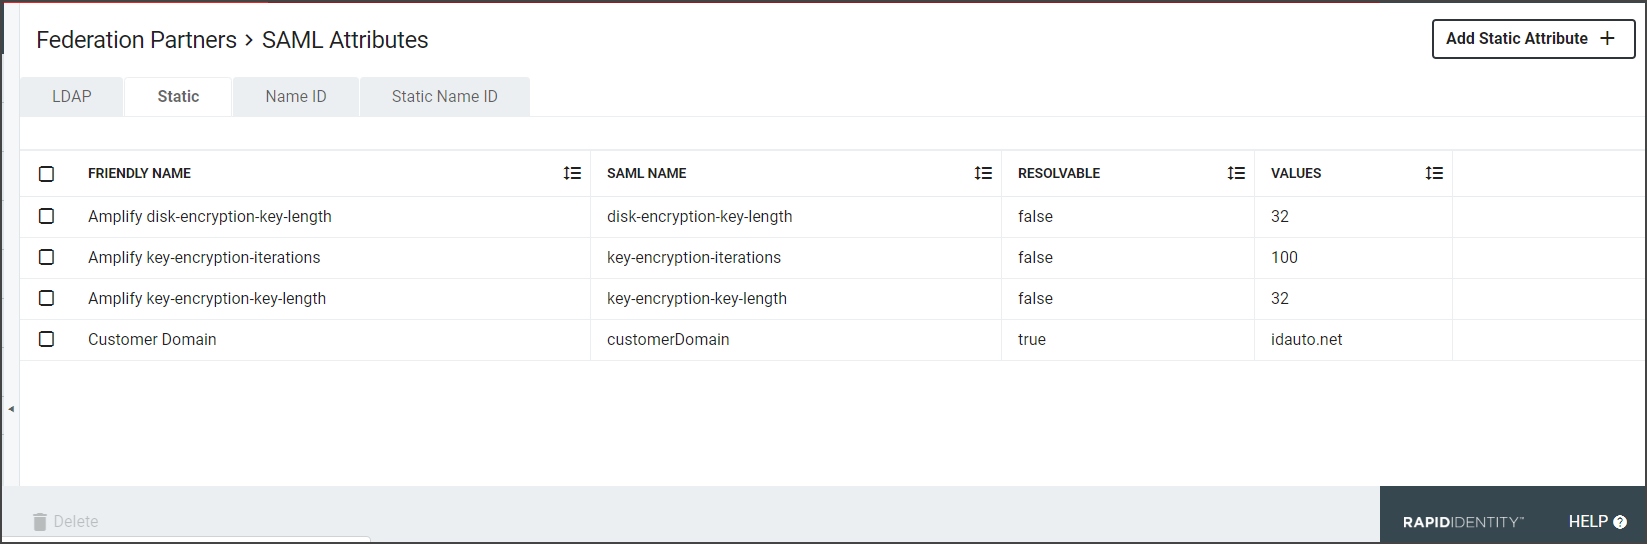
The next tab is the Static tab. Static Attributes are attributes whose values are based on values which generally do not change from user to user. For instance, if a Relying Party wants the IdP to release a common value for all users in a particular organization, then a Static Attribute should be used. When using an LDAP Attribute, then every user in your organization must have the attribute on their LDAP entry containing the same value.
-
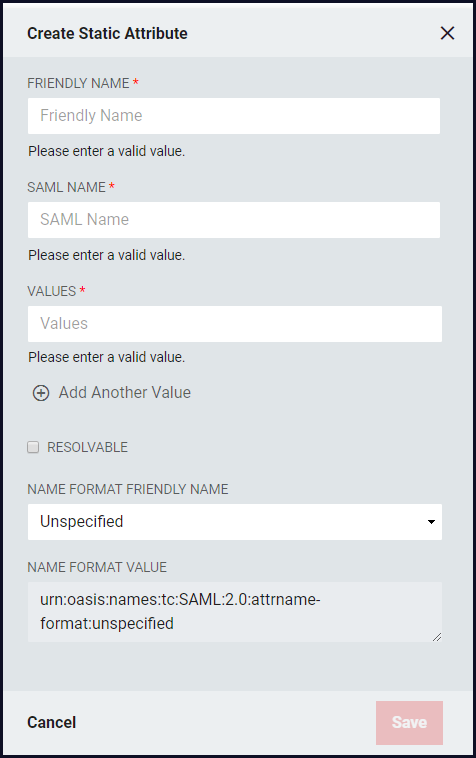
Click the Add Static Attribute + button to open the Create Static Attribute window.
-
Friendly Name: This is the name as the Static attribute will appear in the SAML Assertion.
-
SAML Name: The name of the attribute as it will appear in SAML assertions. Different Relying Parties might require the same attribute value, such as a user email address, to be released for them, but could require different names. For example, for a user email address, multiple names such as "EMAIL", "mail", or "http://schemas.xmlsoap.org/ws/2005/05/identity/claims/address."
-
Values: Enter the Static Attribute
- Click +Add Another Value to enter multiple acceptable values
-
Resolvable: Allows the static value to contain tokens which can be resolved to real value(s) at the time the SAML Assertion is being generated.
- For example, If two Static attributes exist, first being "givenname" that contains a user's first name and the second "sn" which contains a user's surname, then a third attribute can be generated representing the first two attributes. The Relying Party could request that the Identity Provider release an attribute called "name" containing the surname followed by a comma and space, then by the first name. This could be accomplished with a "Resolvable" static attribute where the value is defined as "%sn%, %givenName%."
-
Name Format Friendly Name: Select the format value type to be used for the Static Attribute Value. Name ID Formats are typically URIs which convey information to the Relying Party of what format the attribute takes. Depending upon the requirements of the Relying Party, a certain value may or may not be required.
- Unspecified: urn:oasis:names:tc:SAML:2.0:attrname-format:unspecified
- URI Reference: urn:oasis:names:tc:SAML:2.0:attrname-format:uri
- Basic: urn:oasis:names:tc:SAML:2.0:attrname-format:basic
- Custom Name Format: If the provided common values in the drop-down do not provide the correct format choose "Custom Name Format." If the Relying Party does not require a specific value, select "Unspecified." The format will adjust the Name Format Value.
-
Name Format Value: This value will adjust based on the Name Format Friendly Name selected.
-
-
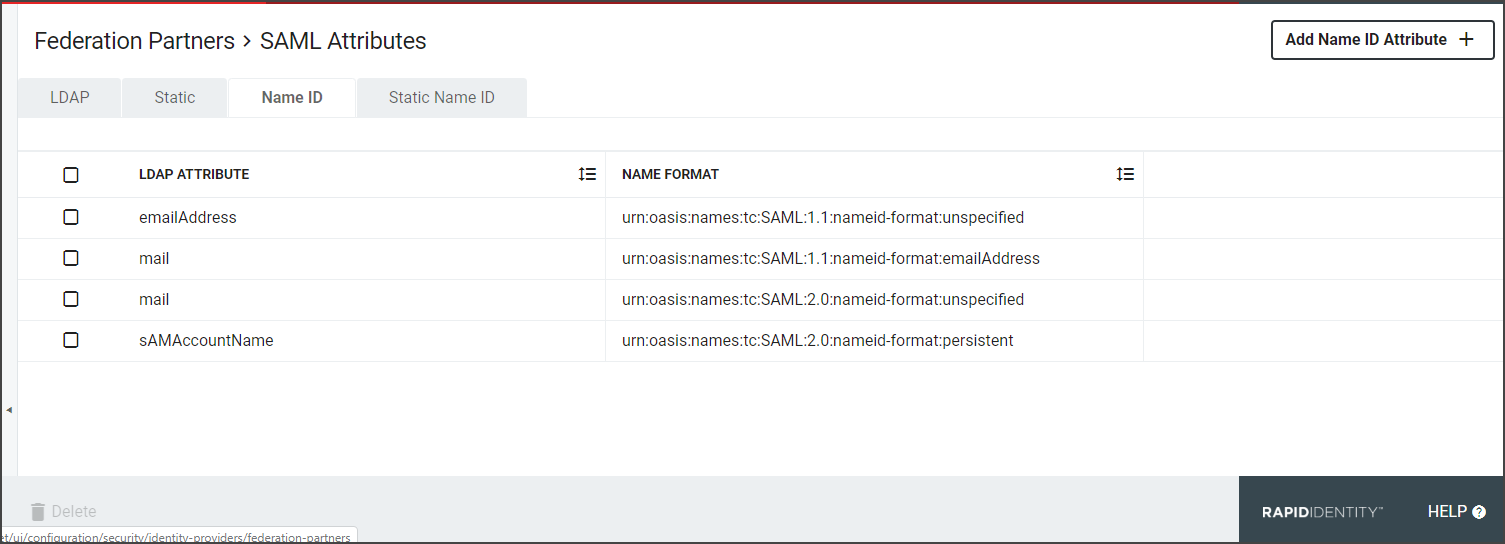
The next tab is the Name ID Tab. A SAML Assertion may contain 0 or 1 Name ID attribute and 0 or more non-Name ID attributes. Name ID attributes will typically provide information about the format of the value. The Relying Party must specify any requirements that may exist for the Name Format.
-
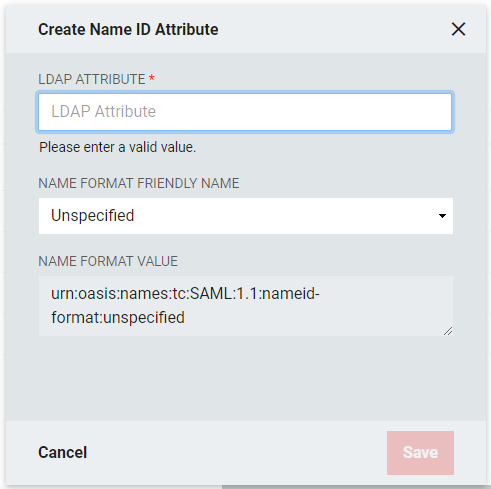
Click Add Name ID Attribute+. Name ID attributes are typically used to convey the "primary identifying attribute" about the user to the Relying Party. Often times, this will be the user's email address, but ultimately it's up to the Relying Party to communicate what value is expected, if any, and define the format, etc.
-
LDAP Attribute: Enter the name of the LDAP Attribute
-
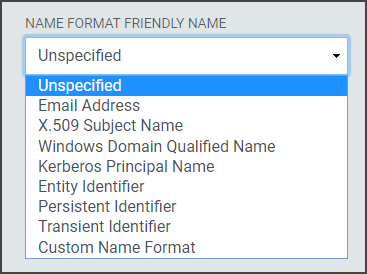
Name Format Friendly Name: Select the format value type to be used for the Name ID Value. Name ID Formats are typically URIs which convey information to the Relying Party of what format the attribute takes. Depending upon the requirements of the Relying Party, a certain value may or may not be required.

- Unspecified: Allows a free from entry (urn:oasis:names:tc:SAML:1.1:nameid-format:unspecified)
- Email Address: Uses the email format ( (urn:oasis:names:tc:SAML:1.1:nameid-format:emailAddress)
- X.509 Subject Name: Uses the subject name of the X509 Certificate (urn:oasis:names:tc:SAML:1.1:nameid-format:X509SubjectName)
- Windows Domain Qualified Name: Uses the FQDN of the hostname and domain name (urn:oasis:names:tc:SAML:1.1:nameid-format:WindowsDomainQualifiedName)
- Kerberos Principal Name: Uses the Principal Name to identify the user or service (urn:oasis:names:tc:SAML:2.0:nameid-format:kerberos)
- Entity Identifier: Uses a URI is a URL that contains the domain name of the entity (urn:oasis:names:tc:SAML:2.0:nameid-format:entity)
- Persistent Identifier: Reliably points to a digital entity as an identifier to build trusted connections (Directsurn:oasis:names:tc:SAML:2.0:nameid-format:persistent)
- Transient Identifier: An identifier intended to be used for a single session only (urn:oasis:names:tc:SAML:2.0:nameid-format:transient)
- Custom Name Format: The drop-down contains some common Name Format values, but if the required value is not present in the list of available values, choose the Custom Name Format option and provide a custom value. If the Relying Party does not require a specific value, select "Unspecified. "The format will adjust the Name Format Value.
-
Name Format Value: This value will adjust based on the Name Format Friendly Name selected.
-
-
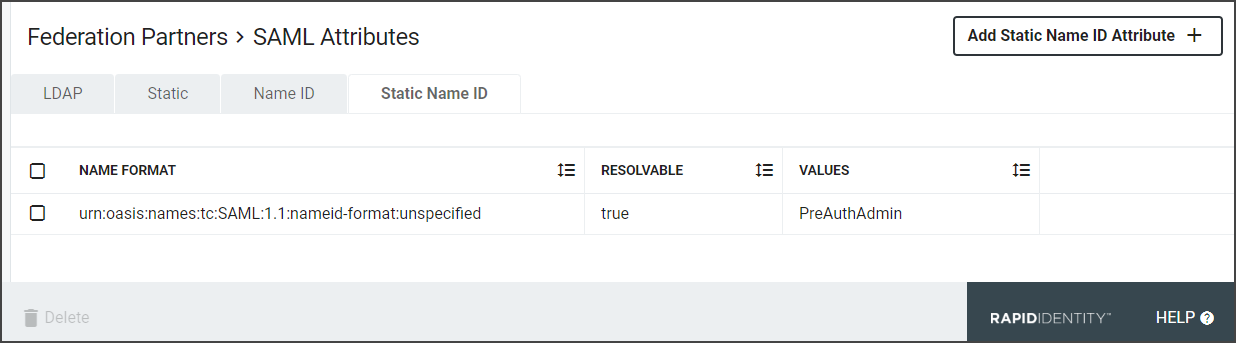
The last tab is the Static Name ID tab. Static Name ID Attributes are like Static Attributes, except they define the value of the Name ID Attribute in the SAML Assertion.
-
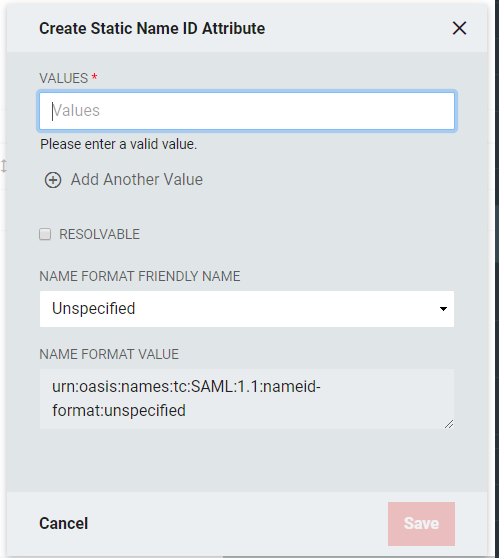
Click Add Static Name ID Attribute+.
-
Values: Enter a Name ID Attribute
- Click +Add Another Value to enter multiple acceptable values
-
Resolvable: Allows the static value to contain tokens which can be resolved to real value(s) at the time the SAML Assertion is being generated.
- For example, If two Static attributes exist, first being "givenname" that contains a user's first name and the second "sn" which contains a user's surname, then a third attribute can be generated representing the first two attributes. The Relying Party could request that the Identity Provider release an attribute called "name" containing the surname followed by a comma and space, then by the first name. This could be accomplished with a "Resolvable" static attribute where the value is defined as "%sn%, %givenName%."
-
Name Format Friendly Name: Select the format value type to be used for the Static Name ID Value. SAML, Static Name ID Formats are typically URIs which convey information to the Relying Party of what format the attribute takes. Depending upon the requirements of the Relying Party, a certain value may or may not be required.
-
Unspecified: Allows a free from entry (urn:oasis:names:tc:SAML:1.1:nameid-format:unspecified)
-
Email Address: Uses the email format (urn:oasis:names:tc:SAML:1.1:nameid-format:emailAddress)
-
X.509 Subject Name: Uses the subject name of the X509 Certificate (urn:oasis:names:tc:SAML:1.1:nameid-format:X509SubjectName)
-
Windows Domain Qualified Name: Uses the FQDN of the hostname and domain name (urn:oasis:names:tc:SAML:1.1:nameid-format:WindowsDomainQualifiedName)
-
Kerberos Principal Name: Uses the Principal Name to identify the user or service (urn:oasis:names:tc:SAML:2.0:nameid-format:kerberos)
-
Entity Identifier: Uses a URI is a URL that contains the domain name of the entity (urn:oasis:names:tc:SAML:2.0:nameid-format:entity)
-
Persistent Identifier: Reliably points to a digital entity as an identifier to build trusted connections (Directsurn:oasis:names:tc:SAML:2.0:nameid-format:persistent)
-
Custom Name Format: If the provided common values in the drop-down do not provide the correct format choose "Custom Name Format". If the Relying Party does not require a specific value, select "Unspecified."The format will adjust the Name Format Value.
-
-
Name Format Value: This value will adjust and populate based on the Name Format Friendly Name selected.
-