Windows Autopilot-Enrolling a device in Microsoft Intune
- Prerequisites
- Microsoft Intune Subscription Level Verification
- Configure Microsoft Intune auto-enrollment
- Capture Client Workstation Hardware ID
- Reset workstation back to Out-of-the-box-Experience(OOBE)
- Client workstation registration with Microsoft Intune
- Create and assign a Windows Autopilot deployment profile
- Create the deployment profile
- How to Create a New User
- Assign licenses to users so they can enroll devices in Intune
- Windows Autopilot OOBE experience on Client Workstation
- Remove devices from Autopilot
Prerequisites
You'll need the following components to enroll a device:
Windows 10 installation media | Windows 10 1703 and above versions. Professional or Enterprise ISO file for a supported version of Windows 10 on your device or on your VMware |
Internet access | Make sure that you have a connection to the internet. |
An account with Azure Active Directory (Azure AD) Premium license | This guide will describe how to get a free 30-day trial Azure AD Premium subscription that can be used to complete the lab. |
Microsoft Intune Subscription Level Verification
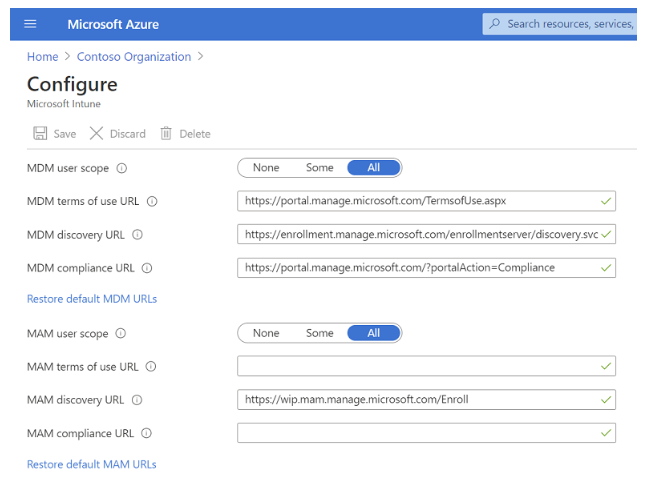
For this enrollment, you need an Azure AD Premium subscription. To verify if you have a Premium subscription, go to MDM enrollment configuration at https://portal.azure.com/#home. See the following example:
Azure Active Directory > Mobility (MDM and MAM) > Microsoft Intune
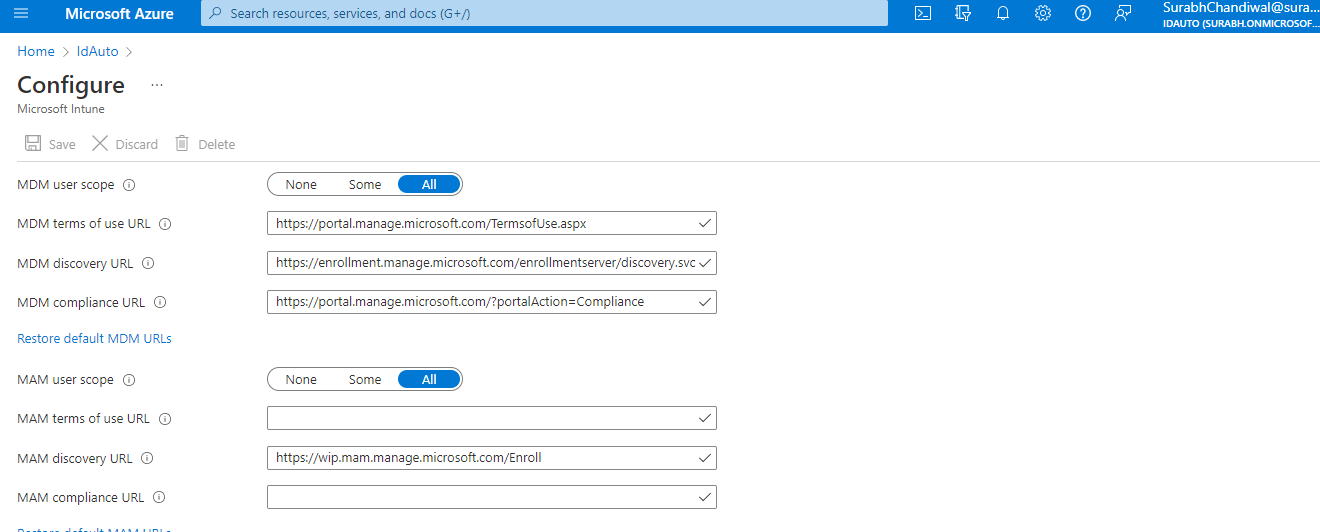
If this configuration doesn't appear, it's likely that you don't have a Premium subscription. Auto-enrollment is a feature only available in Azure AD Premium.
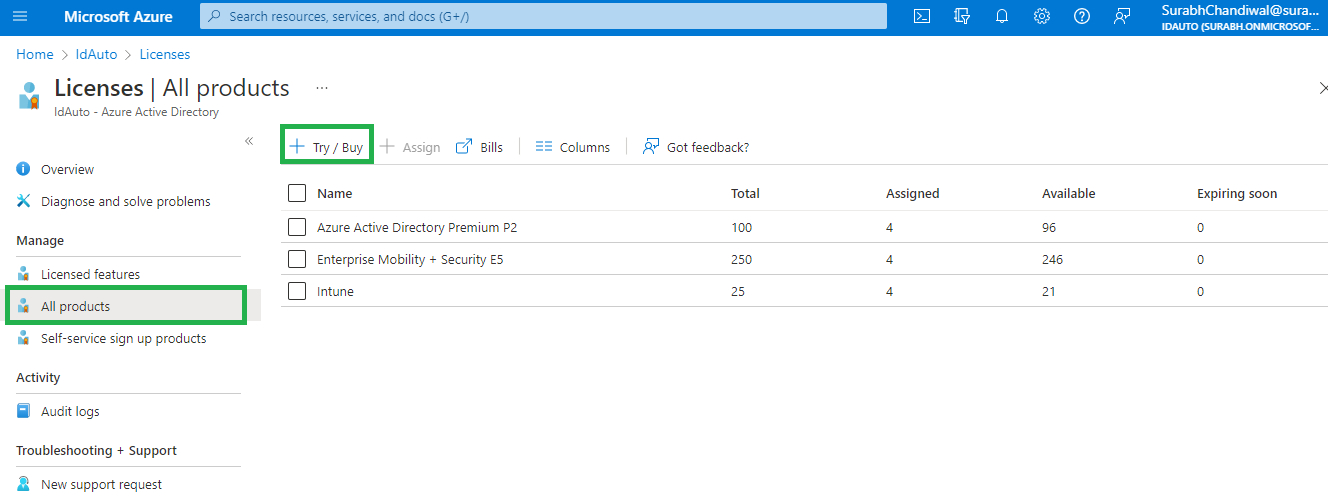
To convert your Intune trial account to a free Premium trial account, go to Azure Active Directory > Licenses > All products > Try / Buy and select Free trial for Azure AD Premium, or EMS E5.
Configure Microsoft Intune Auto-Enrollment
If you already have MDM auto-enrollment configured in Azure AD, you can skip this step.
Open Mobility (MDM and MAM) in Azure Active Directory and select Microsoft Intune. If you don't see Microsoft Intune, select Add application and choose Intune.
Select All under the MDM user scope and select Save.
Capture Client Workstation Hardware ID
Follow these steps to capture the Client workstation hardware ID.
- On Client workstation: Open an elevated Windows PowerShell prompt and run the following commands.
- New-Item -Type Directory -Path "C:\HWID"
- Set - Location C:\HWID
- Set - ExecutionPolicy -Scope Process -ExecutionPolicy RemoteSigned
- Install - Script -Name Get-WindowsAutopilotInfo -Force
- $env:Path += ";C:\Program Files\WindowsPowerShell\Scripts"
- Get - WindowsAutopilotInfo -OutputFile AutopilotHWID.csv
- When you're prompted to install the NuGet package, choose Yes.
- Navigate to C:\HWID directory to find AutopilotHWID.csv. This file contains the complete Hardware ID(4K Hardware Hash).
You'll need to upload this data into Intune to register your device for Autopilot. Save this file to the workstation you'll use to access the Azure portal.
- If you're using a physical device instead of a VM, you can copy the file to a USB drive.
- If you're using a VM, you can right-click the AutopilotHWID.csv file and copy it. Then right-click and paste the file to your desktop (outside the VM).
Reset Client Workstation back to Out-Of-Box-Experience (OOBE)
With the hardware ID captured in a file, prepare your Client workstation for Windows Autopilot deployment by resetting it back to OOBE.
- On the Client workstation, navigate to Settings > Update & Security > Recovery.
- Click Get started under Reset this PC.
- Click Remove everything.
- You will now be presented with an option asking how you would like to reinstall Windows 10. At this screen, click on the 'Local reinstall' option.
- You will now be asked to confirm your selection. Please review the selected options and click on the Next button.
- You will now be shown a final screen asking you to confirm your final selections. When ready, click on the Reset button.
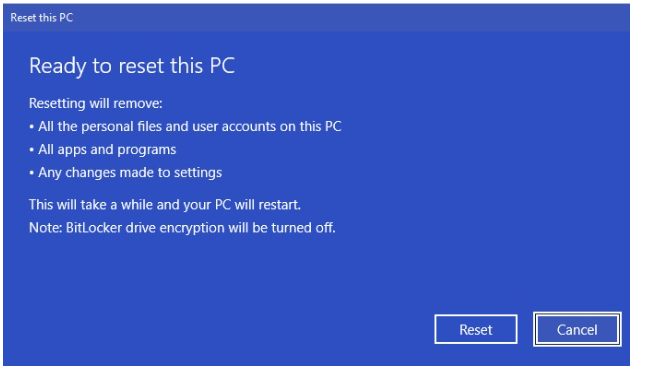
Resetting the device can take a while.

Client Workstation Registration via Microsoft Intune
Follow these steps to register your Client Workstation via Intune.
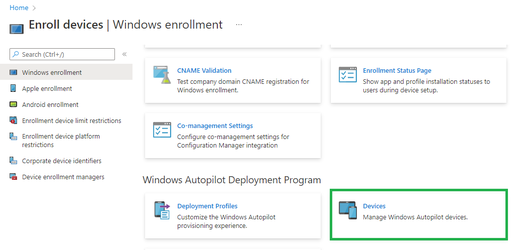
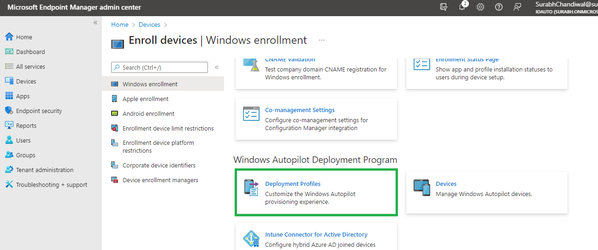
- In https://endpoint.microsoft.com/#home, navigate to Devices > Device enrollment | Enroll devices > Windows enrollment > Windows Autopilot Deployment Program | Devices
- On the Windows Autopilot devices page, click Import.
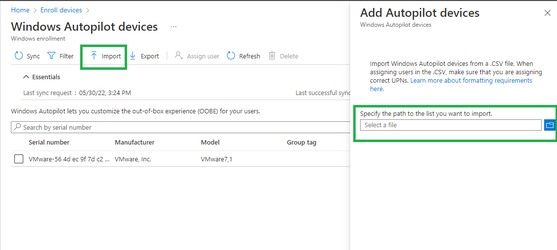
- Under Add Windows Autopilot devices, browse to the AutopilotHWID.csv file saved from step 4 that lists the devices that you want to add. The file should contain the serial number and 4K HH of your workstation. It's okay if other fields (Windows Product ID) are left blank.

- Select Import to start importing the device information. Importing can take several minutes.
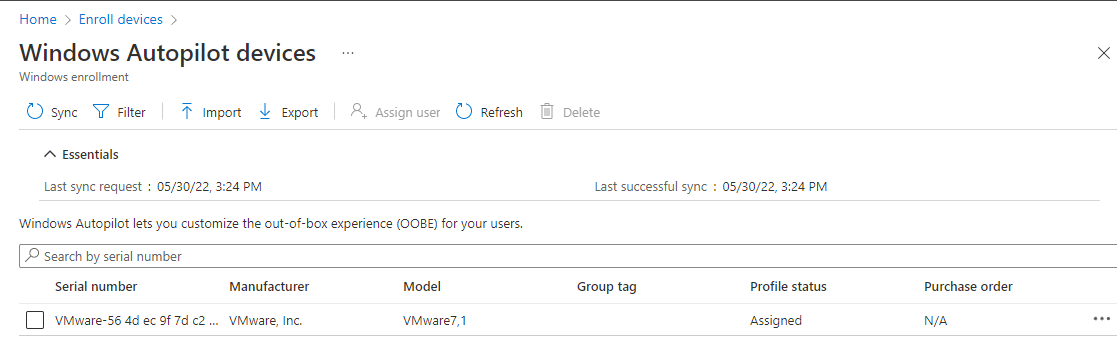
- Click Refresh to verify your Client workstation is added.
Create and assign a Windows Autopilot deployment profile
- In the Microsoft Endpoint Manager admin center, Select Groups > New Group.
- In the New Group pane:
- For Group type, choose Security.
- Type a Group name and Group description (ex: Autopilot Lab).
- Azure AD roles can be assigned to the group: No
- For Membership type, choose Assigned.
- Search device name which is registered in Step 6 and add to this group. See below for reference
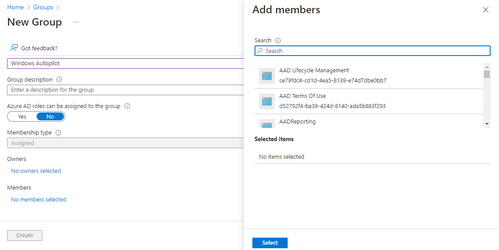
- Click Create.
Create the deployment profile
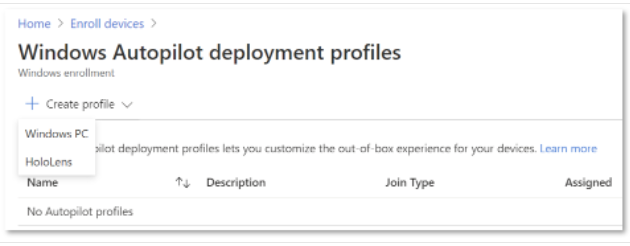
- Select Devices, then under Enroll devices | Windows enrollment select Deployment Profiles.
- Select Create profile > Windows PC
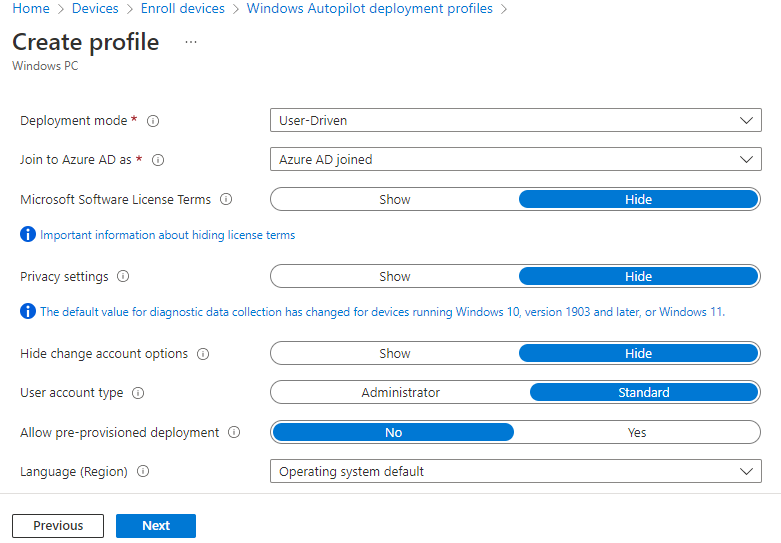
- On the Create profile pane, use the following values:

- Click Next to continue with the Out-of-box experience (OOBE) settings:
- Click Next to continue with the Assignments settings:
- Click Add Groups
- Select the Autopilot Lab group, and then click Select.
- Click Next to continue, and then click Create.
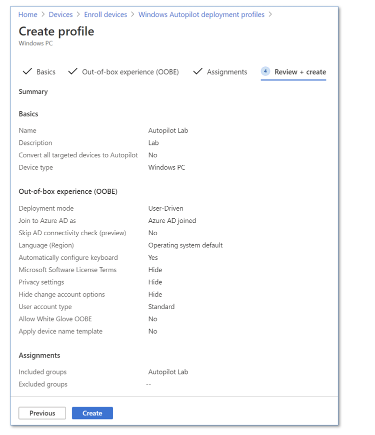
- Select OK, and then select Create.
How to Create a New User
- In the Microsoft Endpoint Manager admin center, choose Users > All users > New user > Create user.
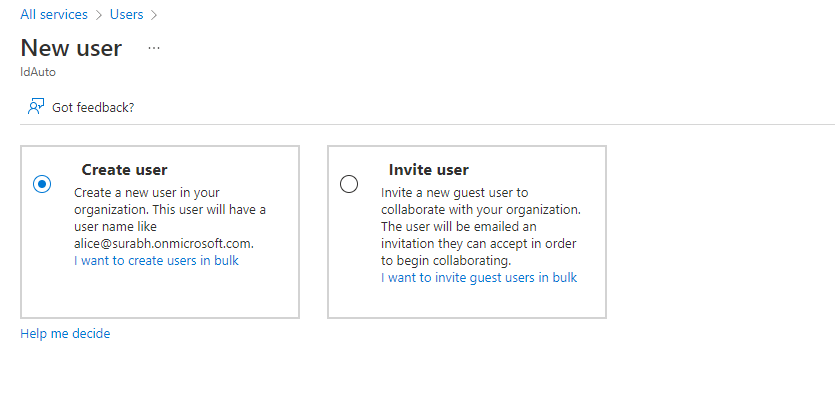
- Specify the following user details:
- Username - The new name that the user will use to sign in to Azure Active Directory.
- Name - The user's given name.
- Choose whether you want to create the password for the new user or have it autogenerated.
- To assign the new user to groups (optional), choose 0 groups selected to open the Groups pane. Here you can select the groups you want to assign to the user. When finished selecting groups, choose Select.
- By default, the new user is assigned the role of User. If you want to add roles to the user, select User under Groups and roles. In the Directory roles pane, select the roles you want to assign to the user and then choose Select.
- If you want to block the user from signing in, you can select Yes for Block sign in. Make sure to switch this back to No when you're ready to let the user sign in.
- Choose a Usage location for the new user. Usage location is required before you can assign the new user an Intune license.
- Optionally, you can provide information for the Job title, Department, Company name, and Manager fields.
- Select Create to add the new user to Intune.
Assign licenses to users so they can enroll devices in Intune
Whether you manually add users or synchronize from your on-premises Active Directory, you must first assign each user an Intune license before users can enroll their devices in Intune.
You can use the Microsoft Admin to manually add cloud-based users and assign licenses to both cloud-based user accounts and accounts synchronized from your on-premises Active Directory to Azure AD.
- In the Microsoft Admin, select Users > All Users > choose a user > Licenses > Assignments.
- Choose the box for Intune and Enterprise Mobility + Security E5 > Save.
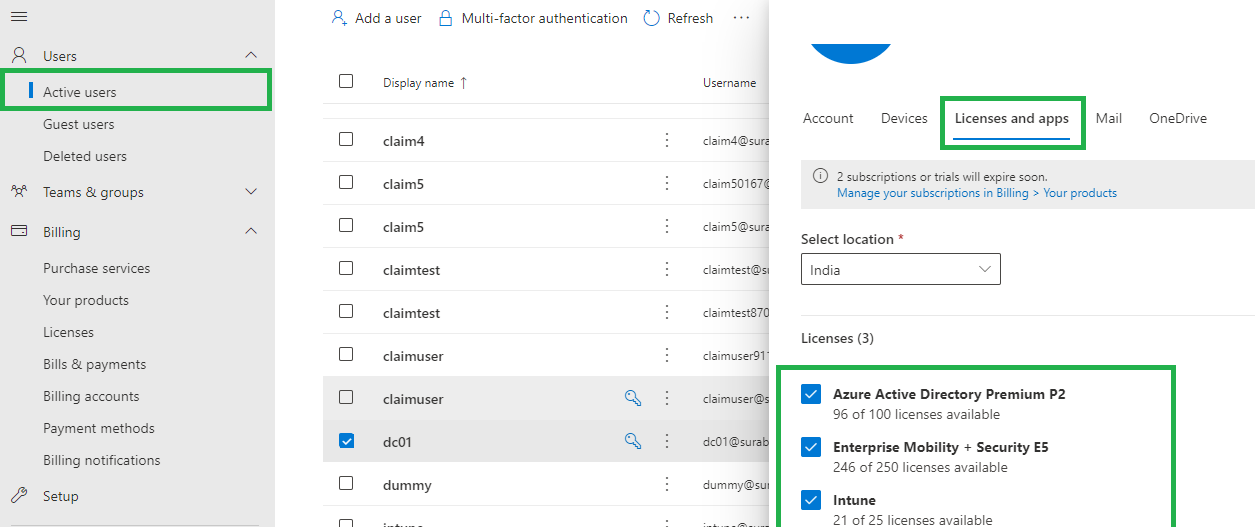
- The user account now has the permissions needed to use the service and enroll devices into management.
Windows Autopilot OOBE experience on Client Workstation
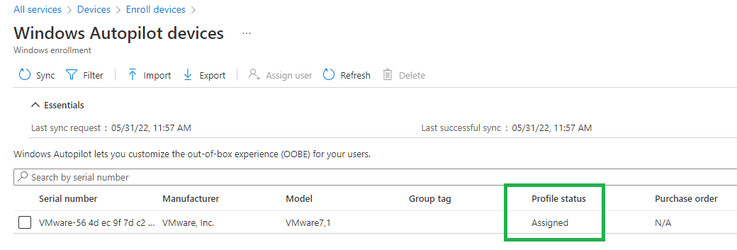
Restart the client workstation if you have shut it down after the last reset. It will then go through the Autopilot OOBE experience. However, don't attempt to start your device again until the PROFILE STATUS for your device in Intune is changed from Not assigned to Assigning, and finally to Assigned:
If you reset your device previously, after collecting the 4K HH info, let it restart back to the first OOBE screen. Then you might need to restart the device again to make sure the device is recognized as an Autopilot device and displays the Autopilot OOBE experience you're expecting. If you don't see the Autopilot OOBE experience, then reset the device again (Settings > Update & Security > Recovery and select Get started. Under Reset this PC, select Remove everything and Just remove my files. Select Reset).
- Make sure your device has an internet connection.
- Turn on the device.
- Verify that the appropriate OOBE screens appear. Provide your user credentials created in Step 9. Then you're all done.
After the device loads the desktop, the device should show up in Intune as an enabled Autopilot device. Go to the Intune portal, and select Devices > All devices. Then Refresh the data to verify that your device has changed to an enabled state, and the name of the device is updated.
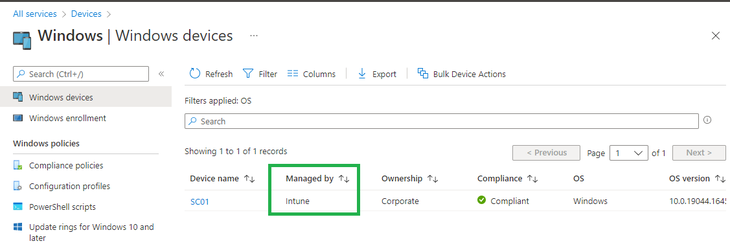
Windows Autopilot automatically join your device into Azure AD and enroll it into Microsoft Intune.
Remove devices from Autopilot
If you need to remove (deregister) it from Autopilot via either Intune and then reset it. Instructions for deregistering devices can be found in below steps.
Delete (deregister) Autopilot device
You need to delete (or retire, or factory reset) the device from Intune before deregistering the device from Autopilot. To delete the device from Intune (not Azure AD), log into the Microsoft Endpoint Manager admin center, then go to Intune > Devices > All Devices. Select the device you want to delete, then select the Delete button along the top menu.
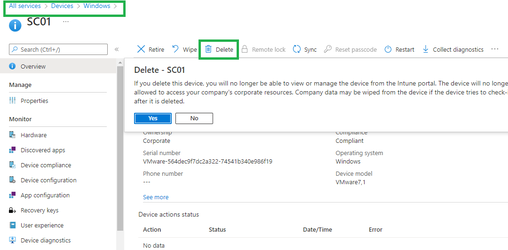
This action removes the device from Intune management and it will disappear from Intune > Devices > All devices. But this action doesn't yet deregister the device from Autopilot. So, the device should still appear under Intune > Device Enrollment > Windows Enrollment > Windows Autopilot Deployment Program > Devices.
The Intune > Devices > All Devices list and the Intune > Device Enrollment > Windows Enrollment > Windows Autopilot Deployment Program > Devices list mean different things and are two separate datastores. The former (All devices) is the list of devices currently enrolled into Intune.
A device only appears in the All devices list once it has booted. The latter (Windows Autopilot Deployment Program > Devices) is the list of devices currently registered from that Intune account into the Autopilot program - which may or may not be enrolled to Intune.
To remove the device from the Autopilot program, select the device, and then select Delete. A pop-up dialog box appears to confirm deletion.

At this point, your device is unenrolled from Intune and also deregistered from Autopilot. After several minutes, select the Sync button, followed by the Refresh button to confirm the device is no longer listed in the Autopilot program.
Once the device no longer appears, you're free to reuse it for other purposes.
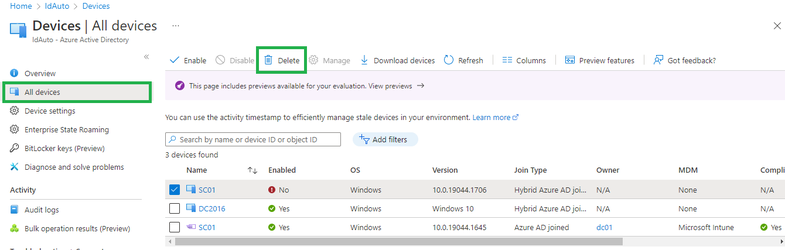
If you also (optionally) want to remove your device from Azure AD, go to Azure Active Directory > Devices > All Devices, select your device, and then select the Delete button:
How to deploy an MSI package to an enrolled device through Microsoft Intune